Installation
MODEL
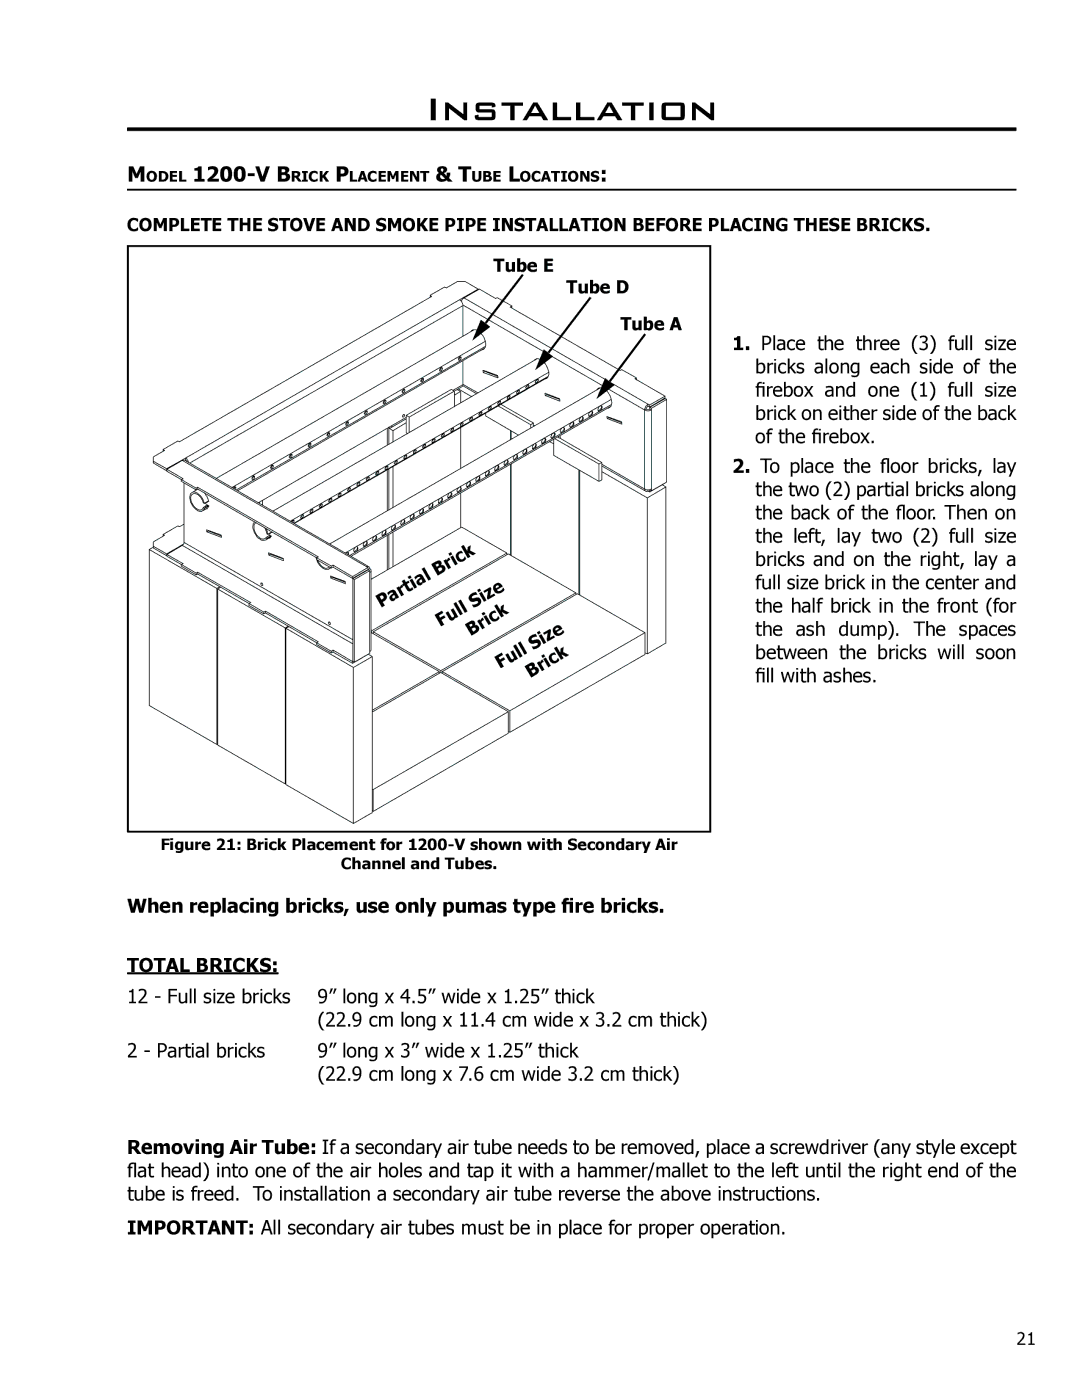
COMPLETE THE STOVE AND SMOKE PIPE INSTALLATION BEFORE PLACING THESE BRICKS.
Tube E
Tube D
Tube A
|
|
|
|
|
|
| k |
|
|
|
|
|
|
|
|
| ||
|
|
|
|
|
| c |
|
|
|
|
|
|
|
|
|
| ||
|
|
|
|
| i |
|
|
|
|
|
|
|
|
|
|
| ||
|
|
|
|
| r |
|
|
|
|
|
|
|
|
|
|
|
| |
|
|
|
| B |
|
|
|
|
|
|
|
|
|
|
|
|
| |
|
|
|
| l |
|
|
|
|
|
|
|
|
|
|
|
|
|
|
|
|
| a |
|
|
|
|
|
|
|
|
|
|
|
|
|
| |
|
| i |
|
|
|
|
|
|
|
|
|
|
|
|
|
|
| |
| t |
|
|
|
|
|
|
| e |
|
|
|
|
|
| |||
| r |
|
|
|
|
|
|
|
|
|
|
|
|
|
| |||
a |
|
|
|
|
|
|
| z |
|
|
|
|
|
| ||||
|
|
|
|
|
|
| i |
|
|
|
|
|
|
| ||||
P |
|
|
|
|
|
|
| S |
|
|
|
|
|
|
|
| ||
|
|
|
|
|
|
| l |
|
|
|
|
|
|
|
|
|
| |
|
|
|
|
|
| l |
|
|
| k |
|
|
|
|
|
| ||
|
|
|
|
| u |
|
|
|
|
|
|
|
|
|
| |||
|
|
|
|
|
|
| c |
|
|
|
|
|
| |||||
|
|
|
| F |
|
|
| i |
|
|
|
|
|
| ||||
|
|
|
|
|
|
|
|
| r |
|
|
|
|
| e | |||
|
|
|
|
|
|
|
| B |
|
|
|
|
|
|
| |||
|
|
|
|
|
|
|
|
|
|
|
|
|
|
| z | |||
|
|
|
|
|
|
|
|
|
|
|
|
|
|
| i |
| ||
|
|
|
|
|
|
|
|
|
|
|
|
|
| S |
|
| ||
|
|
|
|
|
|
|
|
|
|
|
|
| l |
|
|
|
| |
|
|
|
|
|
|
|
|
|
|
|
|
| l |
|
|
| k | |
|
|
|
|
|
|
|
|
|
|
|
| u |
|
|
|
| ||
|
|
|
|
|
|
|
|
|
|
|
|
|
| c | ||||
|
|
|
|
|
|
|
|
|
|
|
| F |
|
| i | |||
|
|
|
|
|
|
|
|
|
|
|
|
|
|
| r |
| ||
|
|
|
|
|
|
|
|
|
|
|
|
|
| B |
|
|
| |
1.Place the three (3) full size bricks along each side of the firebox and one (1) full size brick on either side of the back of the firebox.
2.To place the floor bricks, lay the two (2) partial bricks along the back of the floor. Then on the left, lay two (2) full size bricks and on the right, lay a full size brick in the center and the half brick in the front (for the ash dump). The spaces between the bricks will soon fill with ashes.
Figure 21: Brick Placement for 1200-V shown with Secondary Air
Channel and Tubes.
When replacing bricks, use only pumas type fire bricks.
TOTAL BRICKS: |
|
12 - Full size bricks | 9” long x 4.5” wide x 1.25” thick |
| (22.9 cm long x 11.4 cm wide x 3.2 cm thick) |
2 - Partial bricks | 9” long x 3” wide x 1.25” thick |
| (22.9 cm long x 7.6 cm wide 3.2 cm thick) |
Removing Air Tube: If a secondary air tube needs to be removed, place a screwdriver (any style except flat head) into one of the air holes and tap it with a hammer/mallet to the left until the right end of the tube is freed. To installation a secondary air tube reverse the above instructions.
IMPORTANT: All secondary air tubes must be in place for proper operation.
21
