POWERING STATES
Powering On the EWP-2000 V2 from “Power Off” Mode
The battery shipped with your EWP-2000 V2 may be low in power – please be prepared to use the AC-DC adapter while setting up the device for the first time and to fully charge the internal battery pack.
The EWP-2000 V2 is delivered form the factory in a “Power Off” or “Reset State”.
To start the EWP-2000 V2 for the first time, push and release the Power button located on the left side of the device with the AC-DC adapter connected. The display will come on in about 10 seconds. It will then take 50-60 seconds for the Windows desktop to be displayed.
Powering Off the EWP-2000 V2 to “Standby” Mode
To turn the display off, push and release the power button on the left side.
Powering On the EWP-2000 V2 from “Standby” Mode
If for some reason the EWP-2000 V2 becomes unresponsive, press and hold the power button on the left side of the display for 4 seconds. The display will go out and the EWP-2000 V2 will reboot itself.
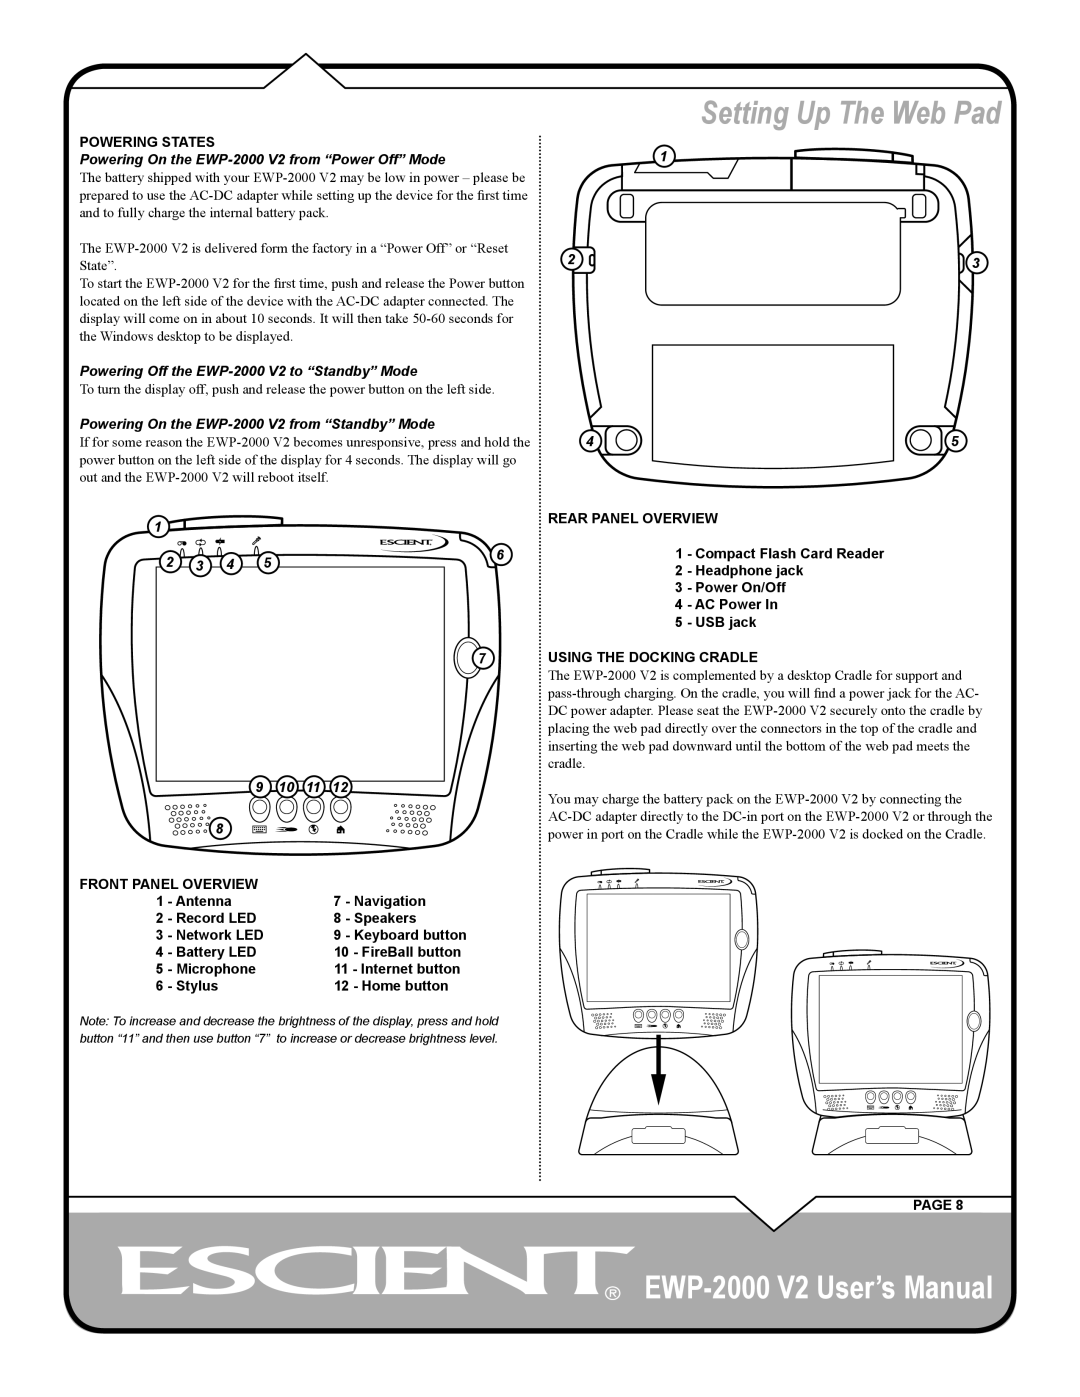
1 | | | REAR PANEL OVERVIEW |
| | | |
2 3 4 | 5 | 6 | 1 | - Compact Flash Card Reader |
| 2 | - Headphone jack |
| | | 3 | - Power On/Off |
| | | 4 | - AC Power In |
| | | 5 | - USB jack |
7USING THE DOCKING CRADLE
The EWP-2000 V2 is complemented by a desktop Cradle for support and pass-through charging. On the cradle, you will find a power jack for the AC- DC power adapter. Please seat the EWP-2000 V2 securely onto the cradle by placing the web pad directly over the connectors in the top of the cradle and inserting the web pad downward until the bottom of the web pad meets the cradle.
| 9 | 10 | 11 | 12 | You may charge the battery pack on the EWP-2000 V2 by connecting the |
| | | | | |
| 8 | | | | | AC-DC adapter directly to the DC-in port on the EWP-2000 V2 or through the |
| | | | | power in port on the Cradle while the EWP-2000 V2 is docked on the Cradle. |
FRONT PANEL OVERVIEW | | | 7 | - Navigation | |
1 | - Antenna | | | |
2 | - Record LED | | | 8 | - Speakers | |
3 | - Network LED | | | 9 | - Keyboard button | |
4 | - Battery LED | | | 10 - FireBall button | |
5 | - Microphone | | | 11 - Internet button | |
6 | - Stylus | | | 12 - Home button | |
Note: To increase and decrease the brightness of the display, press and hold button “11” and then use button “7” to increase or decrease brightness level.
PAGE 8