Euro-Pro V1310PT owner manual Hepa

Models: V1310PT

1 20
Download 20 pages 61.66 Kb
Page 7
Image 7
Fig. 22
Fig. 19
Filtre HEPA avec L’anneau de filtre
Fig. 18

CONSIGNES D’UTILISATION

OPERATING INSTRUCTIONS

Nettoyage du Filtre de Coupelle à Poussière HEPA

Le filtre HEPA peut aussi être lavé à l’eau du robinet en laissant l’eau couler sur le côté souillé. (Fig.18)

Nous vous recommandons de le nettoyer une fois par mois ou lorsque la succion semble réduite. Laissez-le toujours sécher à l’air

durant 24 heures avant de le replacer dans l’aspirateur.

Remarque : Le matériel blanc du filtre HEPA subira une décoloration avec le temps. Ceci est NORMAL et N’AFFECTERA EN RIEN sa performance.

AVERTISSEMENT: Videz toujours la coupelle et nettoyez

toujours le filtre HEPA et le filtre à débris avant chaque utilisation et pendant l’usage prolongé. Ne faites jamais déborder la coupelle. Retirez la saleté et nettoyez le filtre HEPA et le filtre à débris chaque fois que la coupelle est vidée durant un usage prolongé, sans quoi vous encourrez le risque d’endommager le moteur.

Nettoyage de l’Anneau de Filtre

1.Autour du filtre HEPA se trouve un anneau. Il est lavable à l’eau tiède. (Fig. 19)

Pour le retirer

L’anneau

HEPA

faites-le glisser du

de filtre


Filtre

filtre HEPA.


2.Nous vous recom- mandons de laver

l’anneau de filtre en même temps que votre filtre HEPA.

Laissez toujours l’anneau de

filtre sécher à l’air pendant 24 heures avant de le replacer sur le filtre HEPA. N’utilisez jamais l’aspirateur sans que tous ses filtres soient en place.

Remarque: Ce filtre est lavable, mais il est recommandé de le remplacer tous les trois

(3) mois.

33

Nettoyage du Cadre du Filtre

HEPA

1.Avant de replacer le filtre HEPA dans son cadre, vous pouvez (et vous devriez) rincer le cadre à l’eau tiède du robinet afin d’éliminer toute poussière

accumulée autour du cadre. (Fig. 20)

NE LAVEZ PAS

Fig. 20

au lave-vaisselle.

2.Assurez-vous que le

cadre du filtre est entièrement sec avant de le remettre dans la coupelle à poussière. Faites toujours sécher à l’air durant 24 heures.

Nettoyage des Filtres Pré-Moteur

1.Deux filtres pré-moteur sont situés sous le réservoir de la coupelle à poussière. (Fig. 21)

2.Le petit s’insère dans l’entrée d’air du tuyau.

3.Tirez-le pour le retirer.

4.Pour retirer le second filtre pré-moteur, tournez son couvercle, levez le couvercle et retirez le filtre. (Fig. 21)

Fig. 21

Couvercle du

filtre pré-

moteur

5.Pour nettoyer les filtres pré-moteur, rincez-les à l’eau tiède et laissez-les séchez complètement pendant 24 heures. Ne rincez pas les filtres à la laveuse. N’utilisez pas de séchoir à cheveux pour les sécher.

Séchez à l’air seulement. N’utilisez jamais l’aspirateur sans que tous ses filtres soient en place.

6.Nous vous recommandons

de laver les filtres pré-moteur en même temps que le filtre HEPA. (Fig. 22)

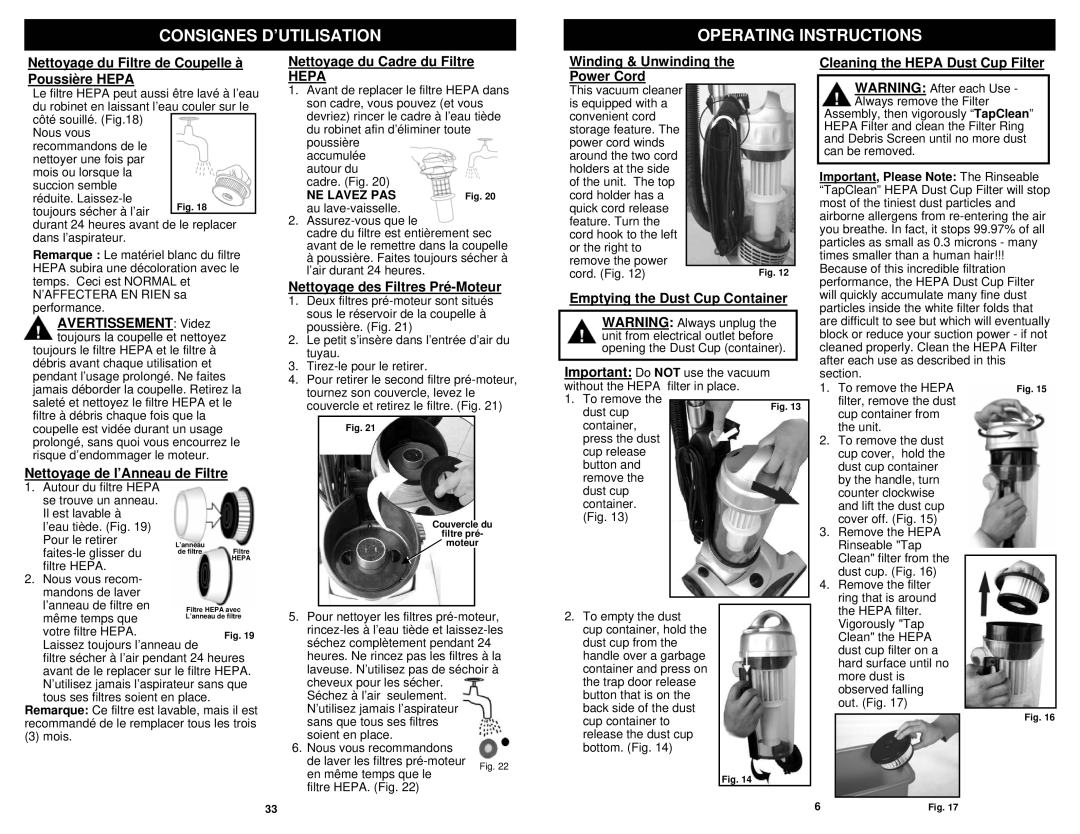
Winding & Unwinding the

Power Cord

This vacuum cleaner is equipped with a convenient cord storage feature. The power cord winds around the two cord holders at the side of the unit. The top cord holder has a quick cord release feature. Turn the cord hook to the left or the right to remove the power

cord. (Fig. 12)

Fig. 12

Emptying the Dust Cup Container

WARNING: Always unplug the unit from electrical outlet before opening the Dust Cup (container).

Important: Do NOT use the vacuum without the HEPA filter in place.

1. To remove the

dust cupFig. 13 container,

press the dust cup release button and remove the dust cup container. (Fig. 13)

2.To empty the dust cup container, hold the dust cup from the handle over a garbage container and press on the trap door release button that is on the back side of the dust cup container to release the dust cup bottom. (Fig. 14)

Fig. 14

Cleaning the HEPA Dust Cup Filter

WARNING: After each Use - Always remove the Filter

Assembly, then vigorously “TapClean” HEPA Filter and clean the Filter Ring and Debris Screen until no more dust can be removed.

Important, Please Note: The Rinseable “TapClean” HEPA Dust Cup Filter will stop most of the tiniest dust particles and airborne allergens from re-entering the air you breathe. In fact, it stops 99.97% of all particles as small as 0.3 microns - many times smaller than a human hair!!! Because of this incredible filtration performance, the HEPA Dust Cup Filter will quickly accumulate many fine dust particles inside the white filter folds that are difficult to see but which will eventually block or reduce your suction power - if not cleaned properly. Clean the HEPA Filter after each use as described in this section.

1.

To remove the HEPA

Fig. 15


filter, remove the dust


cup container from


the unit.


2. To remove the dust


cup cover, hold the


dust cup container


by the handle, turn


counter clockwise


and lift the dust cup


cover off. (Fig. 15)


3.

Remove the HEPA


Rinseable "Tap


Clean" filter from the


dust cup. (Fig. 16)


4.

Remove the filter


ring that is around


the HEPA filter.


Vigorously "Tap


Clean" the HEPA


dust cup filter on a


hard surface until no


more dust is


observed falling


out. (Fig. 17)


Fig. 16


6

Fig. 17

Page 7
Image 7
Euro-Pro V1310PT owner manual Hepa

V1310PT specifications

The Euro-Pro V1310PT is a versatile and compact steam cleaner that has gained popularity among homeowners and cleaning enthusiasts alike. Known for its efficiency, the V1310PT features a powerful steam output that effectively tackles dirt, grime, and other difficult stains in a variety of surfaces.

At the heart of the Euro-Pro V1310PT is its impressive heating element which allows the device to reach steam-ready temperatures in just a matter of minutes. This rapid heating technology ensures that users can start cleaning without long waiting times, making it ideal for those with busy lifestyles. The steam output can be adjusted according to the cleaning task, providing both ultra-high pressure steam for deep cleaning and gentler steam for delicate surfaces.

One of the standout features of the V1310PT is its lightweight and portable design. Weighing in at just a few pounds, this steam cleaner is easy to maneuver, whether you are cleaning floors, upholstery, or tight corners. The long power cord further adds to its flexibility, allowing you to cover larger areas without the need to constantly change power outlets.

The Euro-Pro V1310PT comes with a variety of attachments that enhance its cleaning capability. It includes different nozzles designed for specific tasks – from wide and narrow brushes for floors, to fabric steamers for clothing and drapes. These specialized attachments make it easy to customize the cleaning process, ensuring optimal results on various surfaces.

Safety is another important consideration in the V1310PT’s design. It features automatic shut-off technology that activates when the water level is low or if the unit has been idle for an extended period. This not only helps in conserving energy but also adds a layer of safety during use.

In terms of energy efficiency, the Euro-Pro V1310PT is a welcome option for eco-conscious users. It uses only water to produce steam, eliminating the need for harmful chemicals and contributing to a healthier environment.

Overall, the Euro-Pro V1310PT combines efficiency, safety, and versatility in one compact package, making it an excellent choice for anyone looking to enhance their cleaning routine with the power of steam. Its combination of advanced features and user-friendly design solidifies its position as a go-to steam cleaning solution in many homes.