Fig. 7

CONSIGNES D’UTILISATION

OPERATING INSTRUCTIONS

2.Vérifiez s’il y a un bouchon derrière la barre de brosse. (Fig. 25)

Entrée d’air

Fig. 25

3.Procédez au déblocage par cette entrée. N’insérez jamais d’objet pointu dans l’ouverture.

4.Branchez l’appareil et passez l’aspirateur.

Déblocage de la Poignée du Tuyau

Si le pouvoir aspirant est toujours diminué, vérifiez que la poignée n’est pas obstruée.

1. Débranchez l’appareil et retirez la poignée du tuyau pour vérifier si elle est obstruée.

Déblocage

Fig. 26

2.Débloquez l’ouverture de la poignée du tuyau. (Fig. 26) N’insérez jamais d’objet pointu dans l’ouverture.

3.Vérifiez si le tube de rallonge est débloqué en le mettant sous la lumière et en repérant tout débris pouvant l’obstruer.

4.Branchez l’appareil et passez l’aspirateur.

Changement et Nettoyage de la Courroie

AVERTISSEMENT: Afin de

réduire les risques de choc électrique, le cordon d’alimentation doit être débranché avant de retirer la coupelle ou le filtre HEPA, de changer le filtre et de procéder à l’entretien ou au dépannage.

La courroie d’entraînement du bec souffleur doit être remplacée occasionnellement. La fréquence varie selon l’utilisation de votre aspirateur.

1.Éteignez l’appareil et débranchez-le de l’alimentation électrique.

2.Tournez l’aspirateur à l’envers sur une surface plane.

3.À l’aide d’un tournevis Philips, retirez les quatre (4) vis tenant la plaque de fond à la plaque inférieure. (Fig. 27)

Fig. 27

4.Une fois la plaque de fond retirée, retirez les cinq (5) vis restantes de la plaque inférieure à l’aide d’un tournevis Philips. (Fig. 28)

Plaque

inférieure

Fig. 28

Plaque de fond

5.L’appareil toujours couché, retournez-le et levez le panneau de l’électrobrosse, en prenant appui à l’arrière de l’électrobrosse. (Fig. 29)

Fig. 29

WARNING: Always remove the power plug from the wall outlet

before assembling or removing accessories.

Inserting the Telescopic Tube into the Main Unit

1.Insert the telescopic tube into the hole on the top of the unit. Make sure that the telescopic tube fits correctly into the opening. (Fig. 1)

2.Insert the hand grip into the top opening of the telescopic tube making sure that the hand grip

locking pin is in place. (Fig. 2)

3.To remove the hand grip, press the hand grip locking pin and pull the hand grip up. (Fig. 3)

4.To remove the telescopic tube, press the handle release button which is located on the back of the unit and lift the telescopic tube up. (Fig. 4)

Fig. 1

Fig. 2


Fig. 3

Fig. 4

Attaching the Hose Clip

1.Place the hose clip into the slot in the back of the vacuum. (Fig. 5)

2.Using a Philips screwdriver and the screw provided, attach the hose clip to the vacuum. (Fig. 6)

Fig. 5

Fig. 6

Using with the Accessories

Crevice Tool

For radiators, crevices, corners, baseboards and between cushions.

Dusting Brush

The dusting brush is used for the furniture, venetian blinds, books, lamp shades and shelves.

Attaching the Accessories

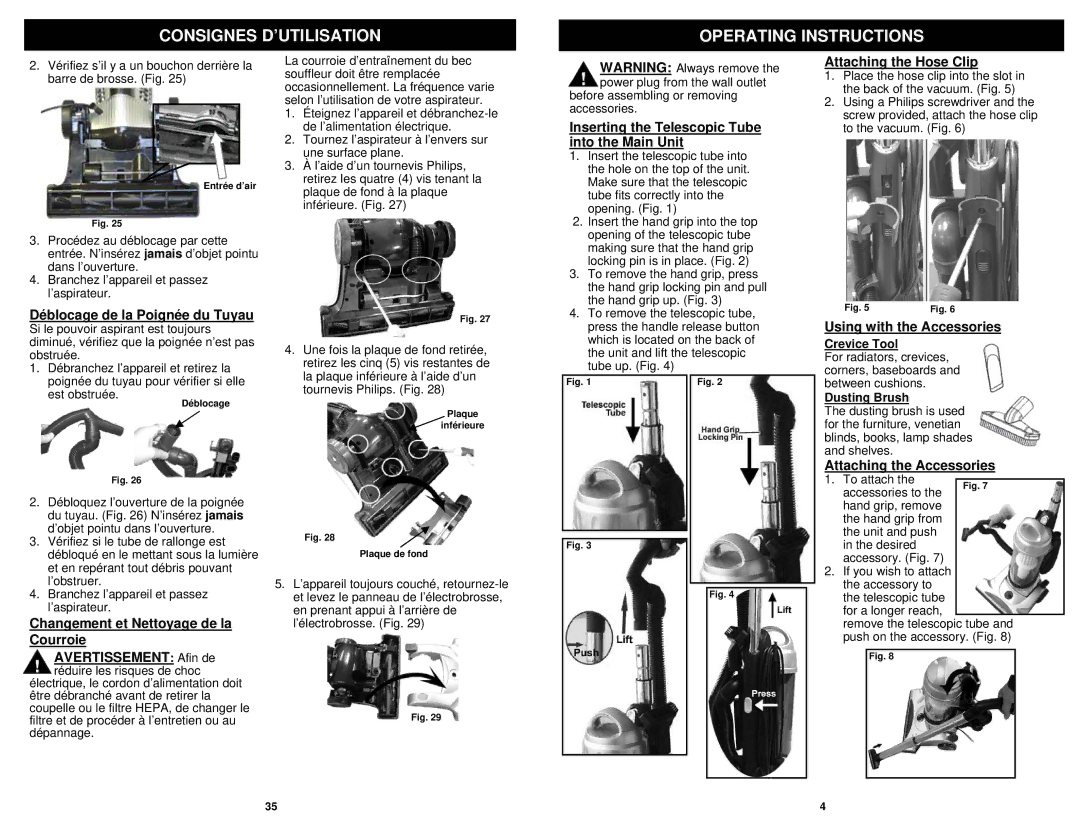
1. To attach the accessories to the hand grip, remove the hand grip from the unit and push in the desired accessory. (Fig. 7)

2.If you wish to attach the accessory to the telescopic tube for a longer reach,

remove the telescopic tube and push on the accessory. (Fig. 8)

Fig. 8

35

4

Page 5
Image 5
Euro-Pro V1310PT owner manual Consignes D’UTILISATION Operating Instructions

V1310PT specifications

The Euro-Pro V1310PT is a versatile and compact steam cleaner that has gained popularity among homeowners and cleaning enthusiasts alike. Known for its efficiency, the V1310PT features a powerful steam output that effectively tackles dirt, grime, and other difficult stains in a variety of surfaces.

At the heart of the Euro-Pro V1310PT is its impressive heating element which allows the device to reach steam-ready temperatures in just a matter of minutes. This rapid heating technology ensures that users can start cleaning without long waiting times, making it ideal for those with busy lifestyles. The steam output can be adjusted according to the cleaning task, providing both ultra-high pressure steam for deep cleaning and gentler steam for delicate surfaces.

One of the standout features of the V1310PT is its lightweight and portable design. Weighing in at just a few pounds, this steam cleaner is easy to maneuver, whether you are cleaning floors, upholstery, or tight corners. The long power cord further adds to its flexibility, allowing you to cover larger areas without the need to constantly change power outlets.

The Euro-Pro V1310PT comes with a variety of attachments that enhance its cleaning capability. It includes different nozzles designed for specific tasks – from wide and narrow brushes for floors, to fabric steamers for clothing and drapes. These specialized attachments make it easy to customize the cleaning process, ensuring optimal results on various surfaces.

Safety is another important consideration in the V1310PT’s design. It features automatic shut-off technology that activates when the water level is low or if the unit has been idle for an extended period. This not only helps in conserving energy but also adds a layer of safety during use.

In terms of energy efficiency, the Euro-Pro V1310PT is a welcome option for eco-conscious users. It uses only water to produce steam, eliminating the need for harmful chemicals and contributing to a healthier environment.

Overall, the Euro-Pro V1310PT combines efficiency, safety, and versatility in one compact package, making it an excellent choice for anyone looking to enhance their cleaning routine with the power of steam. Its combination of advanced features and user-friendly design solidifies its position as a go-to steam cleaning solution in many homes.