INSTALLATION DIMENSIONS

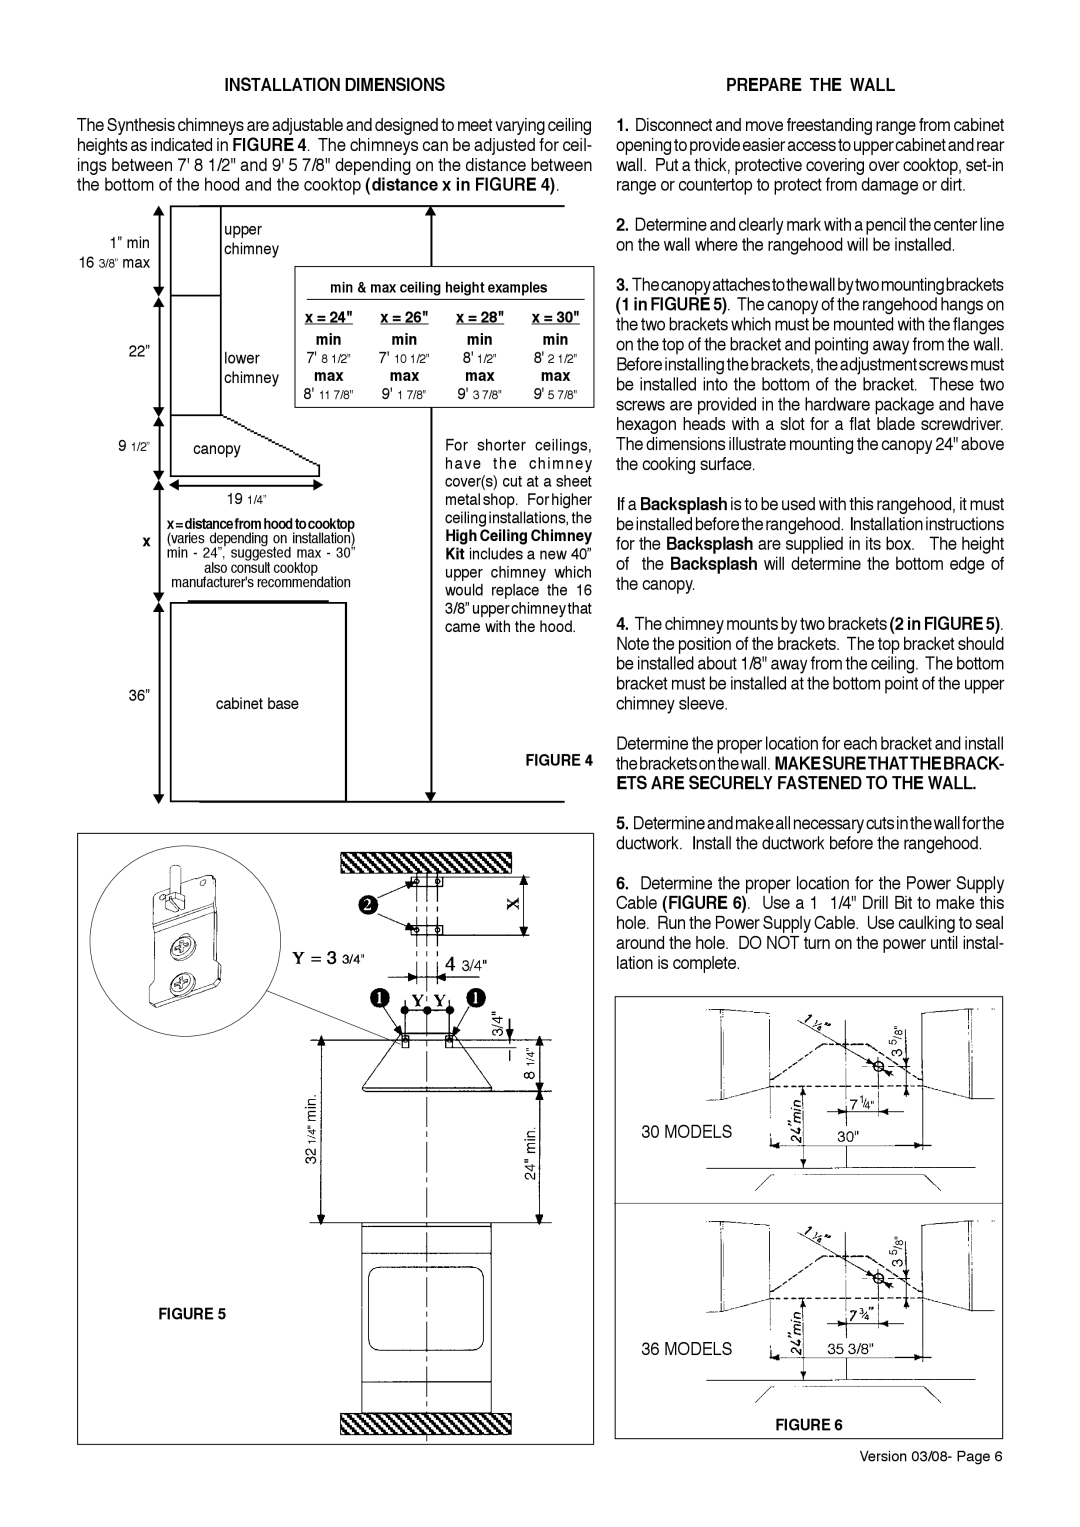
The Synthesis chimneys are adjustable and designed to meet varying ceiling heights as indicated in FIGURE 4. The chimneys can be adjusted for ceil- ings between 7' 8 1/2" and 9' 5 7/8" depending on the distance between the bottom of the hood and the cooktop (distance x in FIGURE 4).

PREPARE THE WALL

1. Disconnect and move freestanding range from cabinet

openingtoprovideeasieraccesstouppercabinetandrear

wall. Put a thick, protective covering over cooktop, set-in

range or countertop to protect from damage or dirt.

1” min 16 3/8” max

22”

upper chimney

lower chimney

min & max ceiling height examples

x = 24"

x = 26"

x = 28"

x = 30"

min

min

min

min

7'

8 1/2"

7'

10 1/2"

8'

1/2"

8'

2 1/2"

max

max

max

max

8'

11 7/8"

9'

1 7/8"

9'

3 7/8"

9'

5 7/8"

2. Determine and clearly mark with a pencil the center line

on the wall where the rangehood will be installed.

3. Thecanopyattachestothewallbytwomountingbrackets

(1 in FIGURE 5). The canopy of the rangehood hangs on

the two brackets which must be mounted with the flanges

on the top of the bracket and pointing away from the wall.

Beforeinstallingthebrackets,theadjustmentscrewsmust

be installed into the bottom of the bracket. These two

screws are provided in the hardware package and have

hexagon heads with a slot for a flat blade screwdriver.

9 1/2”


canopy


19 1/4”


x

x=distancefromhoodtocooktop

(varies depending on installation)


min - 24”, suggested max - 30”


also consult cooktop


manufacturer's recommendation

36”

cabinet base


For shorter ceilings, have the chimney cover(s) cut at a sheet metal shop. For higher ceiling installations, the

High Ceiling Chimney Kit includes a new 40” upper chimney which would replace the 16 3/8” upper chimney that came with the hood.

FIGURE 4

The dimensions illustrate mounting the canopy 24" above

the cooking surface.

If a Backsplash is to be used with this rangehood, it must beinstalledbeforetherangehood. Installationinstructions for the Backsplash are supplied in its box. The height of the Backsplash will determine the bottom edge of the canopy.

4.The chimney mounts by two brackets (2 in FIGURE 5). Note the position of the brackets. The top bracket should be installed about 1/8" away from the ceiling. The bottom bracket must be installed at the bottom point of the upper chimney sleeve.

Determine the proper location for each bracket and install thebracketsonthewall. MAKESURETHATTHEBRACK-

ETS ARE SECURELY FASTENED TO THE WALL.

5.Determineandmakeallnecessarycutsinthewallforthe ductwork. Install the ductwork before the rangehood.

6.Determine the proper location for the Power Supply

Cable (FIGURE 6). Use a 1 1/4" Drill Bit to make this hole. Run the Power Supply Cable. Use caulking to seal around the hole. DO NOT turn on the power until instal- lation is complete.

FIGURE 5

30MODELS

36MODELS

FIGURE 6

Version 03/08- Page 6

Page 6
Image 6
Faber 500 CFM, 280 CFM Installation Dimensions, Prepare the Wall, On the wall where the rangehood will be installed

280 CFM, 500 CFM specifications

Faber, a respected name in the kitchen ventilation industry, brings innovation and functionality to home cooking with its range of powerful range hoods, including the Faber 280 CFM and 500 CFM models. These hoods are designed to efficiently eliminate smoke, steam, and odors from your kitchen, enhancing not only the cooking experience but also the overall atmosphere of your home.

The 280 CFM range hood is an ideal choice for smaller kitchens or for those who don’t cook frequently. Despite its compact size, this model packs a punch with its impressive airflow capacity of 280 cubic feet per minute. This ensures that cooking odors and airborne grease particles are quickly drawn away, leaving your kitchen fresh and clean. The low-profile design is perfect for modern kitchen spaces while still providing maximum functionality. This model often features user-friendly controls, allowing for easy operation of fan speeds and lighting adjustments.

On the other hand, the Faber 500 CFM range hood caters to serious home chefs and larger kitchen spaces. With an impressive airflow capability of 500 CFM, it is equipped to handle the demands of heavy cooking. This model is particularly beneficial for those who regularly use gas ranges and generate significant heat and smoke. The robust motor is designed for quiet operation, ensuring that you can enjoy your culinary creations without the disruptive noise common in many traditional hood models.

Both the 280 CFM and 500 CFM range hoods incorporate advanced technologies such as LED lighting, which provides energy-efficient illumination for your cooking area. This feature not only enhances visibility but also adds a modern touch to your kitchen aesthetics. Additionally, these models often include dishwasher-safe filters, making maintenance a breeze. The stainless steel construction of these range hoods ensures durability and resistance to scratches and tarnishing, leading to a longevity that surpasses many competitors in the market.

With their blend of high performance, stylish design, and advanced features, the Faber 280 CFM and 500 CFM range hoods stand out as excellent choices for any home chef looking to elevate their kitchen experience. Whether you opt for the compact efficiency of the 280 CFM or the powerful performance of the 500 CFM, Faber's commitment to quality ensures that your cooking environment remains clean and pleasant.