VM04 Owner’s manual
1. Input Section
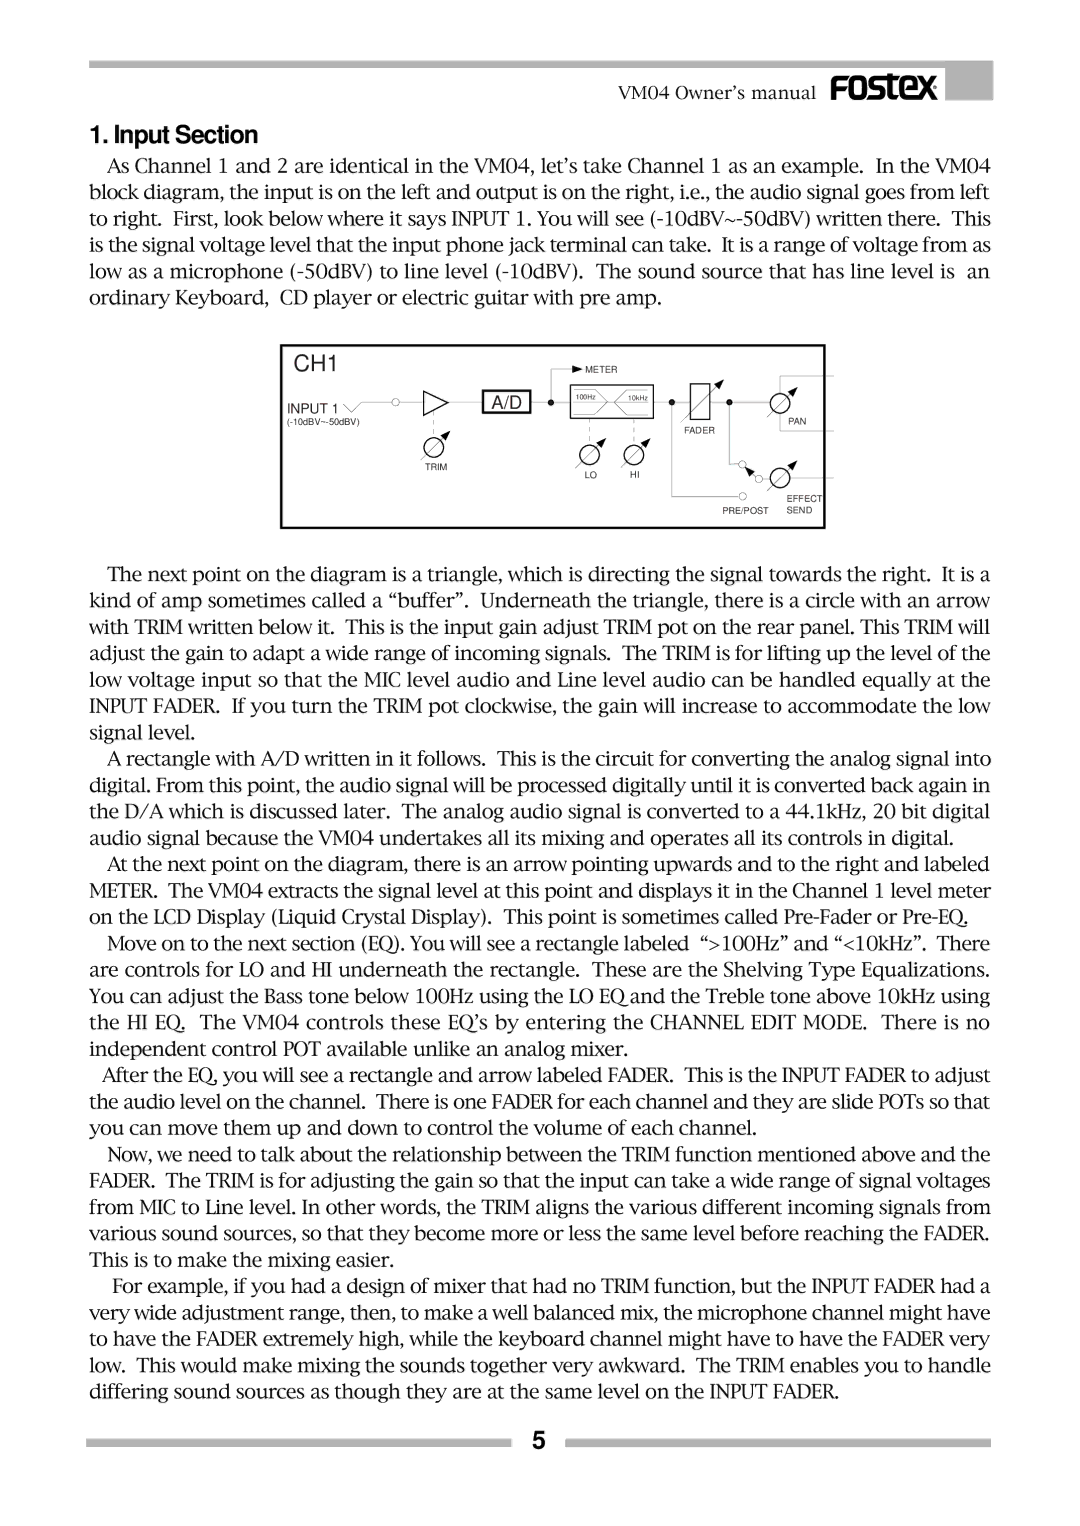
As Channel 1 and 2 are identical in the VM04, let’s take Channel 1 as an example. In the VM04 block diagram, the input is on the left and output is on the right, i.e., the audio signal goes from left to right. First, look below where it says INPUT 1. You will see
CH1 |
| METER |
|
|
INPUT 1 | A/D | 100Hz | 10kHz |
|
|
| PAN | ||
|
| FADER | ||
|
|
|
| |
| TRIM | LO | HI |
|
|
|
| ||
|
|
|
| EFFECT |
|
|
| PRE/POST | SEND |
The next point on the diagram is a triangle, which is directing the signal towards the right. It is a kind of amp sometimes called a “buffer”. Underneath the triangle, there is a circle with an arrow with TRIM written below it. This is the input gain adjust TRIM pot on the rear panel. This TRIM will adjust the gain to adapt a wide range of incoming signals. The TRIM is for lifting up the level of the low voltage input so that the MIC level audio and Line level audio can be handled equally at the INPUT FADER. If you turn the TRIM pot clockwise, the gain will increase to accommodate the low signal level.
A rectangle with A/D written in it follows. This is the circuit for converting the analog signal into digital. From this point, the audio signal will be processed digitally until it is converted back again in the D/A which is discussed later. The analog audio signal is converted to a 44.1kHz, 20 bit digital audio signal because the VM04 undertakes all its mixing and operates all its controls in digital.
At the next point on the diagram, there is an arrow pointing upwards and to the right and labeled METER. The VM04 extracts the signal level at this point and displays it in the Channel 1 level meter on the LCD Display (Liquid Crystal Display). This point is sometimes called
Move on to the next section (EQ). You will see a rectangle labeled “>100Hz” and “<10kHz”. There are controls for LO and HI underneath the rectangle. These are the Shelving Type Equalizations. You can adjust the Bass tone below 100Hz using the LO EQ and the Treble tone above 10kHz using the HI EQ. The VM04 controls these EQ’s by entering the CHANNEL EDIT MODE. There is no independent control POT available unlike an analog mixer.
After the EQ, you will see a rectangle and arrow labeled FADER. This is the INPUT FADER to adjust the audio level on the channel. There is one FADER for each channel and they are slide POTs so that you can move them up and down to control the volume of each channel.
Now, we need to talk about the relationship between the TRIM function mentioned above and the FADER. The TRIM is for adjusting the gain so that the input can take a wide range of signal voltages from MIC to Line level. In other words, the TRIM aligns the various different incoming signals from various sound sources, so that they become more or less the same level before reaching the FADER. This is to make the mixing easier.
For example, if you had a design of mixer that had no TRIM function, but the INPUT FADER had a very wide adjustment range, then, to make a well balanced mix, the microphone channel might have to have the FADER extremely high, while the keyboard channel might have to have the FADER very low. This would make mixing the sounds together very awkward. The TRIM enables you to handle differing sound sources as though they are at the same level on the INPUT FADER.
5
