Activating the Auto plotter
To activate the Auto Plotter, follow the steps shown below:
1.Adjust the GAIN, A/C SEA and A/C RAIN controls for proper radar picture.
2.Press the [MENU] key to open the main menu.
3.Operate the omnipad to select
4.Press the [ACQ/ENTER] key. The menu shown in Figure
|
| [ ARP MENU ] |
| ||||
|
| Select item by omnipad |
| ||||
|
| and press ENTER key. |
| ||||
¡. Display |
| Off |
| On |
| ||
2 | . All Cancel |
|
|
|
|
|
|
3 | . Vector Ref |
| Rel |
| True |
| |
4 | . Vector Length |
| 30S | 1M | |||
|
|
| 3M | 6M | 15M |
| |
|
|
| 30M | ||||
5 | . History |
|
|
| 30SLo 1M | ||
| Off |
| 15S | ||||
|
|
| 2M | 3M Off6M |
| ||
6 | . CPA Set |
|
|
| 0.5 | 1nm | 2nm |
| Off | ||||||
|
|
| 3nm | 5nm 6nm |
| ||
7 | . TCPA Set |
|
|
| 1M | 2M | 3M |
| 30S | ||||||
|
|
| 4M | 5M | 6M | 12M | |
8 | . Auto ACQ |
|
|
|
| On |
|
| Off |
|
| ||||
Figure AP-1 ARP Menu
5.Operate the omnipad to select the menu item "1. Display".
6.Operate the omnipad to select "On".
7.Press the [ACQ/ENTER] key.
8.Press the [MENU] key to close the menu.
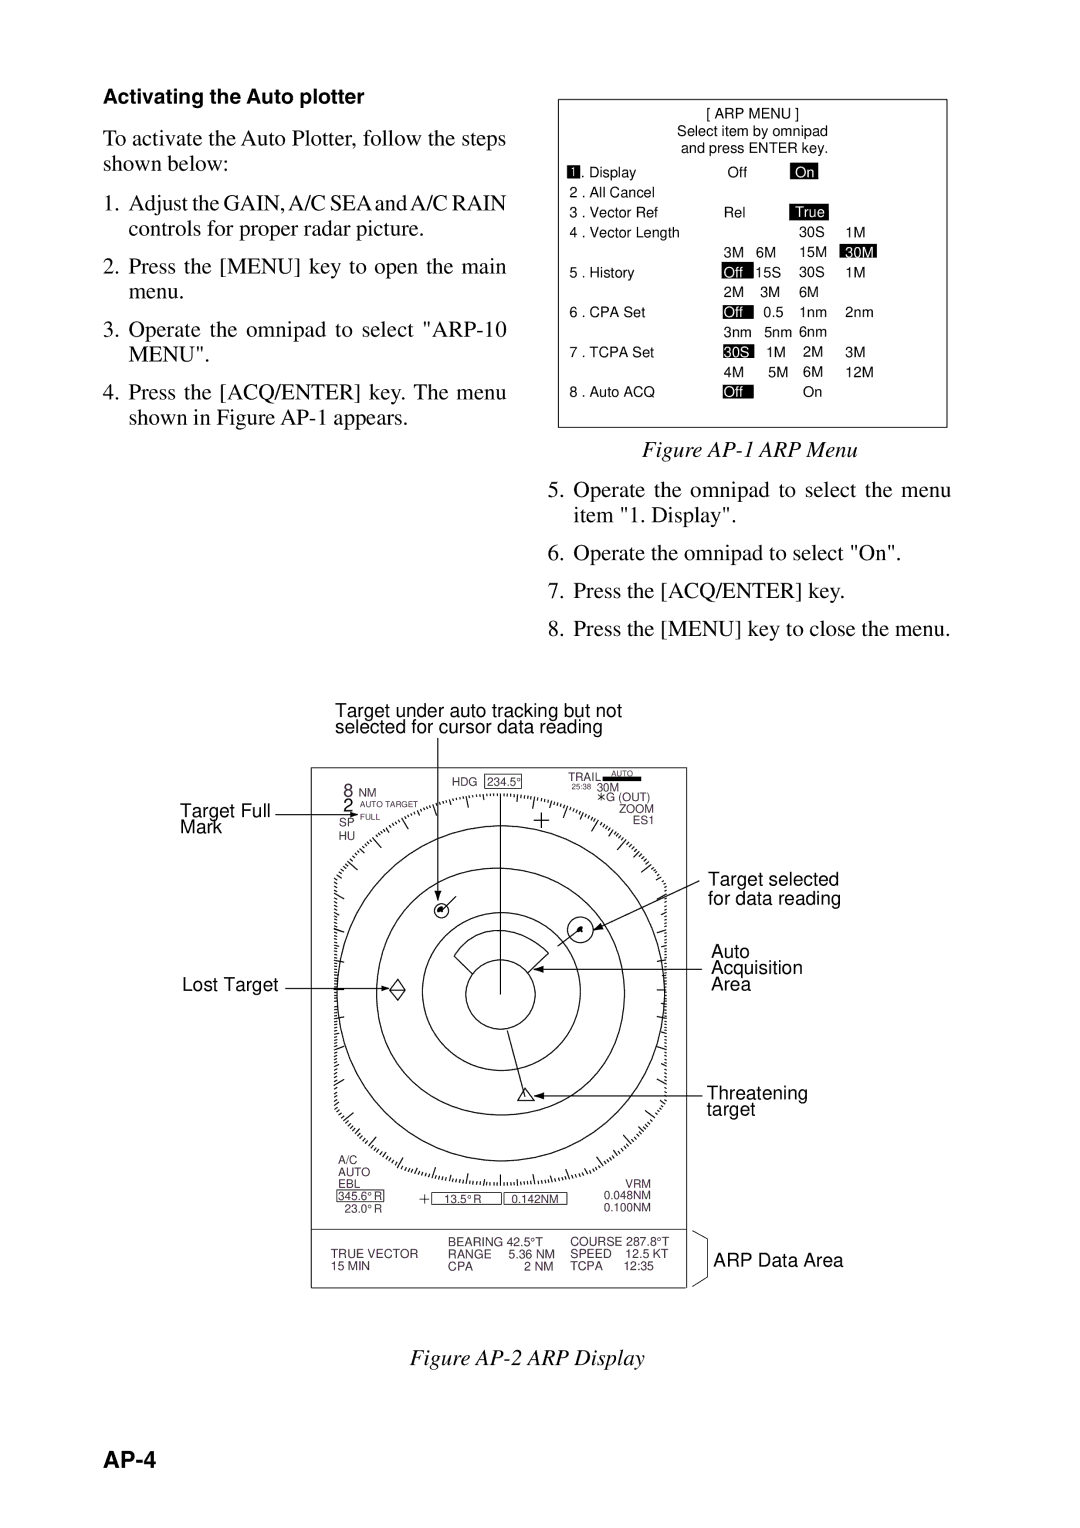
Target Full Mark
Lost Target
Target under auto tracking but not selected for cursor data reading
HDG | 234.5° | TRAIL AUTO | ||
25:38 | 30M | |||
8 NM |
| |||
|
| G (OUT) | ||
2 AUTO TARGET |
|
| ZOOM | |
SP FULL |
|
| ES1 | |
HU |
|
|
| |
A/C |
|
|
|
|
|
AUTO |
|
|
|
| VRM |
EBL |
|
|
|
| |
345.6° | R | 13.5° R | 0.142NM | 0.048NM | |
23.0° | R |
|
| 0.100NM | |
|
| BEARING 42.5°T | COURSE 287.8°T | ||
TRUE VECTOR | RANGE | 5.36 NM | SPEED | 12.5 KT | |
15 MIN |
| CPA | 2 NM | TCPA | 12:35 |
Target selected for data reading
Auto
Acquisition
Area
Threatening target
ARP Data Area