Safety Instructions
Normal Operating Sounds
Write the model and serial numbers here Model # Serial #
Consumer Support Troubleshooting Tips
Safety Instructions
Refrigerants
Troubleshooting Tips Consumer Support
Before You Throw Away Your Old Refrigerator or Freezer
GEAppliances.com
Operating Instructions
HOW to Connect Electricity
Safety Instructions Operating Instructions
About the temperature controls
About TurboCool. on some models
Tips Consumer Support
Troubleshooting Tips
Operating Instructions Safety Instructions
About ClimateKeeper2
About CustomCool.on some models
Instructions Operating Instructions
About the water filter. on some models
About the shelves and bins
Support Troubleshooting Tips
Instructions
Consumer
Slide-Out Freezer Shelves
Freezer Baskets
Fixed Freezer Shelves
Door Wine/Beverage Rack on some models
Refrigerator Doors
About the refrigerator doors
Door Alignment
Wrench is used
About crisper removal
About the crispers and pans
When replacing the bin, be sure to press
Operating Instructions Safety
About the automatic icemaker
Automatic Icemaker
About the ice and water dispenser. on some models
Care and cleaning of the refrigerator
Cleaning the Outside
Cleaning the Inside
Behind the Refrigerator
Safety
Preparing for Vacation
Preparing to Move
Safety Instructions
Replacing the light bulbs
Tips
Trim kits and decorator panels
Safety Instructions Operating Instructions
Panels less than 1/4 6 mm thick
19 mm or Raised Panel
25‘ CustomStyle Dimensions for Custom Wood Panels
23‘ Dimensions for Custom Wood Panels
Insert the Freezer Panel and Fresh Food Panel
Inserting the door panels
Insert the Bottom Freezer Panel on dispenser models
Attach the Top Trim on the Freezer and Fresh Food Doors
These pieces are tucked inside the refrigerator door handle
Install the Side Trim
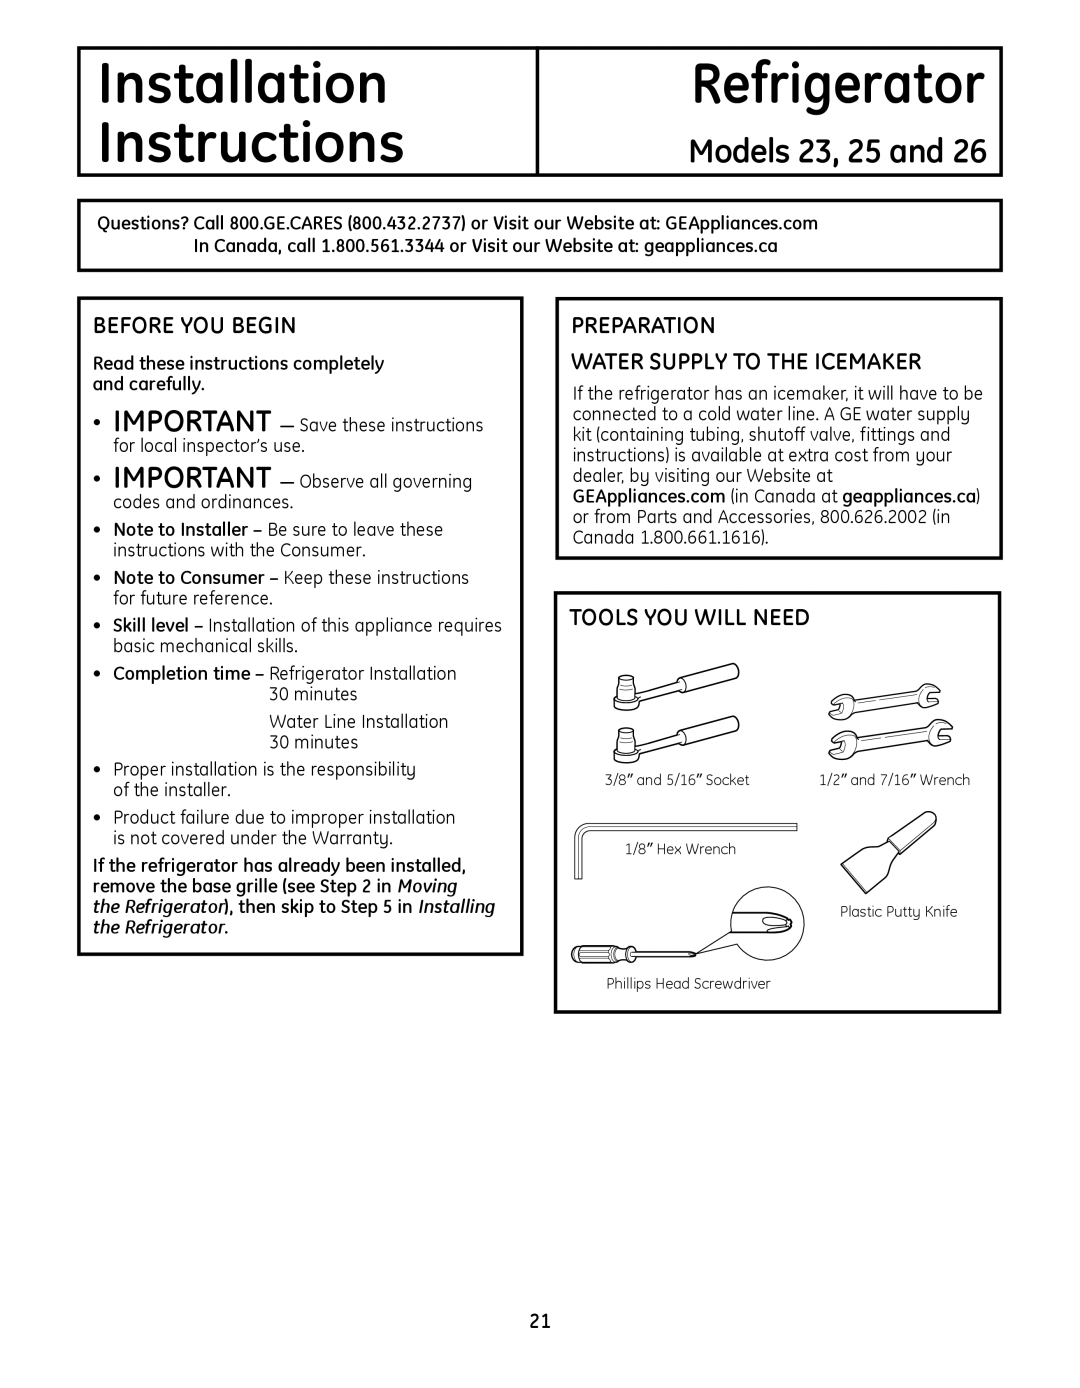
Before YOU Begin
Preparation Water Supply to the Icemaker
Read these instructions completely and carefully
Moving the Refrigerator
Remove the Base Grille
Do not remove the handles
Remove the Freezer Door
To disconnect, pull apart at the coupling
Hinge pin Open the freezer door to
Remove the Refrigerator Door
Set the door on a non-scratching surface with the inside up
Open the refrigerator door to
Lift the refrigerator door up and off the bottom hinge
Replacing the Doors
To replace the doors, simply reverse steps 3 through
However, please note the following
Dimensions and Specifications
Installing the Refrigerator
Refrigerator Location
Clearances
Plug in the Refrigerator
Turn on the Water Supply
PUT the Refrigerator in Place
Level the Refrigerator
Level the Doors
Replace the Base Grille
Set the controls to the recommended setting
Start the Icemaker
SET the Controls
Copper or GE SmartConnect Refrigerator
Choose the Valve Location
Shut OFF the Main Water Supply
Drill the Hole for the Valve
Take care not to allow water to drain into the drill
Installing the Water Line
Normal operating sounds
Troubleshooting Tips Consumer Support
Before you call for service…
Consumer Support Troubleshooting Tips
Problem Possible Causes What To Do
Setting. This is normal
Is warm Is first installed Water dispenser has not been
On position will damage the water valve
Connected
Operating Instructions Safety Instructions
Safety Instructions
Installation Instructions Operating Instructions
Compressor
What is covered How Long Warranted Parts Labour
Evaporator, condenser
Tubing and refrigerant
GE Will Replace
Consumer Support
What GE Will Not Cover
For The Period
Operating Specifications
Performance Data Sheet
General Installation/Operation/Maintenance Requirements
100% safety factors built in for unmetered usage
Name Address City State Zip SignatureDate
Water Treatment Device Certificate Number
Please place in envelope and mail to
GE Service Protection Plus
Consumer Product Ownership Registration
Operating Instructions
Mesures de sécurité . . . . . . . . . . . . . . . . .47
Fonctionnement Mesures de sécurité Installation
Fonctionnement
De dépannage Soutien
Réfrigérants
Mesures de sécurité
Le réfrigérateur doit toujours être branché dans
Ne débranchez jamais le réfrigérateur en tirant sur
Mesures de sécurité Fonctionnement Installation
Les commandes
Au sujet de TurboCool. sur certains modèles
Fonctionnement
Au sujet de CustomCool
Au sujet de ClimateKeeper2
Comment il fonctionne
Utilisation
Mesures
Installation de la cartouche du filtre à eau
Cartouche du filtre à eau
Retrait de la cartouche du filtre
De sécurité
Clayettes et bacs
Fonctionnement Mesures
Clayette QuickSpace
Paniers du congélateur
Mesures de sécurité Fonctionnement
Clayettes de congélateur à retrait par coulissement
Clayettes de congélateur fixes
Sécurité
Les portes du réfrigérateur
Fonctionnement Mesures de
Portes du réfrigérateur
Enlèvement des contenants
Les tiroirs et contenants à légume
Machine à glaçons automatique
Installation Dépannage
Machine à glaçons automatique
Enlèvement du tiroir à glace modèles avec distributeur
De sécurité Fonctionnement
Installation Conseils de
Entretien et nettoyage du réfrigérateur
Des commandes
Nettoyage de l’extérieur
Nettoyage de l’intérieur
Fonctionnement
Installation
Derrière le réfrigérateur
Départ en vacances
Installation Au Conseils de dépannage
Remplacement des ampoules
Compartiment réfrigérateur-lampe supérieure
Compartiment réfrigérateur-lampe inférieure
Ensembles de moulures et de panneaux décoratifs
Installation
Panneaux de moins de 6 mm 1/4 po d’épaisseur
Panneau de 19 mm 3/4 po ou surélevé
Fonctionnement Mesures
23‘ Dimensions pour les panneaux de bois sur mesure
Panneau du Congélateur sans Distributeur
Panneaux du
Insérez les panneaux du congélateur et du réfrigérateur
Installation des panneaux de porte
Au panneau supérieur du congélateur
La moulure supérieure se trouve à lintérieur
Mesures de
Installez la moulure latérale
Préparation
Avant DE Commencer
Outils Requis
Veuillez lire toutes les directives attentivement
Déménagement DU Réfrigérateur
Enlevez LA Grille DE Base
’ENLEVEZ PAS les poignées
Ouvrez la porte du compartiment congélation à
Pour débrancher, tirez de chaque côté des connecteurs
Enlevez LA Porte
Déménagement DU Réfrigérateur Suite
Enlevez LA Porte DU Compartiment Réfrigération
Ouvrez la porte du compartiment réfrigération à
Veuillez cependant noter les points suivants
Remise EN Place DES Portes
La marque
Les connecteurs sont complètement imbriqués
Emplacement DU Réfrigérateur
Installation DU Réfrigérateur
Dimensions ET Spécifications
Dégagements
Ouvrez L’ALIMENTATION D’EAU
Ne coupez pas le tuyau de plastique pour installer le filtre
Installation DU Réfrigérateur Suite
Placez LE Réfrigérateur Dans SON Emplacement
Alignez LES Portes
Réglez les commandes selon les recommandations
Réglez LES Commandes
Replacez LA Grille DE Base
Mettez EN Marche LA Machine À Glaçons
CE Dont Vous Aurez Besoin
Installation DE LA Conduite D’EAU
Percez UN Trou Pour LE Robinet
Une alimentation d’eau froide potable
Percez un trou de 1/4 po dans le tuyau d’eau
Installation DE LA Conduite D’EAU Suite
CLICS, Claquements
Bruits normaux de fonctionnement
Problème
Avant d’appeler un réparateur…
Problème Causes possibles Correctifs
Conseils de dépannage
Glace était choisi mais
Faites couler l’eau du distributeur pendant 3 minutes
Du réglage précédent. C’est normal
Essuyez bien la surface extérieure
Nest pas égale à celle
Heures
Affichée Longtemps Des aliments chauds ont été
Placés dans le réfrigérateur Cycle de dégivrage en cours
Agraphez votre reçu ici
Feuillet de données relatives à la performance
Exigences générales d’installation/opération/entretien
Spécifications d’opération
Avis spéciaux
Page
Page
Page
Service de réparations
Prolongation de garantie
Inscrivez votre appareil électroménager
Instalar el refrigerador
Información de seguridad Instrucciones de operación
Seguridad
Solucionar problemas Servicio
Al consumidor
Refrigerantes
Haga que un electricista calificado verifique
Como Conectar LA Electricidad
Los controles del refrigerador
Problemas Servicio al consumidor
Acerca de TurboCool. en algunos modelos
Seguridad
Acerca de ClimateKeeper2
Instalación Solucionar problemas
Cómo usar
Para remover y reemplazar la gaveta
Cuándo reemplazar el filtro en los modelos con
Cartucho del filtro de agua
Luz indicadora de recambio
Indicadora de recambio
Los entrepaños y recipientes del refrigerador
Consumidor Solucionar problemas
Servicio al
Entrepaño deslizable a prueba de derramamientos
Entrepaños deslizantes del congelador
Cestas de congelador
Entrepaños fijos del congelador
Estante de vino/bebidas en la puerta
Puertas del refrigerador
Instalación Problemas
Puertas del refrigerador
Alineación de las puertas
Servicio al consumidor
Gavetas y cacerolas
Servicio al consumidor Solucionar
El dispositivo automático para hacer hielo
En los modelos con
12 y 24 horas para empezar a hacer hielo
Para usar el dispensador
Door Alarm Alarma de puerta
Para bloquear el dispensador
Dispenser Light Luz del dispensador
Cuidado y limpieza del refrigerador
Instalación Servicio al consumidor Solucionar problemas
Limpiar el exterior
Limpiar el interior
Atrás del refrigerador
Instalación Solucionar problemas Servicio al consumidor
Preparación para vacaciones
En caso de mudanza
Reemplazo de bombillas
Instalación Consumidor Solucionar problemas
Compartimento del refrigerador-Luz superior
Compartimento del refrigerador-Luz inferior
Seguridad Operación
Molduras y paneles decorativos
Instalación
Paneles de menos de 1/4 6 mm de espesor
23‘ Dimensiones de los paneles precortados
25‘ Dimensiones CustomStyle de los paneles precortados
Las áreas superiores de los paneles necesitan recortarse
Consumidor
Cómo insertar los paneles de la puerta
Instalación de la moldura lateral
Preparación
Antes DE Iniciar
Lea estas instrucciones completa y cuidadosamente
Tiempo de ejecución Instalación
Refrigerador. no LA Apriete Demasiado
Cómo Mover EL Refrigerador
Remueva la parrilla removiendo
Los dos tornillos de cabeza Phillips
Desconecte
Si el refrigerador tiene un dispensador
LOS Conectadores Eléctricos en algunos modelos
Abra la puerta del refrigerador a
Remueva LA Puerta DEL Refrigerador
Remueva LA Puerta
Cómo Reemplazar LAS Puertas
Sin embargo, note lo siguiente
Cómo Instalar EL Refrigerador
Dimensiones Y Especificaciones
Localización DEL Refrigerador
Espacio
Conecte EL Refrigerador
Active LA Conexión DE Agua
La abrazadera haciendo palanca
Inspeccione en busca de fugas
Cómo Nivelar LAS Puertas
Cómo Nivelar EL Refrigerador
Ajuste LOS Controles
Inicie LA Máquina DE Hielos
Fije el interruptor de la máquina de hielos
3 días para que se llene el cubo de hielo
Cómo Instalar LA Tubería DEL Agua
QUÉ Necesita
El tiempo y causarán daños en su casa debido al agua
Bien
Cierre EL Suministro Principal DE Agua
Conecte LA Tubería a LA Válvula
Instale LA Válvula DE Apagado
Dirija LA Tubería
Lave LA Tubería
Sonidos normales de operación
CHASQUIDOS, Estallidos
CRUJIDO, Gorjeos
Antes de solicitar un servicio…
Problema Causas Posibles Qué hacer
Seguridad Operación Instalación
De la selección anterior. Esto es normal
122
Que de vez en cuando usted
En el refrigerador, es posible
Del refrigerador cuando
De papel si desea
GE reemplazará
Garantía del Refrigerador
Lo que GE no cubrirá
El período de tiempo más breve permitido por la ley
Especificaciones de Operación
Avisos Especiales
Factores de 100% incorporados para la utilización no medida
Nombre Dirección Ciudad Estado Código Postal Firma Fecha
Nombre Dirección Ciudad Estado
Firma Fecha
Solicite una reparación
Servicio al consumidor Página Web de GE Appliances
Garantías ampliadas
Piezas y accesorios
GE Appliances Website
Consumer Support