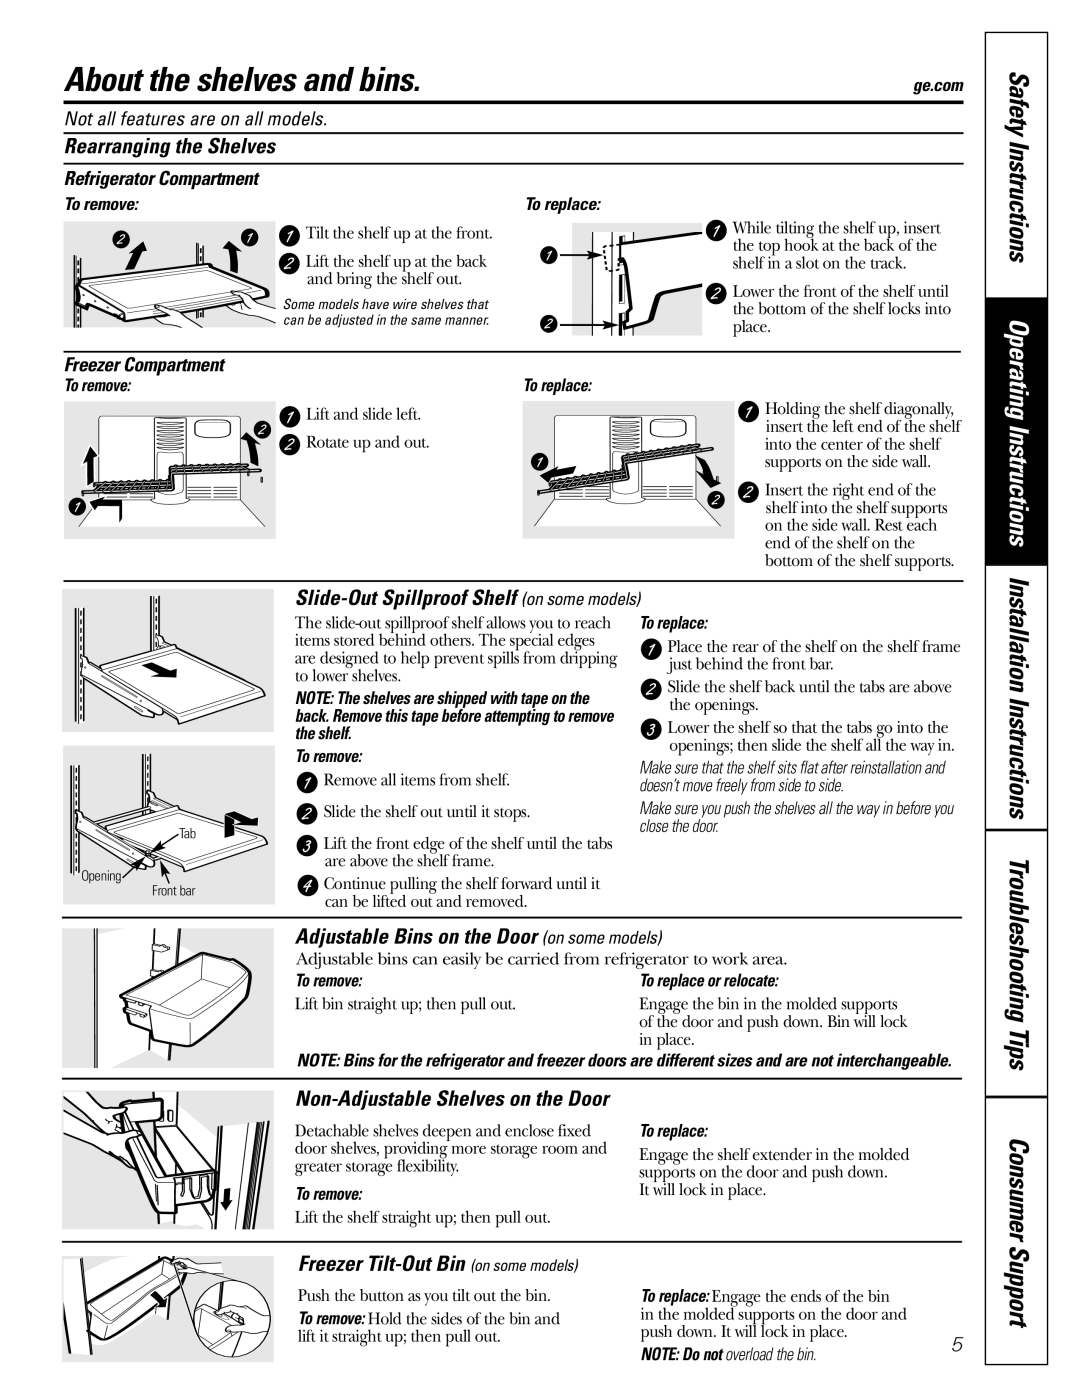
About the shelves and bins.

ge.com

Not all features are on all models.

Rearranging the Shelves

Refrigerator Compartment

To remove:

To replace:

Tilt the shelf up at the front.

While tilting the shelf up, insert

the top hook at the back of the

Lift the shelf up at the back

shelf in a slot on the track.

and bring the shelf out.

Lower the front of the shelf until

Some models have wire shelves that

the bottom of the shelf locks into

can be adjusted in the same manner.

place.


Safety Instructions

Freezer Compartment

To remove:

To replace:

Lift and slide left.

Rotate up and out.

Holding the shelf diagonally, insert the left end of the shelf into the center of the shelf supports on the side wall.

Insert the right end of the shelf into the shelf supports on the side wall. Rest each end of the shelf on the bottom of the shelf supports.

Operating Instructions

Slide-Out Spillproof Shelf (on some models)

Tab

Opening Front bar

The slide-out spillproof shelf allows you to reach items stored behind others. The special edges are designed to help prevent spills from dripping to lower shelves.

NOTE: The shelves are shipped with tape on the back. Remove this tape before attempting to remove the shelf.

To remove:

Remove all items from shelf.

Slide the shelf out until it stops.

Lift the front edge of the shelf until the tabs are above the shelf frame.

Continue pulling the shelf forward until it can be lifted out and removed.

To replace:

Place the rear of the shelf on the shelf frame just behind the front bar.

Slide the shelf back until the tabs are above the openings.

Lower the shelf so that the tabs go into the openings; then slide the shelf all the way in.

Make sure that the shelf sits flat after reinstallation and doesn’t move freely from side to side.

Make sure you push the shelves all the way in before you close the door.

Adjustable Bins on the Door (on some models)

Adjustable bins can easily be carried from refrigerator to work area.

To remove:

To replace or relocate:

Lift bin straight up; then pull out.

Engage the bin in the molded supports


of the door and push down. Bin will lock


in place.

NOTE: Bins for the refrigerator and freezer doors are different sizes and are not interchangeable.

Non-Adjustable Shelves on the Door

Detachable shelves deepen and enclose fixed

To replace:

door shelves, providing more storage room and

Engage the shelf extender in the molded

greater storage flexibility.

supports on the door and push down.

To remove:

It will lock in place.

Lift the shelf straight up; then pull out.


Freezer Tilt-Out Bin (on some models)

Push the button as you tilt out the bin.

To replace: Engage the ends of the bin


To remove: Hold the sides of the bin and

in the molded supports on the door and


lift it straight up; then pull out.

push down. It will lock in place.

5


NOTE: Do not overload the bin.


Installation Instructions Troubleshooting Tips Consumer Support

Page 5
Image 5
GE WX08X10025, WX08X10015, WX08X10006, 197D3354P013 About the shelves and bins, Safety Instructions, Operating Instructions

197D3354P013, WX08X10006, WX08X10025, WX08X10015 specifications

The GE WX08X10015, WX08X10025, WX08X10006, and 197D3354P013 are essential components designed for enhancing the functionality and performance of GE appliances, particularly in laundry applications. These parts are popular for their reliable construction, compatibility, and advanced features that ensure seamless operation.

The GE WX08X10015 is a high-quality washer hose that is engineered for adding flexibility and durability to your washing machine. It typically features a reinforced design to prevent kinks and leaks, ensuring that water flows smoothly without interruptions. The hose is also resistant to extreme temperatures, making it suitable for various washing machine environments. The installation process is straightforward, allowing homeowners to easily replace existing hoses without the need for professional assistance.

On the other hand, the GE WX08X10025 offers a similar application with an extended length that caters to varying laundry room configurations. This appliance part is designed to connect the washing machine to the water supply, providing a consistent and secure water flow during wash cycles. Its robust construction means that it can withstand high pressures, making it a reliable choice for both top-loading and front-loading washing machines.

The GE WX08X10006 is another important hose option, known for its features that allow for an effective drain during laundry cycles. This hose plays a critical role in removing water from the washing machine after each cycle, ensuring that the machine operates efficiently. The drainage hose is typically engineered to fit standard washing machine drain outlets, promoting a hassle-free installation and maintenance experience.

Lastly, the 197D3354P013 is a versatile part that serves as a coupling or connector within washing machine setups. Its design includes durable materials that ensure longevity and resistance to wear and tear. This part is crucial for establishing secure connections between various components, thus maintaining the overall integrity of the washing system.

The combined characteristics of these GE appliance parts highlight their importance in maintaining effective laundry operations. From reliable water connection hoses to efficient drainage solutions and sturdy connectors, these components enhance usability and extend the lifespan of washing machines. Their advanced engineering reflects GE's commitment to quality and performance, making them invaluable to any household laundry setup.