Instrucciones para la instalación

CÓMO INVERTIR EL VAIVÉN DE LA PUERTA (CONT.)

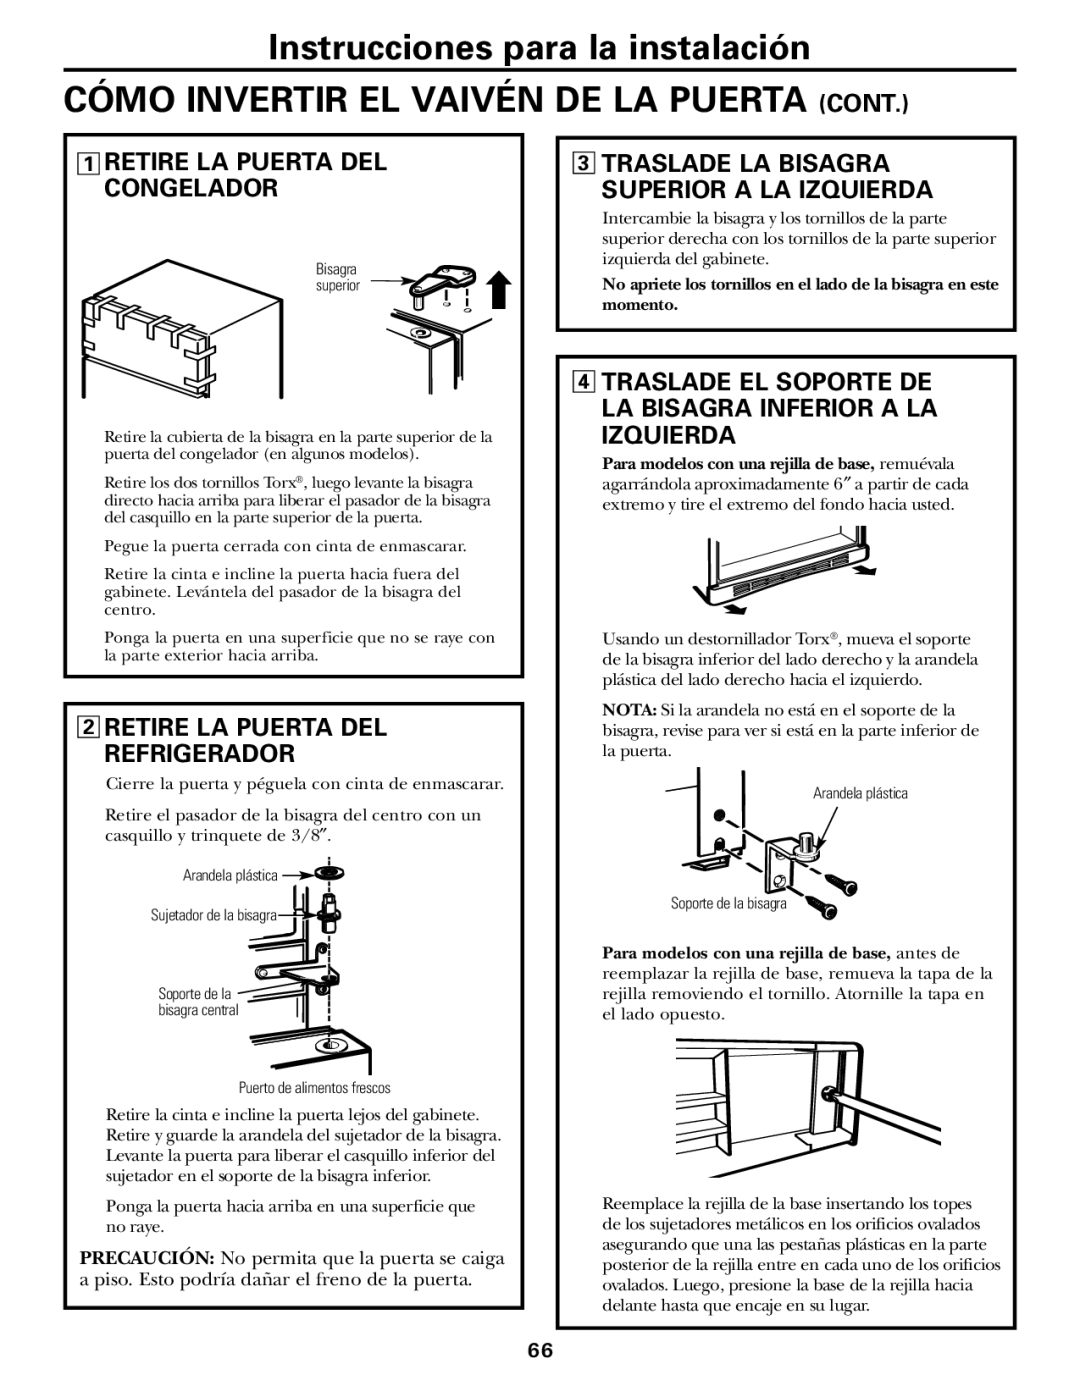
1RETIRE LA PUERTA DEL CONGELADOR

Bisagra superior

Retire la cubierta de la bisagra en la parte superior de la puerta del congelador (en algunos modelos).

Retire los dos tornillos Torx®, luego levante la bisagra directo hacia arriba para liberar el pasador de la bisagra del casquillo en la parte superior de la puerta.

Pegue la puerta cerrada con cinta de enmascarar.

Retire la cinta e incline la puerta hacia fuera del gabinete. Levántela del pasador de la bisagra del centro.

Ponga la puerta en una superficie que no se raye con la parte exterior hacia arriba.

2RETIRE LA PUERTA DEL REFRIGERADOR

Cierre la puerta y péguela con cinta de enmascarar.

Retire el pasador de la bisagra del centro con un casquillo y trinquete de 3/8″.

Arandela plástica

Sujetador de la bisagra

Soporte de la bisagra central

Puerto de alimentos frescos

Retire la cinta e incline la puerta lejos del gabinete. Retire y guarde la arandela del sujetador de la bisagra. Levante la puerta para liberar el casquillo inferior del sujetador en el soporte de la bisagra inferior.

Ponga la puerta hacia arriba en una superficie que no raye.

PRECAUCIÓN: No permita que la puerta se caiga

a piso. Esto podría dañar el freno de la puerta.

3TRASLADE LA BISAGRA

SUPERIOR A LA IZQUIERDA

Intercambie la bisagra y los tornillos de la parte superior derecha con los tornillos de la parte superior izquierda del gabinete.

No apriete los tornillos en el lado de la bisagra en este momento.

4TRASLADE EL SOPORTE DE LA BISAGRA INFERIOR A LA

IZQUIERDA

Para modelos con una rejilla de base, remuévala agarrándola aproximadamente 6″ a partir de cada extremo y tire el extremo del fondo hacia usted.

Usando un destornillador Torx®, mueva el soporte de la bisagra inferior del lado derecho y la arandela plástica del lado derecho hacia el izquierdo.

NOTA: Si la arandela no está en el soporte de la bisagra, revise para ver si está en la parte inferior de la puerta.

Arandela plástica

Soporte de la bisagra

Para modelos con una rejilla de base, antes de reemplazar la rejilla de base, remueva la tapa de la rejilla removiendo el tornillo. Atornille la tapa en el lado opuesto.

Reemplace la rejilla de la base insertando los topes de los sujetadores metálicos en los orificios ovalados asegurando que una las pestañas plásticas en la parte posterior de la rejilla entre en cada uno de los orificios ovalados. Luego, presione la base de la rejilla hacia delante hasta que encaje en su lugar.

66

Page 66
Image 66
GE WX08X10006, WX08X10015, WX08X10025 manual Retire LA Puerta DEL Congelador, Retire LA Puerta DEL Refrigerador, Izquierda

197D3354P013, WX08X10006, WX08X10025, WX08X10015 specifications

The GE WX08X10015, WX08X10025, WX08X10006, and 197D3354P013 are essential components designed for enhancing the functionality and performance of GE appliances, particularly in laundry applications. These parts are popular for their reliable construction, compatibility, and advanced features that ensure seamless operation.

The GE WX08X10015 is a high-quality washer hose that is engineered for adding flexibility and durability to your washing machine. It typically features a reinforced design to prevent kinks and leaks, ensuring that water flows smoothly without interruptions. The hose is also resistant to extreme temperatures, making it suitable for various washing machine environments. The installation process is straightforward, allowing homeowners to easily replace existing hoses without the need for professional assistance.

On the other hand, the GE WX08X10025 offers a similar application with an extended length that caters to varying laundry room configurations. This appliance part is designed to connect the washing machine to the water supply, providing a consistent and secure water flow during wash cycles. Its robust construction means that it can withstand high pressures, making it a reliable choice for both top-loading and front-loading washing machines.

The GE WX08X10006 is another important hose option, known for its features that allow for an effective drain during laundry cycles. This hose plays a critical role in removing water from the washing machine after each cycle, ensuring that the machine operates efficiently. The drainage hose is typically engineered to fit standard washing machine drain outlets, promoting a hassle-free installation and maintenance experience.

Lastly, the 197D3354P013 is a versatile part that serves as a coupling or connector within washing machine setups. Its design includes durable materials that ensure longevity and resistance to wear and tear. This part is crucial for establishing secure connections between various components, thus maintaining the overall integrity of the washing system.

The combined characteristics of these GE appliance parts highlight their importance in maintaining effective laundry operations. From reliable water connection hoses to efficient drainage solutions and sturdy connectors, these components enhance usability and extend the lifespan of washing machines. Their advanced engineering reflects GE's commitment to quality and performance, making them invaluable to any household laundry setup.