Installation Preparation

Warming Drawer

Remove

Packaging

and Parts

Place carton on a flat surface.

Open one end of the carton and lift off the top piece.

Lift the warmer up and out of the carton.

Place the drawer on top of the shipping carton to protect the drawer front and the finished flooring.

Remove all packing materials and tape.

Locate package containing 4 wood screws and set aside.

Parts provided:

• 4 Wood Screws

Installation

Below a

Countertop


Install

Electrical Outlet 42" Max.


2x4 or 2x2


Anti-Tip Block

Electrical Outlet

From Right Side.

1-1/2" Cabinet Top


Against Rear


Flush With Side


Cabinet Wall

25"


of Cabinet 7" Max.


9" From Floor


Electrical

to Bottom

7"

Install a Solid Barrier


of Block

Below a Cooktop


Outlet 16" Max.


See Note


From Left Side.


1" Min.*

36"

9"


Countertop

9-1/4"

Height


A


Solid Barrier


1/4" Air Gap

23-1/2" Min.

Install a Solid Barrier

and a 1/4" Air Gap

Above Warming Drawer


B

e

lo

w

Dim. A


n


lla

tio

er


sta


ra

w


ZTD910

28-1/2”

In


D


a


ZKD910

25-1/2”


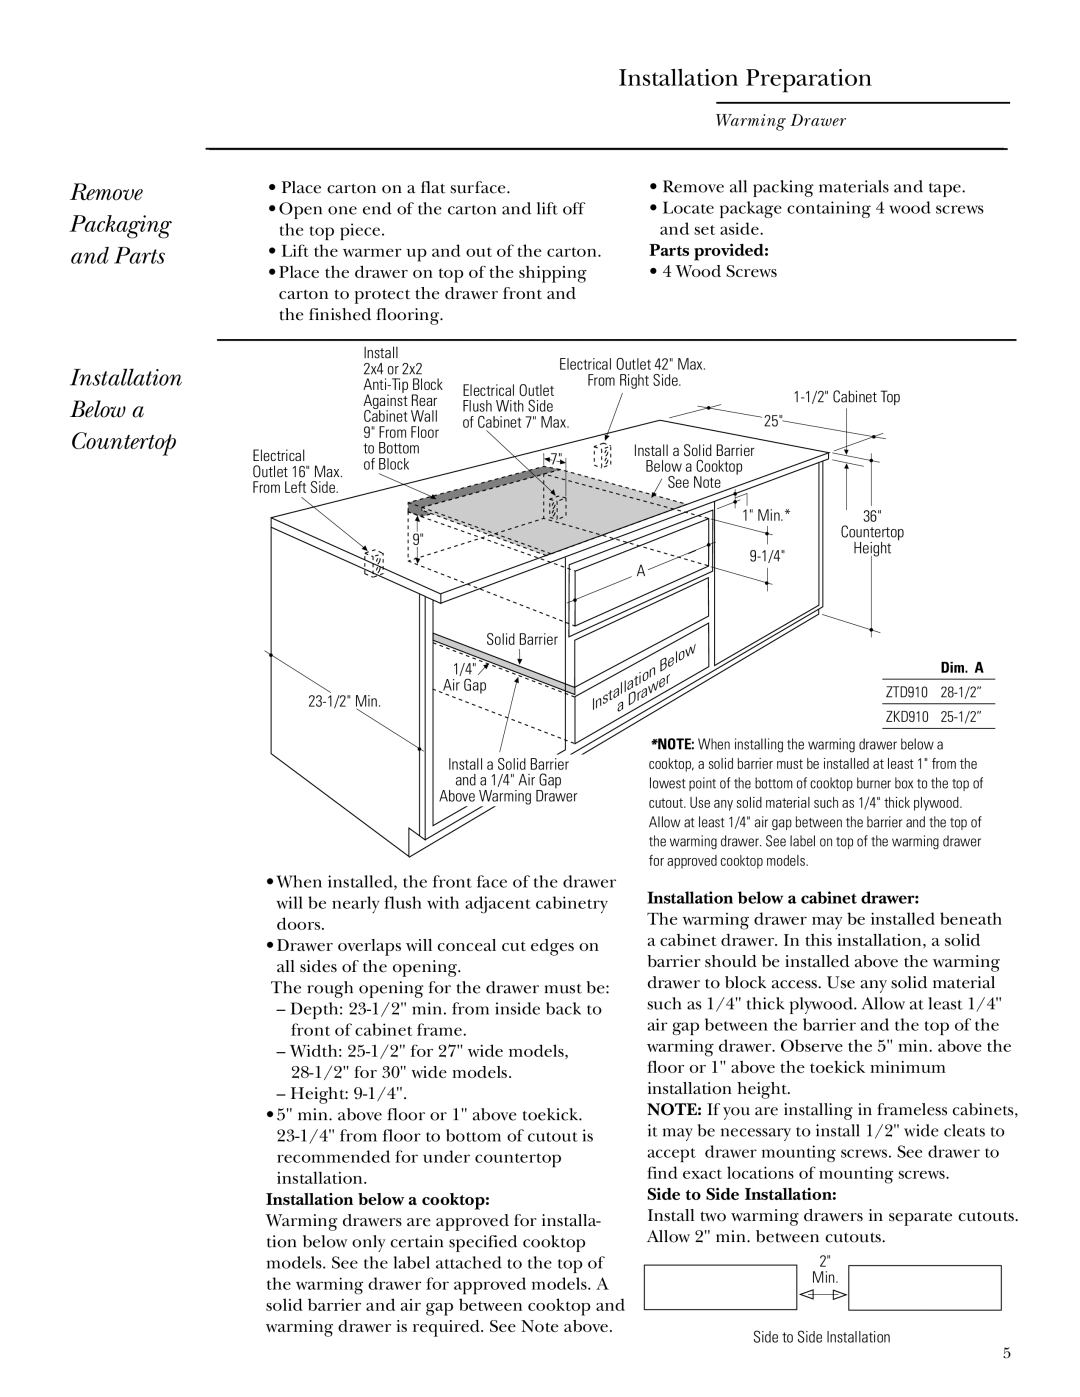
*NOTE: When installing the warming drawer below a cooktop, a solid barrier must be installed at least 1" from the lowest point of the bottom of cooktop burner box to the top of cutout. Use any solid material such as 1/4" thick plywood. Allow at least 1/4" air gap between the barrier and the top of the warming drawer. See label on top of the warming drawer for approved cooktop models.

When installed, the front face of the drawer will be nearly flush with adjacent cabinetry doors.

Drawer overlaps will conceal cut edges on all sides of the opening.

The rough opening for the drawer must be:

Depth: 23-1/2" min. from inside back to front of cabinet frame.

Width: 25-1/2" for 27" wide models, 28-1/2" for 30" wide models.

Height: 9-1/4".

5" min. above floor or 1" above toekick. 23-1/4" from floor to bottom of cutout is recommended for under countertop installation.

Installation below a cooktop:

Warming drawers are approved for installa- tion below only certain specified cooktop models. See the label attached to the top of the warming drawer for approved models. A solid barrier and air gap between cooktop and warming drawer is required. See Note above.

Installation below a cabinet drawer:

The warming drawer may be installed beneath a cabinet drawer. In this installation, a solid barrier should be installed above the warming drawer to block access. Use any solid material such as 1/4" thick plywood. Allow at least 1/4" air gap between the barrier and the top of the warming drawer. Observe the 5" min. above the floor or 1" above the toekick minimum installation height.

NOTE: If you are installing in frameless cabinets, it may be necessary to install 1/2" wide cleats to accept drawer mounting screws. See drawer to find exact locations of mounting screws.

Side to Side Installation:

Install two warming drawers in separate cutouts. Allow 2" min. between cutouts.

2"

Min.

Side to Side Installation

5

Page 5
Image 5
GE Monogram ZKD910, ZTD910 installation instructions Remove Packaging Parts, Installation Below a Countertop

ZKD910, ZTD910 specifications

The GE Monogram ZTD910 and ZKD910 are premium appliances designed to redefine cooking and kitchen experience for homeowners who value both performance and aesthetics. These models come equipped with advanced features and technologies, making them stand out in the competitive market of high-end kitchen appliances.

One of the key features of the GE Monogram ZTD910 and ZKD910 is their spacious capacity. With generous interiors, both models provide ample room for cooking, ensuring that food enthusiasts have the freedom to experiment with different dishes without worrying about space constraints. The spacious design is complemented by versatile cooking options, including multiple cooking modes such as convection, bake, and broil, which allow users to achieve optimal results for a variety of culinary techniques.

Another highlight of these appliances is their advanced temperature control technology. With precise temperature management, home chefs can maintain consistent heating, which is critical in achieving perfect baking results or slow-roasting meats. The integrated temperature probes are noteworthy as they allow users to monitor cooking progress without opening the oven door, ensuring heat is retained and results are flawless.

The design elements of the GE Monogram ZTD910 and ZKD910 are crafted with elegance in mind. Featuring a sleek stainless-steel finish, these appliances not only perform exceptionally but also add a modern touch to any kitchen decor. The interior is easy to clean and maintain, with smooth surfaces that prevent food residue from sticking, thereby enhancing overall user experience.

In terms of user interface, both models are equipped with intuitive controls and advanced display options that simplify the cooking process. Touch-sensitive controls enable seamless selection of cooking functions, while LED lighting enhances visibility within the oven cavity, making it easy to monitor dishes as they cook.

Safety features are also paramount in these models, with automatic shut-off mechanisms and child lock options designed to give users peace of mind. The self-cleaning function is particularly convenient, as it makes upkeep effortless, allowing homeowners to enjoy their appliances without the hassle of rigorous cleaning.

In conclusion, the GE Monogram ZTD910 and ZKD910 embody luxury, efficiency, and innovation in the kitchen. With their spacious capacity, advanced technologies, elegant design, and user-friendly features, these appliances are ideal for culinary enthusiasts seeking to elevate their cooking experience while enjoying the benefits of a high-performance kitchen appliance.