Glowworm Lighting 40 manual Servicing, Heat Exchanger Cleaning

Models: 40

1 40
Download 40 pages 37.42 Kb
Page 24
Image 24

12 Servicing

Notes

To ensure the continued efficient and safe operation of the boiler it is recommended that it is checked and serviced at regular intervals. The frequency of servicing will depend upon the particular installation and usage, but in general once a year should be enough.

It is the Law that any servicing is carried out by a competent person.

Note. For obtaining a products of combustion reading use the connection on top of the boiler, see diagram 6.1.

Should the gas pressure need adjusting refer to Section 10.4.

Isolate the boiler from the electrical supply.

Before starting a service, remove the casing, refer to diagram 5.1.

Turn the gas supply off at the gas service cock, see diagram 8.1.

Unless stated otherwise, parts removed for servicing should be replaced in the reverse order to removal.

After completing any servicing of gas carrying components, ALWAYS test for gas soundness and carry out functional check of controls.

Also check for condensate leaks at fan outlet/flue elbow and fan inlet/flue hood joints.

It should be noted that the burner is water cooled and a system drain down is necessary if the burner is removed.

12.1 Heat Exchanger Cleaning

Remove the inner case cover, see diagram 5.3.

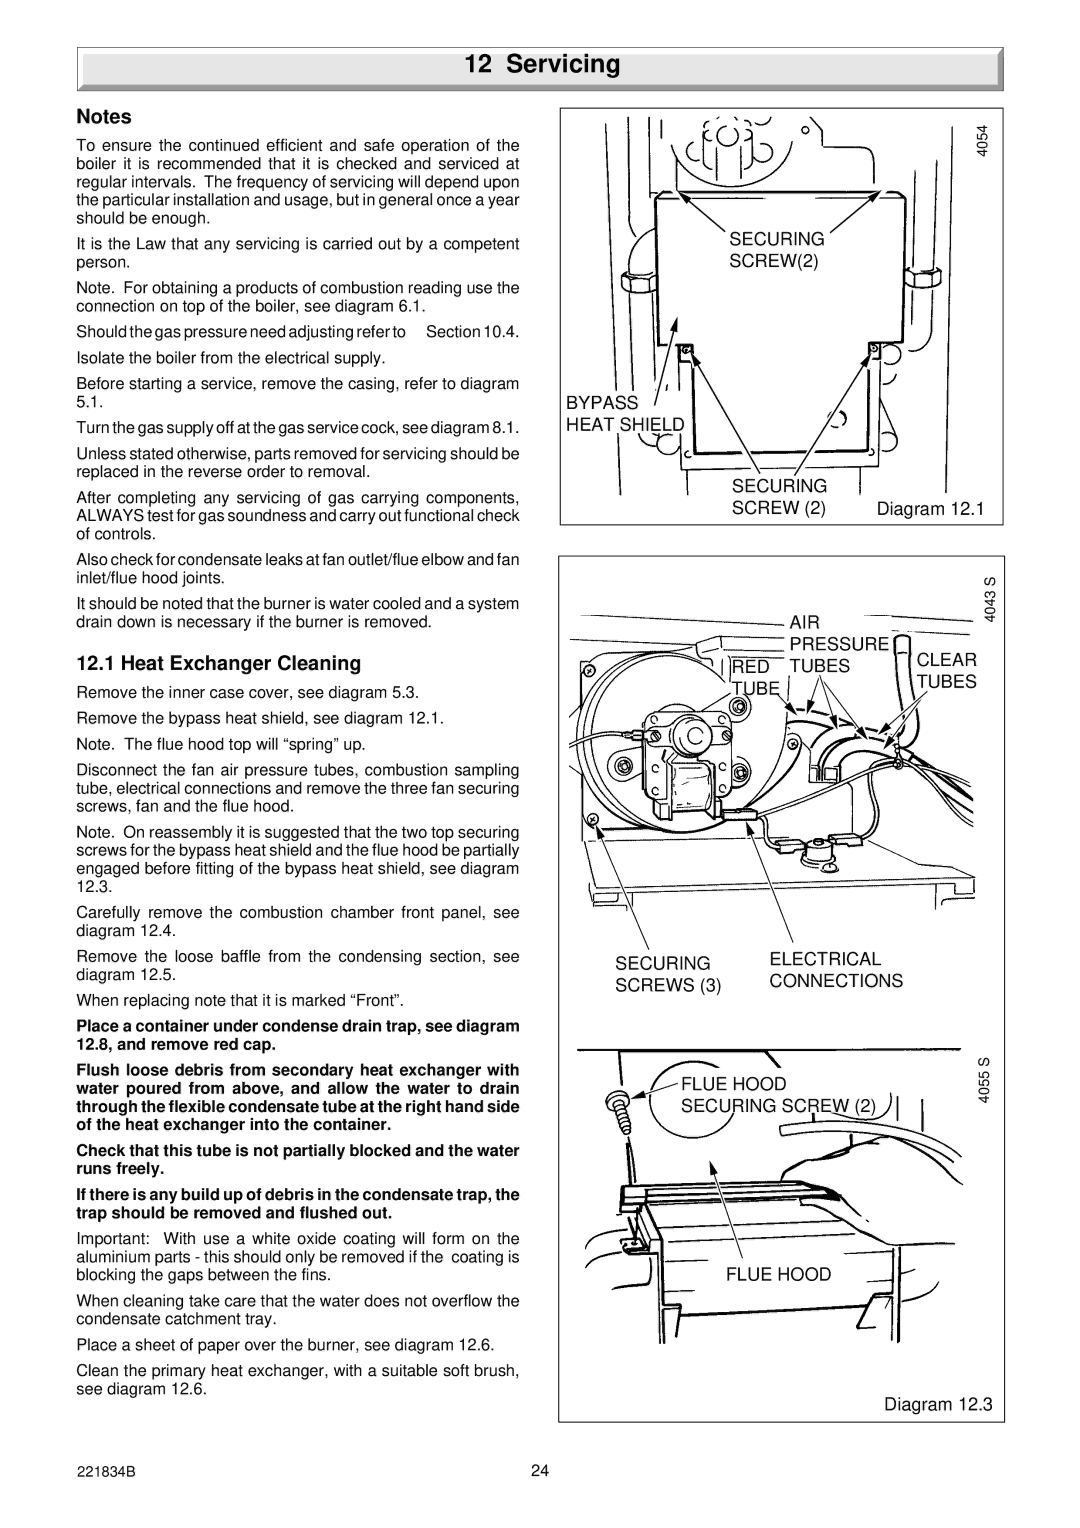
Remove the bypass heat shield, see diagram 12.1.

Note. The flue hood top will “spring” up.

Disconnect the fan air pressure tubes, combustion sampling tube, electrical connections and remove the three fan securing screws, fan and the flue hood.

Note. On reassembly it is suggested that the two top securing screws for the bypass heat shield and the flue hood be partially engaged before fitting of the bypass heat shield, see diagram 12.3.

Carefully remove the combustion chamber front panel, see diagram 12.4.

Remove the loose baffle from the condensing section, see diagram 12.5.

When replacing note that it is marked “Front”.

Place a container under condense drain trap, see diagram 12.8, and remove red cap.

Flush loose debris from secondary heat exchanger with water poured from above, and allow the water to drain through the flexible condensate tube at the right hand side of the heat exchanger into the container.

Check that this tube is not partially blocked and the water runs freely.

If there is any build up of debris in the condensate trap, the trap should be removed and flushed out.

Important: With use a white oxide coating will form on the aluminium parts - this should only be removed if the coating is blocking the gaps between the fins.

When cleaning take care that the water does not overflow the condensate catchment tray.

Place a sheet of paper over the burner, see diagram 12.6.

Clean the primary heat exchanger, with a suitable soft brush, see diagram 12.6.


4054


SECURING


SCREW(2)


BYPASS


HEAT SHIELD


SECURING


SCREW (2)

Diagram 12.1


AIR

4043S


PRESSURE


RED TUBES

CLEAR


TUBES


TUBE


SECURING

ELECTRICAL

SCREWS (3)

CONNECTIONS


S

FLUE HOOD

4055

SECURING SCREW (2)


FLUE HOOD


Diagram 12.3

221834B

24

Page 24
Image 24
Glowworm Lighting 40 manual Servicing, Heat Exchanger Cleaning

40 specifications

Glowworm Lighting 40 is a popular choice for homeowners seeking energy-efficient heating solutions. This compact, wall-mounted boiler is designed with modern technologies that ensure optimal performance and reliability.

One of the standout features of the Glowworm 40 is its impressive efficiency rating. With an energy efficiency of up to 94%, it significantly reduces energy waste, resulting in lower utility bills and a reduced carbon footprint. This is particularly beneficial for environmentally conscious individuals looking to minimize their impact on the planet while maintaining comfort in their homes.

The Glowworm Lighting 40 is equipped with a robust heat exchanger made from high-grade aluminum, which not only enhances heat transfer efficiency but also contributes to the boiler's lightweight design. This feature makes installation easier, allowing for a more flexible placement within the home.

The boiler operates quietly, which is a crucial characteristic for residential areas where noise can be a concern. Its intelligent controls allow users to manage heating temperatures efficiently through programmable timers, ensuring that warmth is delivered only when needed. This not only helps with comfort but also ensures that energy is conserved.

Moreover, the Glowworm Lighting 40 comes with a built-in frost protection feature, which is essential for preventing damage during colder months. This technology ensures that the system remains operational even in extreme conditions, providing peace of mind to homeowners.

Another significant advantage of the Glowworm Lighting 40 is its compatibility with renewable energy technologies. The system can be easily integrated with solar thermal panels, enhancing the overall efficiency of the heating system and aligning with sustainable living principles.

Maintaining the Glowworm Lighting 40 is straightforward, thanks to its accessible design. Regular servicing is uncomplicated, encouraging adherence to maintenance schedules and prolonging the lifespan of the unit. This user-friendly aspect is a crucial consideration for many homeowners.

In summary, the Glowworm Lighting 40 combines efficiency, user-friendly technology, and innovative design. Its high efficiency rating, lightweight structure, quiet operation, and compatibility with renewable energy sources make it a leading contender in the boiler market for those looking for both practicality and environmental consciousness in their heating solutions. Whether upgrading an existing system or installing a new boiler, the Glowworm Lighting 40 delivers on performance and reliability.