Goodman Mfg VC8 instruction manual Start-Up Procedure And Adjustment

Models: VC8

1 48
Download 48 pages 50.02 Kb
Page 28
Image 28
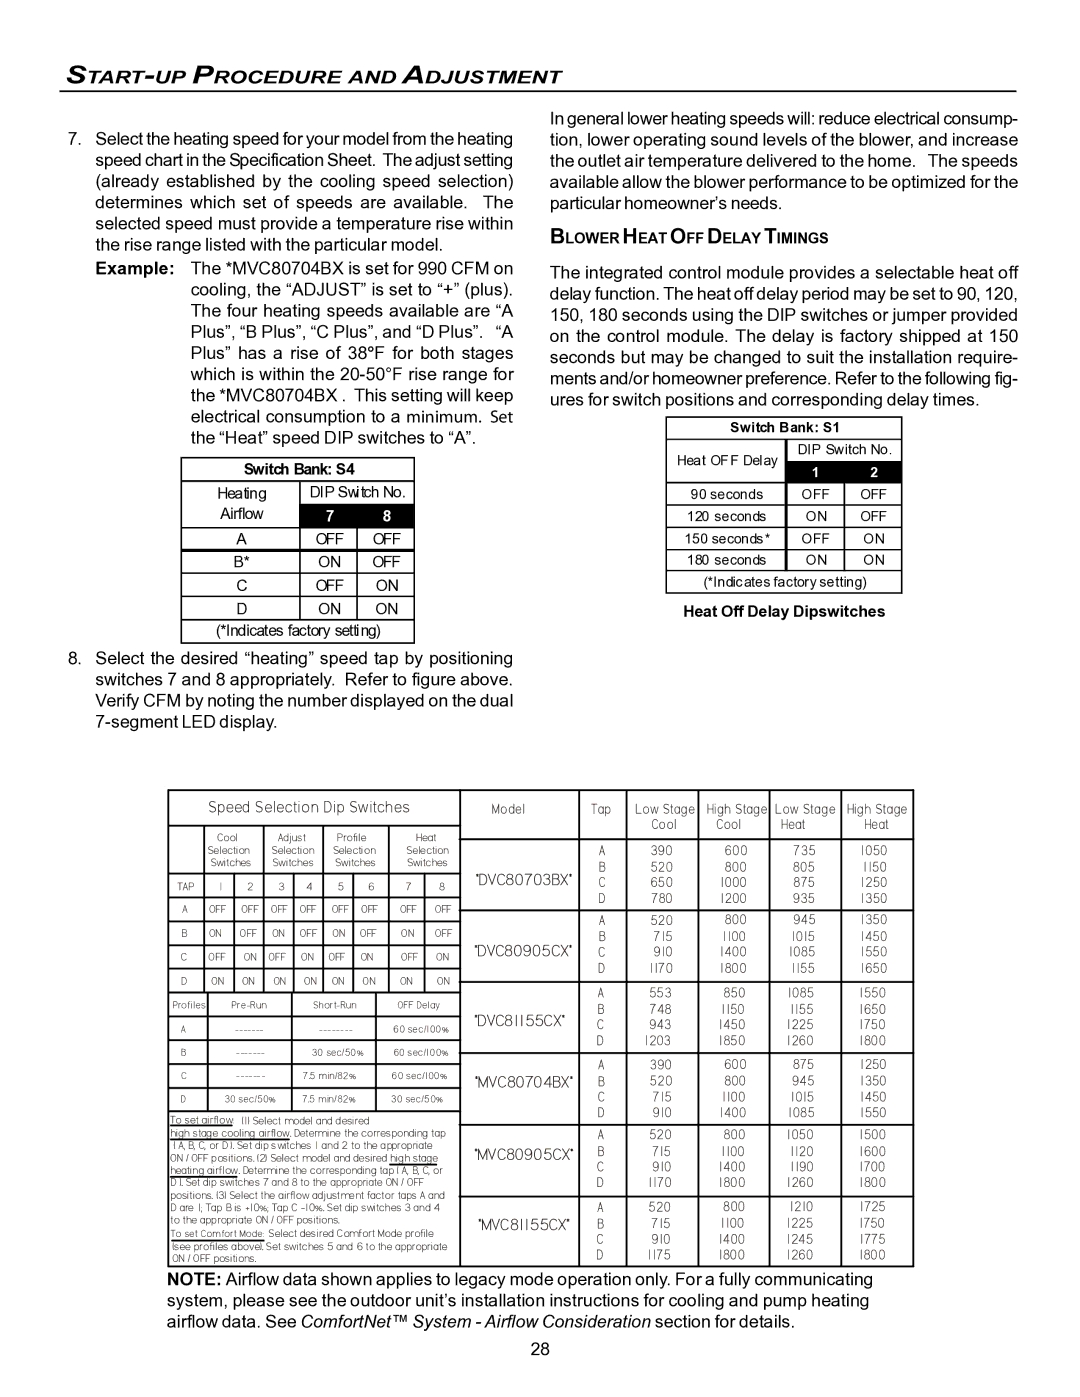
Example: The *MVC80704BX is set for 990 CFM on cooling, the “ADJUST” is set to “+” (plus). The four heating speeds available are “A Plus”, “B Plus”, “C Plus”, and “D Plus”. “A Plus” has a rise of 38°F for both stages which is within the 20-50°F rise range for the *MVC80704BX . This setting will keep electrical consumption to a minimum. Set the “Heat” speed DIP switches to “A”.

START-UP PROCEDURE AND ADJUSTMENT

7.Select the heating speed for your model from the heating speed chart in the Specification Sheet. The adjust setting (already established by the cooling speed selection) determines which set of speeds are available. The selected speed must provide a temperature rise within the rise range listed with the particular model.

Example: The *MVC80704BX is set for 990 CFM on cooling, the “ADJUST” is set to “+” (plus). The four heating speeds available are “A Plus”, “B Plus”, “C Plus”, and “D Plus”. “A Plus” has a rise of 38°F for both stages which is within the 20-50°F rise range for the *MVC80704BX . This setting will keep electrical consumption to a minimum. Set the “Heat” speed DIP switches to “A”.

Switch Bank: S4

Heating

DIP Switch No.

Airflow

7

8

A

OFF

OFF

B*

ON

OFF

C

OFF

ON

D

ON

ON

(*Indicates factory setting)

8.Select the desired “heating” speed tap by positioning switches 7 and 8 appropriately. Refer to figure above. Verify CFM by noting the number displayed on the dual 7-segment LED display.

In general lower heating speeds will: reduce electrical consump- tion, lower operating sound levels of the blower, and increase the outlet air temperature delivered to the home. The speeds available allow the blower performance to be optimized for the particular homeowner’s needs.

BLOWER HEAT OFF DELAY TIMINGS

The integrated control module provides a selectable heat off delay function. The heat off delay period may be set to 90, 120, 150, 180 seconds using the DIP switches or jumper provided on the control module. The delay is factory shipped at 150 seconds but may be changed to suit the installation require- ments and/or homeowner preference. Refer to the following fig- ures for switch positions and corresponding delay times.

Switch Bank: S1

Heat OFF Delay

DIP Switch No.

1

2


90 seconds

OFF

OFF

120 seconds

ON

OFF

150 seconds*

OFF

ON

180 seconds

ON

ON

(*Indicates factory setting)

Heat Off Delay Dipswitches


Speed Selection Dip Switches


Model

Tap

Low Stage

High Stage

Low Stage

High Stage


Cool

Cool

Heat

Heat


Cool


Adjust


Profile

Heat


A

390

600

735

1050


Selection


Selection


Selection

Selection


Switches


Switches


Switches

Switches

*DVC80703BX*

B

520

800

805

1150


TAP


1

2


3


4


5


6


7


8

C

650

1000

875

1250


D

780

1200

935

1350


A


OFF

OFF


OFF

OFF


OFF


OFF

OFF


OFF


A

520

800

945

1350


B


ON

OFF


ON

OFF


ON


OFF

ON


OFF


*DVC80905CX*

B

715

1100

1015

1450


C


OFF

ON


OFF

ON


OFF


ON

OFF


ON

C

910

1400

1085

1550


D

1170

1800

1155

1650


D


ON

ON


ON

ON


ON


ON

ON


ON


A

553

850

1085

1550


Profiles


Pre-Run


Short-Run


OFF Delay


*DVC81155CX*

B

748

1150

1155

1650


A


-------


--------


60 sec/100%

C

943

1450

1225

1750


D

1203

1850

1260

1800


B


-------


30 sec/50%


60 sec/100%


A

390

600

875

1250


C


-------


7.5 min/82%


60 sec/100%

*MVC80704BX*


B

520

800

945

1350


D

30 sec/50%

7.5 min/82%


30 sec/50%


C

715

1100

1015

1450


D

910

1400

1085

1550

To set airflow: (1) Select model and desired


high stage cooling airflow.

Determine the corresponding tap


A

520

800

1050

1500


( A, B, C, or D ). Set dip switches 1 and 2 to the appropriate


*MVC80905CX*

B

715

1100

1120

1600

ON / OFF positions. (2) Select model and desired high stage


C

910

1400

1190

1700

heating airflow. Determine the corresponding tap ( A, B, C, or


D

1170

1800

1260

1800

D ). Set dip switches 7 and 8 to the appropriate ON / OFF


positions. (3) Select the airflow adjustment factor taps A and


A

520

800

1210

1725

D are 1; Tap B is +10%; Tap C -10%. Set dip switches 3 and 4


to the appropriate ON / OFF positions.


*MVC81155CX*

B

715

1100

1225

1750

To set Comfort Mode: Select desired Comfort Mode profile


C

910

1400

1245

1775


(see profiles above). Set switches 5 and 6 to the appropriate


D

1175

1800

1260

1800


ON / OFF positions.


NOTE: Airflow data shown applies to legacy mode operation only. For a fully communicating system, please see the outdoor unit’s installation instructions for cooling and pump heating airflow data. See ComfortNet™ System - Airflow Consideration section for details.

28

Page 28
Image 28
Goodman Mfg VC8 instruction manual Start-Up Procedure And Adjustment