 Put in the laundries
The capacity of washing of the machine refer to the largest weight of the standard laundries under dry condition that can be washed in one
time. Laundries quantity in one washing cycle shall | be lower than |
the standard capacity. |
|
The thickness ,size , type of the cloth will influence the actual | washing capacity. |
It is suitable to put in reasonable amount of laundries and the laundries can be turned round in washing for one time washing.
Do not select " 4" water level for laundries less than 1.0kg ,so as to avoid splashing of water.
Install the water inlet hose
Confirm the water faucet
Water faucet,suitable | Water faucet,not suitable |
Outlet end surface |
|
>10mm |
|
It is required that the front end shall be longer than 10mm.
The exit end face of the faucet shall be flat and smooth. If not please file it to avoid leakage.
Usage of detergent
Control panel seat
![]() Liquid detergent inlet
Liquid detergent inlet
Access for detergent and washing powder
How to use the softner
![]() The usage and dose of the softener as per the specifications of softener.
The usage and dose of the softener as per the specifications of softener.
![]() Before washing put the softener into the hole directly as indicated in the left figure
Before washing put the softener into the hole directly as indicated in the left figure![]() The softener will put into the washer when the last rinsing.
The softener will put into the washer when the last rinsing.
![]() Refer to the following list for the usage of the detergent:selection of the water level,water quantity and dosage of detergent
Refer to the following list for the usage of the detergent:selection of the water level,water quantity and dosage of detergent
![]() After the softener is put in, please don't place for a long time otherwise softener may solidify and cause flowing not smooth.
After the softener is put in, please don't place for a long time otherwise softener may solidify and cause flowing not smooth.
Remark: Do not use softener if rinse times is not two.
How to use the washing powder
Connection between the water inlet hose jointer and the water faucet
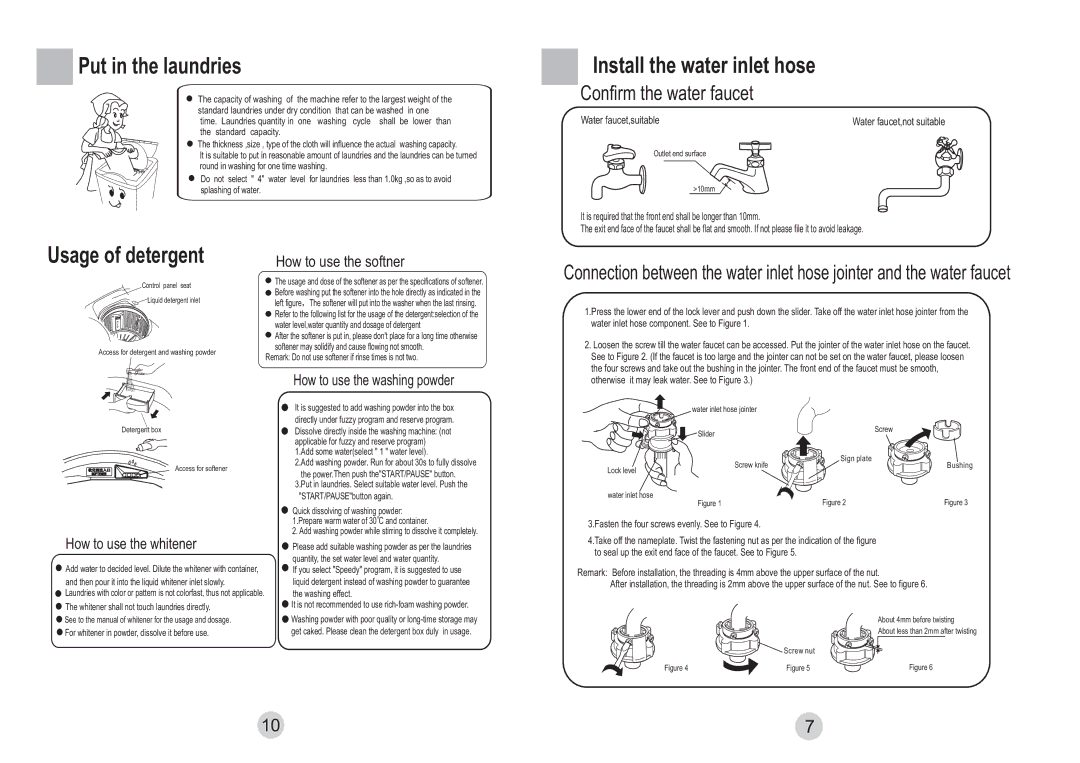
1.Press the lower end of the lock lever and push down the slider. Take off the water inlet hose jointer from the water inlet hose component. See to Figure 1.
2.Loosen the screw till the water faucet can be accessed. Put the jointer of the water inlet hose on the faucet. See to Figure 2. (If the faucet is too large and the jointer can not be set on the water faucet, please loosen the four screws and take out the bushing in the jointer. The front end of the faucet must be smooth,
otherwise it may leak water. See to Figure 3.)
Detergent box
Access for softener
It is suggested to add washing powder into the box directly under fuzzy program and reserve program.
Dissolve directly inside the washing machine: (not applicable for fuzzy and reserve program)
1.Add some water(select " 1 " water level).
2.Add washing powder. Run for about 30s to fully dissolve
the power.Then push the"START/PAUSE" button. 3.Put in laundries. Select suitable water level. Push the
"START/PAUSE"button again.
Lock level
water inlet hose
water inlet hose jointer |
|
|
Slider |
| Screw |
|
| |
Screw knife | Sign plate | Bushing |
| ||
Figure 1 | Figure 2 | Figure 3 |
Quick dissolving of washing powder: 1.Prepare warm water of 30![]() C and container.
C and container.
2. Add washing powder while stirring to dissolve it completely.
3.Fasten the four screws evenly. See to Figure 4.
How to use the whitener
Add water to decided level. Dilute the whitener with container,
and then pour it into the liquid whitener inlet slowly.
![]() Laundries with color or pattern is not colorfast, thus not applicable.
Laundries with color or pattern is not colorfast, thus not applicable. ![]() The whitener shall not touch laundries directly.
The whitener shall not touch laundries directly.
![]() See to the manual of whitener for the usage and dosage.
See to the manual of whitener for the usage and dosage.
 For whitener in powder, dissolve it before use.
Please add suitable washing powder as per the laundries quantity, the set water level and water quantity.
If you select "Speedy" program, it is suggested to use liquid detergent instead of washing powder to guarantee the washing effect.
![]() It is not recommended to use
It is not recommended to use
![]() Washing powder with poor quality or
Washing powder with poor quality or
4.Take off the nameplate. Twist the fastening nut as per the indication of the figure to seal up the exit end face of the faucet. See to Figure 5.
Remark: Before installation, the threading is 4mm above the upper surface of the nut.
After installation, the threading is 2mm above the upper surface of the nut. See to figure 6.
About 4mm before twisting
About less than 2mm after twisting
![]() Screw nut
Screw nut
Figure 4 | Figure 5 | Figure 6 |
10 | 7 |
