AVR

Set Up the AVR

6.Use the remote’s Up/Down/Left/Right and OK buttons to select “Speaker Setup.”

Speaker Setup

Automatic Setup – EzSet/EQ

Automated Speaker Setup and EQ

Manual Setup

Manually Adjust Speaker Settings

7.Select “Automatic Setup – EzSet/EQ” and then select “Continue.”

8.Select the number of speakers in your system. Select “5.1” if no surround back or front height speakers are present or if you will be using the Assigned Amp channels for multizone operation.

9.The test will begin. Make sure that the room is quiet while the test noise is playing through the speakers.

10.When the test finishes, select “Continue,” then select “View Settings” to see the results of the EzSet/EQ process, or select “Done” to exit.

NOTES:

•• If there are fewer than five main speakers in your system, do not use the EzSet/EQ process. Instead, proceed as described in Manual Speaker Setup, on page 36.

•• If you have selected a 6.1-channel configuration with a single surround back speaker, use EzSet/EQ automatic configuration for 5.1 speakers, connect the single surround back speaker to the left Assigned Amp Speaker Output connector, then configure the surround back speaker manually, as described in Manual Speaker Setup, on page 36.

Set Up Your Sources

The Setup Source menu lets you assign the correct physical audio and video connections to each source and lets you set many audio and video playback features for each source.

IMPORTANT: The “Video Input from Source,” “Audio Input from Source” and “Resolution to Display” settings are not optional and must be adjusted before you use your AVR to enable playback of each source. You can adjust the other settings later. See System Settings, on page 39, for complete information about adjusting all of the Settings menu options.

1.Review the input connections you listed on the Input Connections and Assigned Source Buttons table, on page 18. Note what changes (if any) you want to make from the default source-button connector assignments that appear on the list. (If there are no changes, you can skip this section.)

2.To display the Source Settings menu for the active source, press the Info button on the front panel or remote. Or, from the Main Menu screen, select “Setup Source” and select a source from the slide-in menu. The Settings menu for that source will appear.

Cable/Sat

Audio Effects


Video Modes:

Off


Surround Modes:

Auto Select


Audio Format from Source:

NO AUDIO INPUT

Video Input from Source:

HDMI 2

Audio Input from Source:

HDMI 2


Resolution to Display:

720p – 60Hz


Resolution from Source:

No Input


HDMI Bypass:

Off


Change Name:


Cable/Sat

Adjust Lip Sync


3.Select “Video Input From Source” and select the video input connector you want to assign to the source button. Press the OK button. (The setup menu will disappear from the TV.)

Cable/Sat

Audio Effects


HDMI 1


HDMI 2

Video Modes:


Off


HDMI 3

Surround Modes:

Auto Select


HDMI 4

Audio Format from Source:

NO AUDIO INPUT

HDMI 5

HDMI Front

Video Input from Source:

HDMI 2

Component 1

Component 2

Audio Input from Source:

HDMI 2


Composite 1


Composite 2

Resolution to Display:

720p – 60Hz


Resolution from Source:

No Input


HDMI Bypass:

Off


Change Name:


Cable/Sat


Adjust Lip Sync


4.Press the Info button. The Settings menu for the selected source will reappear.

5.Select “Audio Input from Source” and select the audio input connector you want to assign to the source button. Press the OK button.

Cable/Sat

Audio Effects


HDMI 1


HDMI 2

Video Modes:

Off


HDMI 3

Surround Modes:

Auto Select


HDMI 4

Audio Format from Source:

NO AUDIO INPUT

HDMI 5

HDMI Front

Video Input from Source:


Optical 1

Component 1


Optical 2

Audio Input from Source:

Analog 1

Coaxial 1


Coaxial 2

Resolution to Display:

720p – 60Hz


Analog 1

Resolution from Source:

No Input


HDMI Bypass:

Off


Change Name:


Cable/Sat


Adjust Lip Sync


Resolution to Display: This setting reflects the video output resolution, which is dependent upon the capabilities of your TV or video display.

•• If you connected your TV to the AVR’s HDMI Monitor Out connector, the two devices will communicate with each other, and the AVR will automatically select the best available video output resolution. In almost all cases, you should leave the resolution set to the AVR’s automatic selection. (You can override this automatic selection if your video display’s native resolution is different from the AVR’s automatic selection.)

•• If you connected your TV to the AVR’s Composite Video Monitor Out connector, you must set the resolution to “480i” (AVR 3650/AVR 2650) or to “576p” (AVR 365/AVR 265) to view any content.

Audio Effects: This submenu allows you to adjust the Dolby Volume and Dolby PLII/ IIx/IIz settings, the bass and treble tone controls, the LFE trim, the Equalization On/Off setting and the MP3 enhancement for each source independently. We suggest leaving this submenu at its default settings and returning to it later if your system requires fine- tuning. See Audio Effects Button, on page 34, for more information.

Video Modes: This submenu allows you to make picture adjustments for each source independently. We suggest leaving the settings at their factory defaults. You should make picture adjustments to your video display first and use this menu only for fine-tuning. See Video Processing, on page 34, for more information.

Surround Modes: This submenu lets you program surround modes for movies, music and games for each source independently. Digital surround signals, such as Dolby Digital and DTS bitstreams, are automatically played in their native formats, although you may change the surround mode. See Audio Processing and Surround Sound, on page 33, for more information.

Audio Format from Source: This line is informational only. When a digital program is playing, its format will be identified here. When analog audio programs are playing, this line displays ANALOG.

26

Page 26
Image 26
Harman-Kardon AVR 3650, AVR 2650 owner manual Set Up Your Sources, Speaker Setup Automatic Setup EzSet/EQ

AVR 365, AVR 265, AVR 3650, AVR 2650 specifications

The Harman-Kardon AVR 2650 and AVR 3650 are part of a distinguished line of AV receivers that combine high-performance audio and video capabilities with sophisticated technology. Designed to enhance the home entertainment experience, these models stand out for their rich feature sets and exceptional sound quality.

The AVR 2650 is a 7.1-channel receiver that delivers 95 watts per channel, providing robust audio output for both movies and music. It boasts advanced audio processing technologies, including Dolby TrueHD and DTS-HD Master Audio, ensuring that every sound detail is faithfully reproduced. The inclusion of a USB port allows users to connect and play audio files directly from compatible devices, while built-in Bluetooth connectivity offers seamless streaming from smartphones and tablets.

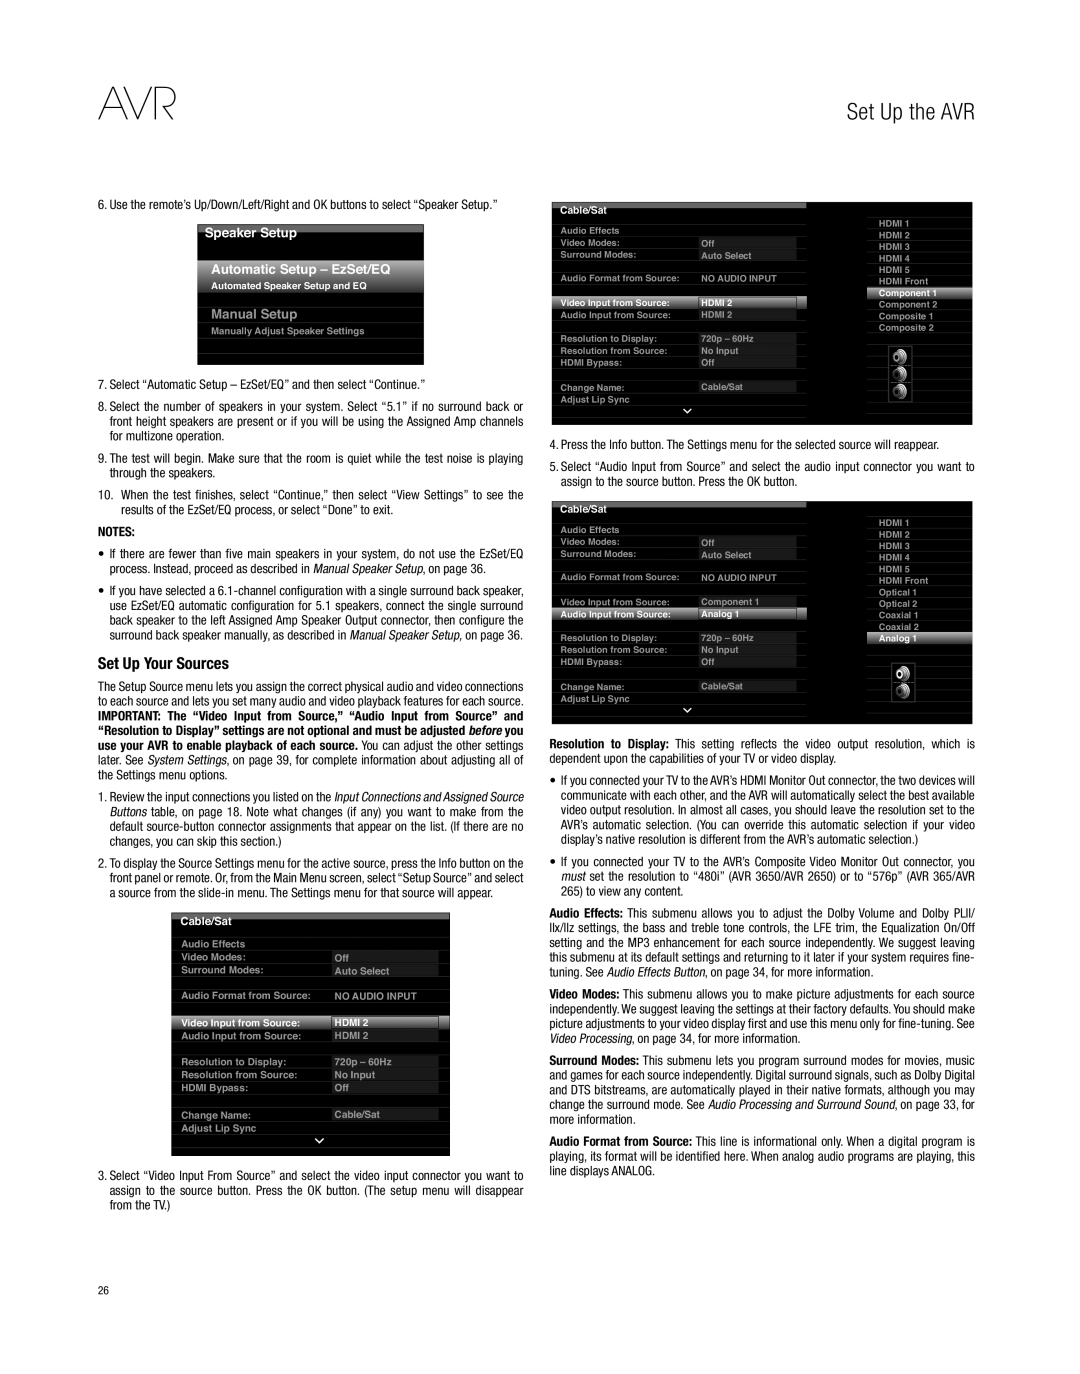
In terms of video performance, the AVR 2650 supports 4K Ultra HD content and is equipped with HDMI inputs that facilitate multiple device connections. The unique Harman Kardon EzSet/EQ feature facilitates easy setup and calibration, optimizing the audio experience based on the room's acoustics for a perfect balance.

The AVR 3650, on the other hand, offers a more advanced setup with 9.1-channel processing and a higher output wattage of 105 watts per channel. This model is designed for audiophiles who demand the utmost in sound clarity and immersive experiences. The AVR 3650 boasts additional features, such as multi-zone capability, allowing users to enjoy different audio sources in multiple rooms simultaneously.

Both models incorporate advanced surround sound technologies, providing 3D audio immersion that complements modern films. Furthermore, these receivers feature HDMI pass-through, which allows for easy switching between high-definition sources without compromising signal quality. Moreover, the AVR series supports a variety of high-definition audio formats, ensuring playback of the latest audio technologies.

The AVR 265 and AVR 365 are earlier models but share core characteristics that define Harman-Kardon's legacy in the audio market. They offer similar surround sound capabilities and are engineered to provide outstanding audio fidelity. Compatible with various streaming services, these models ensure that users have access to a broad array of entertainment options right at their fingertips.

In summary, the Harman-Kardon AVR 2650 and AVR 3650, along with the AVR 265 and AVR 365, continue the brand's tradition of blending innovative technology with user-friendly design. Whether for casual listening or a full home theater setup, these receivers deliver stunning performance, making them an ideal choice for any audio enthusiast.