SETUP AND CONNECTIONS
Connecting to a Receiver/Amplifier With a Dolby Digital or DTS Decoder
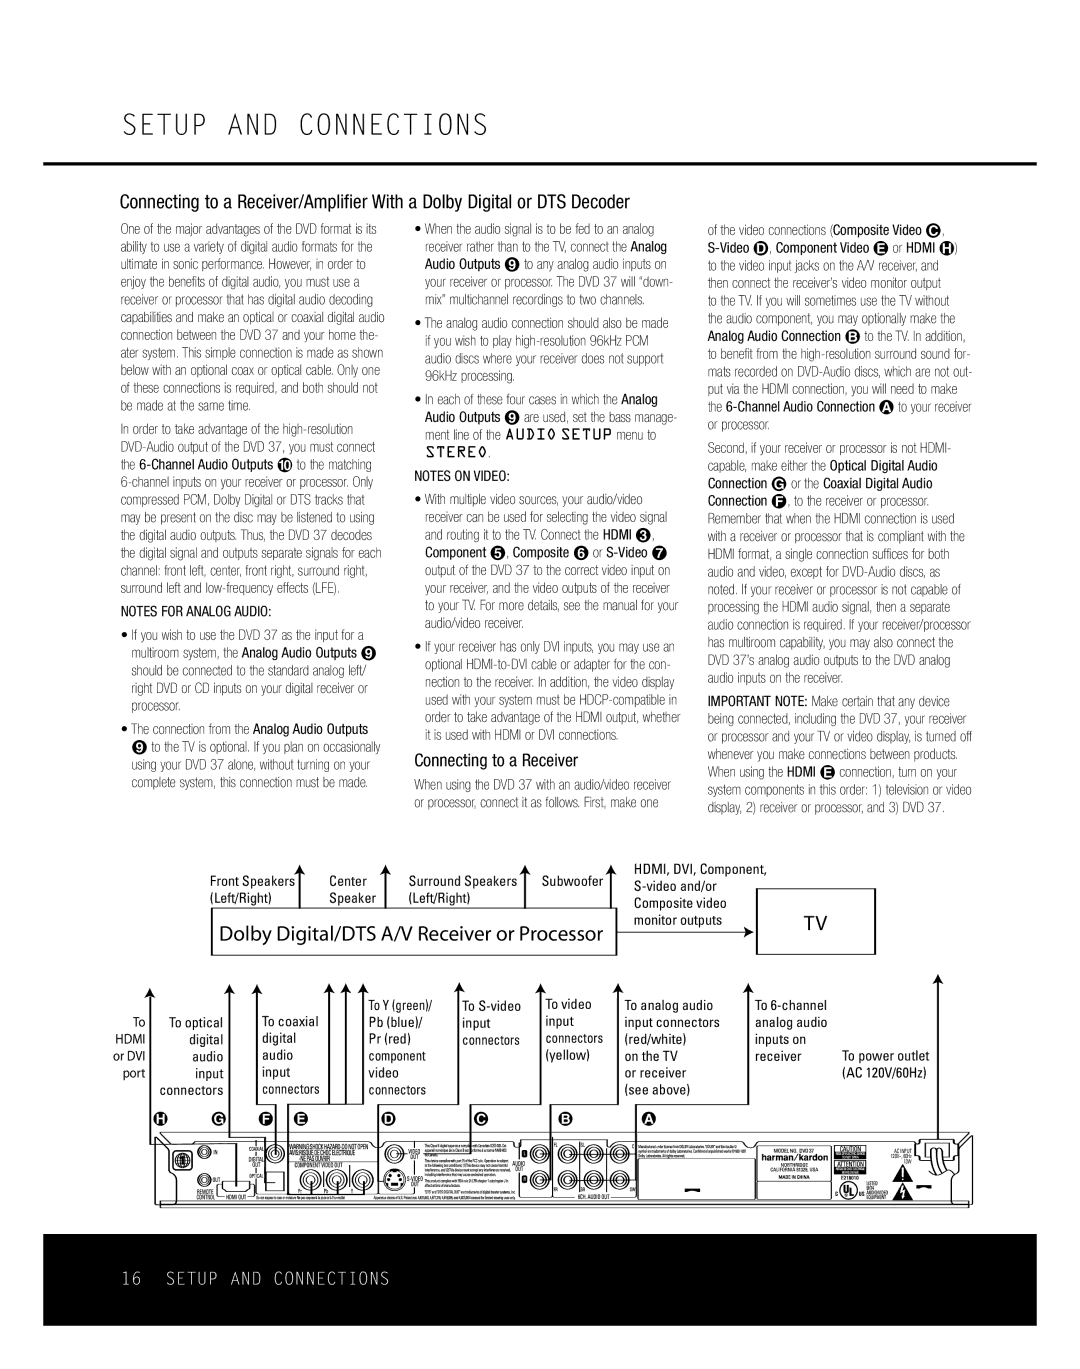
One of the major advantages of the DVD format is its ability to use a variety of digital audio formats for the ultimate in sonic performance. However, in order to enjoy the benefits of digital audio, you must use a receiver or processor that has digital audio decoding capabilities and make an optical or coaxial digital audio connection between the DVD 37 and your home the- ater system. This simple connection is made as shown below with an optional coax or optical cable. Only one of these connections is required, and both should not be made at the same time.
In order to take advantage of the
NOTES FOR ANALOG AUDIO:
•If you wish to use the DVD 37 as the input for a multiroom system, the Analog Audio Outputs ª should be connected to the standard analog left/ right DVD or CD inputs on your digital receiver or processor.
•The connection from the Analog Audio Outputs ª to the TV is optional. If you plan on occasionally using your DVD 37 alone, without turning on your complete system, this connection must be made.
•When the audio signal is to be fed to an analog receiver rather than to the TV, connect the Analog Audio Outputs ª to any analog audio inputs on your receiver or processor. The DVD 37 will “down- mix” multichannel recordings to two channels.
•The analog audio connection should also be made if you wish to play
•In each of these four cases in which the Analog Audio Outputs ª are used, set the bass manage- ment line of the AUDIO SETUP menu to
STEREO.
NOTES ON VIDEO:
•With multiple video sources, your audio/video receiver can be used for selecting the video signal and routing it to the TV. Connect the HDMI 2, Component ∞, Composite § or
•If your receiver has only DVI inputs, you may use an optional
Connecting to a Receiver
When using the DVD 37 with an audio/video receiver or processor, connect it as follows. First, make one
of the video connections (Composite Video ç,
Second, if your receiver or processor is not HDMI- capable, make either the Optical Digital Audio Connection © or the Coaxial Digital Audio Connection ƒ, to the receiver or processor. Remember that when the HDMI connection is used with a receiver or processor that is compliant with the HDMI format, a single connection suffices for both audio and video, except for
IMPORTANT NOTE: Make certain that any device being connected, including the DVD 37, your receiver or processor and your TV or video display, is turned off whenever you make connections between products. When using the HDMI é connection, turn on your system components in this order: 1) television or video display, 2) receiver or processor, and 3) DVD 37.
Front Speakers | Center | Surround Speakers | Subwoofer |
(Left/Right) | Speaker | (Left/Right) |
|
Dolby Digital/DTS A/V Receiver or Processor
HDMI, DVI, Component, |
|
| |
Composite video |
|
monitor outputs | TV |
To | To optical |
HDMI | digital |
or DVI | audio |
port | input |
| connectors |
˙©
To coaxial | To Y (green)/ |
Pb (blue)/ | |
digital | Pr (red) |
audio | component |
input | video |
connectors | connectors |
ƒ é | ∂ |
To
ç
To video | To analog audio | To |
|
input | input connectors | analog audio |
|
connectors | (red/white) | inputs on |
|
(yellow) | on the TV | receiver | To power outlet |
| or receiver |
| (AC 120V/60Hz) |
| (see above) |
|
|
∫å
AC INPUT 120V~, 60Hz 13W
16 SETUP AND CONNECTIONS