OPERAZIONI (continuazione)

Le opzioni contrassegnate da un (*) possono essere usate agendo sul pannello comandi.

Tabella 3. Operazioni base (continuazione)

Opzione


Descrizione


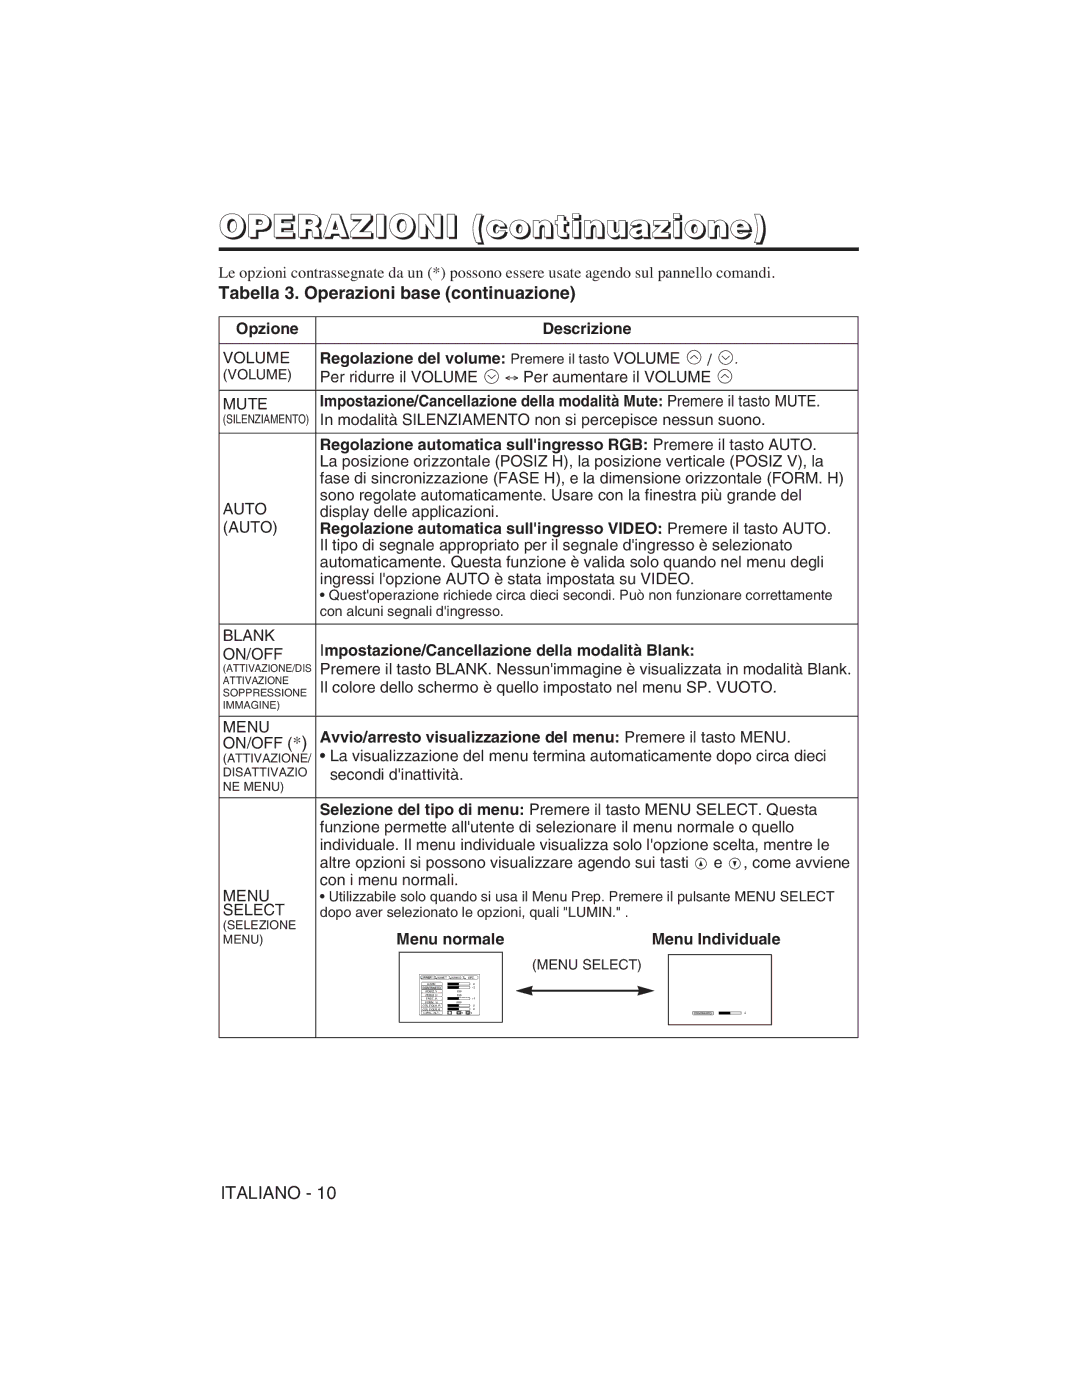
VOLUME

Regolazione del volume: Premere il tasto VOLUME

/ .


(VOLUME)

Per ridurre il VOLUME Per aumentare il VOLUME


MUTE

Impostazione/Cancellazione della modalità Mute: Premere il tasto MUTE.

(SILENZIAMENTO)

In modalità SILENZIAMENTO non si percepisce nessun suono.


Regolazione automatica sull'ingresso RGB: Premere il tasto AUTO.


La posizione orizzontale (POSIZ H), la posizione verticale (POSIZ V), la


fase di sincronizzazione (FASE H), e la dimensione orizzontale (FORM. H)

AUTO

sono regolate automaticamente. Usare con la finestra più grande del

display delle applicazioni.


(AUTO)

Regolazione automatica sull'ingresso VIDEO: Premere il tasto AUTO.


Il tipo di segnale appropriato per il segnale d'ingresso è selezionato


automaticamente. Questa funzione è valida solo quando nel menu degli


ingressi l'opzione AUTO è stata impostata su VIDEO.


• Quest'operazione richiede circa dieci secondi. Può non funzionare correttamente


con alcuni segnali d'ingresso.


BLANK

Impostazione/Cancellazione della modalità Blank:


ON/OFF


(ATTIVAZIONE/DIS

Premere il tasto BLANK. Nessun'immagine è visualizzata in modalità Blank.

ATTIVAZIONE

Il colore dello schermo è quello impostato nel menu SP. VUOTO.

SOPPRESSIONE

IMMAGINE)


MENU

Avvio/arresto visualizzazione del menu: Premere il tasto MENU.

ON/OFF (*)

(ATTIVAZIONE/

• La visualizzazione del menu termina automaticamente dopo circa dieci

DISATTIVAZIO

secondi d'inattività.


NE MENU)


Selezione del tipo di menu: Premere il tasto MENU SELECT. Questa


funzione permette all'utente di selezionare il menu normale o quello


individuale. Il menu individuale visualizza solo l'opzione scelta, mentre le


altre opzioni si possono visualizzare agendo sui tasti

e

, come avviene

MENU

con i menu normali.


• Utilizzabile solo quando si usa il Menu Prep. Premere il pulsante MENU SELECT

SELECT

dopo aver selezionato le opzioni, quali "LUMIN." .


(SELEZIONE

Menu normale

Menu Individuale

MENU)


(MENU SELECT)


PREP. IMMET IMMAG OPZ.


LUMIN.

0


CONTRASTO


-2


POSIZ V

100


POSIZ H

100


FASE H


+1


FORM. H

800


COL EQUIL R


0


COL EQUIL B


0


LARG. /ALT.


CONTRASTO

-2


ITALIANO - 10

Page 83
Image 83
Hitachi CP-X275W, CP-S225W Tabella 3. Operazioni base continuazione, Regolazione del volume Premere il tasto Volume

CP-S225W, CP-X275W specifications

The Hitachi CP-X275W and CP-S225W are advanced projectors designed to meet the varied needs of educational institutions, corporate environments, and home theaters. Both models boast impressive features and cutting-edge technologies that enhance user experience and image quality.

The CP-X275W projector is particularly noteworthy for its WXGA resolution of 1280 x 800 pixels, which enables a clear and vibrant display suitable for detailed presentations and graphics. It has a brightness level of 3,200 ANSI lumens, ensuring that images remain sharp and visible even in well-lit rooms. The contrast ratio of 2,000:1 further enhances image clarity, providing deeper blacks and more vibrant colors.

One of the most significant features of the CP-X275W is its advanced lens shift and keystone correction capabilities. These technologies allow users to adjust the image projection without distorting the picture, making installation more flexible. Moreover, the projector supports various input options, including HDMI, VGA, and USB, providing versatility for different devices and technologies.

On the other hand, the CP-S225W is tailored for more budget-conscious users while still delivering impressive performance. With a resolution of XGA at 1024 x 768 pixels and a brightness of 2,600 ANSI lumens, this model is well-equipped for classroom settings or small conference rooms. The 1,600:1 contrast ratio ensures that presentations remain clear, with defined image quality that captures audience attention.

Both projectors incorporate Hitachi’s proprietary technologies for enhanced performance. The lamps are designed with long operational life, up to 5,000 hours in eco mode, reducing maintenance costs and downtime. Additionally, they feature Hitachi’s Image Care technology, which maintains optimal image quality and energy efficiency, adjusting brightness based on the content being displayed.

Another highlight of both models is their portability, with a compact design and a weight that enables easy transport. They also include built-in speakers, eliminating the need for external audio equipment in many scenarios.

In summary, the Hitachi CP-X275W and CP-S225W projectors stand out for their robust features, image quality, and user-friendly technologies. While the CP-X275W is suited for high-demand environments requiring superior clarity and detail, the CP-S225W provides an excellent value proposition for everyday use. Both projectors cater to diverse audience needs, making them excellent choices for various applications.