INTRODUCTION
GETTING STARTED / SELECTING A PROGRAM (2 . 3T model)
TREADMILL OPERATION (3 . 3T, 5 . 3T models)
INTRODUCTION
IMPORTANT PRECAUTIONS
1) | Check to make sure nothing is on or will hinder the movement of the treadmill. |
2) | Plug in the power cord and turn the treadmill ON. |
3) | Stand on the side rails of the treadmill. |
4) | Attach the safety key clip to part of your clothing. |
5) | Insert the safety key into the safety keyhole in the console. |
6) | You have two options to start your workout: |
H
12 %
10 %
8 %
6 %
C | A | A |
12 |
|
|
11 |
| T I M E |
10 |
|
|
9 |
|
|
8 |
|
|
7 |
|
|
6 |
|
|
5 |
|
|
4 |
|
|
3 |
| I N C L I N E |
2 |
| |
1 |
| HEART RATE |
|
|
B
A A D
| 12 |
D I S TA N C E | 11 |
| 10 |
| 9 |
| 8 |
| 7 |
| 6 |
| 5 |
| 4 |
SPEED | 3 |
2 | |
CALORIES | 1 |
J
12 MPH
10 MPH
8 MPH
6 MPH
IMPORTANT PRECAUTIONS
ASSEMBLY
BEFORE YOU BEGIN
A) quick start up
Simply press the start key to begin working out. OR...
B) SELECT A PROgram
Select a Program using the QUICK PROGRAM KEYS keys. Once a program has been chosen, press enter.
SELECT A LEVEL
Select a program level using the arrow keys.
4 %
2 % | P1: MANUAL | P2: INTERVALS | P3: MTN CLIMB | P4: WEIGHT LOSS | P5: PEAK INTERVALS | P6: GOLF COURSE |
|
|
|
|
|
| |
N | P7: PACER | P8: THR ZONE |
|
| P9: CUSTOM 1 | P10: CUSTOM 2 |
+1% | PRESS TO |
|
|
|
| PRESS TO |
| CONFIRM |
| B A C K | E N T E R |
| CONFIRM |
| INCLINE |
|
|
|
| SPEED |
|
| S T A R T | C H A N G E D I S P L A Y | S T O P |
| |
|
| QUICK START |
|
| HOLD TO RESET |
|
LI F G E K
4 MPH
2 MPH
+1 MPH
M
ASSEMBLY
BEFORE YOU BEGIN
TREADMILL
OPERATION
CONDITIONING TROUBLESHOOTING LIMITED
GUIDELINES & MAINTENANCE WARRANTY
16
Once a program level has been chosen, press enter.
SELECT A TIME
Select a Time using the arrow keys or use the default time.
Once a time has been chosen, press Start.
finishing YOUR WORKOUT
When your workout is complete, you will hear a series of beeps. Your workout information will be displayed for 30 seconds and then reset.
CLEAR CURRENT SELECTION
To clear the current program selection or screen, hold the Stop button for
SCAN VIEWING SCREENS (2.3T ONLY)
To have the display screen rotate continuously (Speed and Time, Pulse and Distance, Incline and Calories), hold the ENTER button for
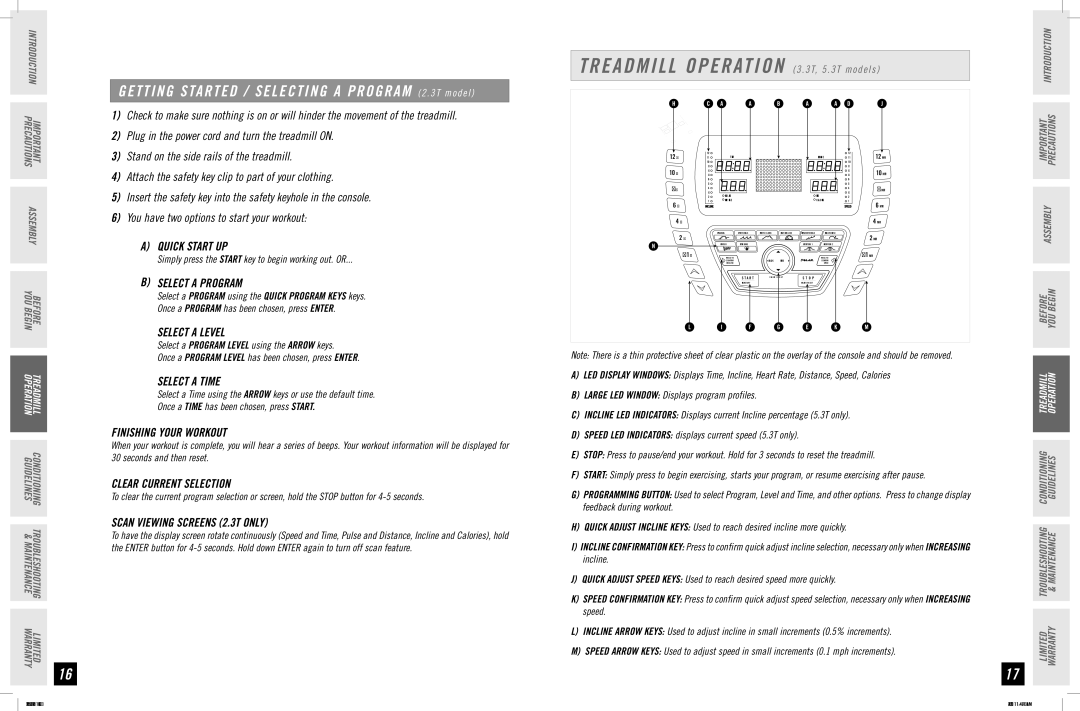
Note: There is a thin protective sheet of clear plastic on the overlay of the console and should be removed.
A)led Display WINDOWS: Displays Time, Incline, Heart Rate, Distance, Speed, Calories
B)large LED WINDOW: Displays program profiles.
C)INCLINE led INDICATORS: Displays current Incline percentage (5.3T only).
d)speed led indicators: displays current speed (5.3T only).
e)Stop: Press to pause/end your workout. Hold for 3 seconds to reset the treadmill.
f)Start: Simply press to begin exercising, starts your program, or resume exercising after pause.
g)programming button: Used to select Program, Level and Time, and other options. Press to change display feedback during workout.
h)QUICK ADJUST Incline Keys: Used to reach desired incline more quickly.
I)incline confirmation key: Press to confirm quick adjust incline selection, necessary only when INCREASING incline.
J)QUICK ADJUST speed Keys: Used to reach desired speed more quickly.
k)speed confirmation key: Press to confirm quick adjust speed selection, necessary only when INCREASING speed.
l)Incline ARROW Keys: Used to adjust incline in small increments (0.5% increments).
m)Speed ARROW Keys: Used to adjust speed in small increments (0.1 mph increments).
17
TREADMILL OPERATION
LIMITED TROUBLESHOOTING CONDITIONING WARRANTY & MAINTENANCE GUIDELINES
7/17/06 11:43:18 AM |