INTRODUCTION IMPORTANT
PRECAUTIONS
ASSEMBLY
BEFORE
YOU BEGIN
BIKE
OPERATION
CONDITIONING TROUBLESHOOTING LIMITED
GUIDELINES & MAINTENANCE WARRANTY
14
BIKE OPERATION
POWER
Your bike is powered by a power supply. The power must be plugged into the power jack, which is located in the front of the bike near the STABILIZER TUBE.
Do not operate the bike if the power cord or plug is damaged.
If the bike appears to not be working properly, do not use the bike.
MOVING
Your bike has a pair of transport wheels built into the FRONT STABILIZER TUBE. To move, first remove the power supply and firmly grasp the handle on the rear stabilizer tube, carefully tilt and roll.
Our bikes are well built and heavy, weighing up to 200 lbs! Use care and additional help if necessary when moving.
ADJUSTING THE SEAT
To adjust the seat turn the handle up into its middle position making the handle feel loose. Then, slide the seat to a position that puts you in a comfortable pedaling range (one that keeps a slight bend in your knee while your legs are in the extended position). Lock the mechanism by rotating it down until handle tightens.
NOTE: It is recommended that you do not sit on the seat while adjusting its position.
B600 CONSOLE DISPLAY
P
|
|
|
|
|
|
|
|
|
|
|
|
|
|
|
|
|
|
|
|
| N |
O |
|
|
|
|
|
|
|
|
|
|
|
|
|
|
|
|
|
|
|
| O |
|
|
|
|
|
|
|
|
|
|
|
|
|
|
|
|
|
|
|
|
| A |
B | R E S I S T A N C E |
|
|
|
|
|
|
|
|
|
|
|
|
|
|
| R E S I S T A N C E |
| |||
8 | PERFOR M A N | CE |
|
|
|
|
|
|
|
|
|
|
| T | R A C K I N G | 16 |
| ||||
|
|
|
|
|
|
| P R E S S T O S W I T C H |
|
|
| |||||||||||
|
|
|
|
|
|
|
|
|
|
|
|
|
|
|
|
| |||||
|
|
|
| TIME |
|
|
|
|
|
|
|
|
|
|
| DISTANCE |
|
| |||
| 7 |
|
|
|
|
|
|
|
|
|
|
|
|
|
|
|
|
|
| 15 |
|
| 6 |
| CLOCK |
|
|
|
|
|
|
|
|
|
|
| DATE |
| 14 |
| |||
|
|
|
|
|
|
|
|
|
|
|
|
|
|
|
|
| |||||
|
|
|
|
| SPEED |
|
| CALORIES |
|
| RPM |
|
|
| C | ||||||
| 5 |
|
|
|
|
|
|
|
|
|
|
|
|
|
|
|
|
|
| 13 | |
|
|
|
|
|
|
|
|
|
|
|
|
|
|
|
|
|
|
|
| ||
J | 4 |
|
|
| PACE |
|
| HEART RATE | WATTS |
|
| 12 | J | ||||||||
| GETTING STARTED |
|
|
|
|
|
|
|
|
|
|
|
|
|
|
| |||||
|
|
|
|
|
|
|
|
|
|
|
|
|
|
|
|
|
| ||||
| 3 | SELECT A USER OR |
|
| SELECT A WORKOUT, PRESS ENTER |
|
| ADJUST WORKOUT | BEGIN WORKOUT | 11 | H | ||||||||||
|
| PRESS ENTER TO SKIP |
|
|
|
|
|
|
|
|
|
|
| SETTINGS |
|
|
| ||||
F |
| U S E R | U S E R |
|
| WEIGHT | CARDIO | POWER | ENERGY |
|
|
| PRESS TO |
|
| ||||||
|
| MANUAL |
| LOSS |
| STRIDE |
| STRIDE |
|
|
|
|
| ||||||||
| 2 | 1 | 2 |
|
| WORKOUTS | WORKOUTS | WORKOUTS | ZONES |
|
|
| BEGIN | 10 |
| ||||||
|
|
|
|
| P1 | P2 | P3 | P4 | P5 | P6 | P7 | P8 | P9 | P10 | P11 |
|
|
|
|
|
|
|
| E N T E R |
| TEMPO 1 | TEMPO 2 | TARGET |
| MY |
| MY |
| E N T E R |
|
|
|
| |||||
| 1 |
|
| HR |
| WORKOUT 1 | WORKOUT 2 |
|
| Heart Rate Receiver | 9 | I | |||||||||
|
|
|
| P12 |
| P13 |
|
| P14 |
|
| P15 |
| P16 |
|
|
| ||||
|
|
|
|
|
|
|
|
|
|
|
|
|
|
|
|
| |||||
|
|
|
|
|
|
|
|
|
|
|
|
|
|
|
|
|
|
|
|
| G |
|
|
|
|
|
|
|
|
|
|
|
|
|
|
|
|
|
|
|
|
| R |
L |
|
| CHANGE |
|
|
|
|
|
|
|
|
|
|
|
|
|
|
| SHOW |
| M |
|
|
|
|
|
|
|
|
|
|
|
|
|
|
|
|
| CLOCK/ |
| |||
|
| DISPLAY |
|
|
|
|
|
|
|
|
|
|
|
|
|
|
|
| |||
|
|
|
|
|
|
|
|
|
|
|
|
|
|
|
|
|
|
| DATE |
|
|
|
|
|
|
|
|
|
|
|
|
| iPod® Controls |
|
|
|
|
|
| ||||
|
| K |
|
|
|
|
| D |
|
| Q |
| E |
|
| K |
|
| |||
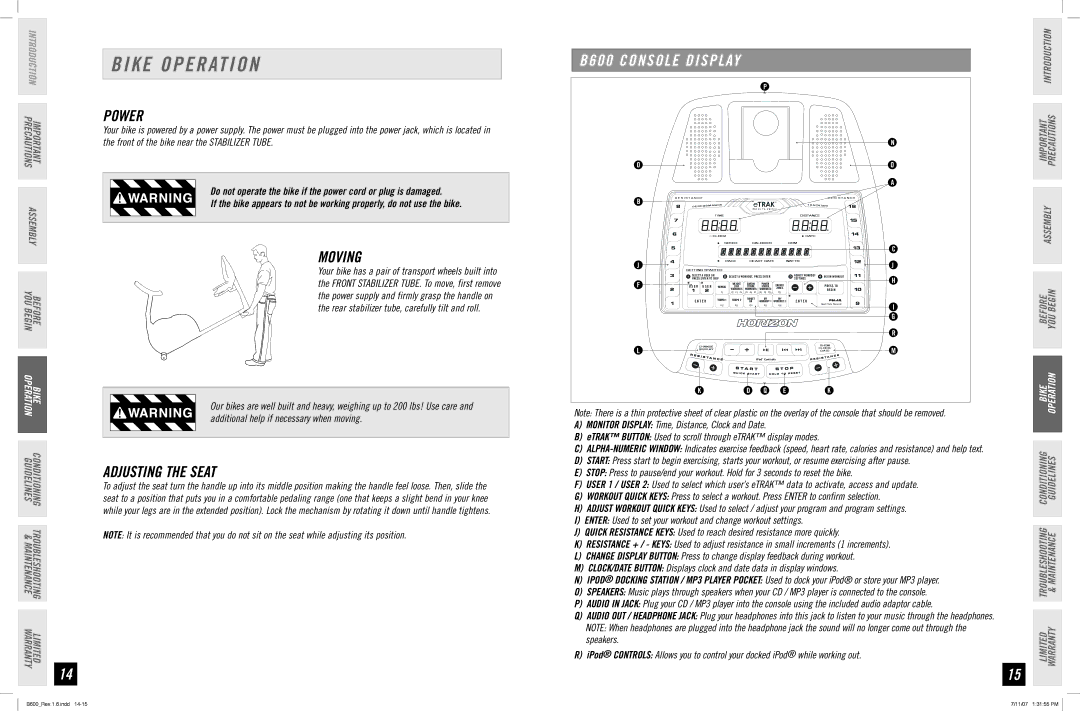
Note: There is a thin protective sheet of clear plastic on the overlay of the console that should be removed.
A)Monitor Display: Time, Distance, Clock and Date.
B)eTRak™ button: Used to scroll through eTRAK™ display modes.
C)
D)Start: Press start to begin exercising, starts your workout, or resume exercising after pause.
E)Stop: Press to pause/end your workout. Hold for 3 seconds to reset the bike.
F)user 1 / user 2: Used to select which user’s eTRAK™ data to activate, access and update.
G)WORKOUT QUICK keys: Press to select a workout. Press ENTER to confirm selection.
H)ADJUST WORKOUT QUICK keys: Used to select / adjust your program and program settings.
I)ENTER: Used to set your workout and change workout settings.
J)QUICK RESISTANCE keys: Used to reach desired resistance more quickly.
K)RESISTANCE + / - keys: Used to adjust resistance in small increments (1 increments).
L)Change display button: Press to change display feedback during workout.
M)Clock/Date button: Displays clock and date data in display windows.
N)iPOD® Docking station / MP3 PLAYER POCKET: Used to dock your iPod® or store your MP3 player.
O)SPEAKERS: Music plays through speakers when your CD / MP3 player is connected to the console.
P)AUDIO IN JACK: Plug your CD / MP3 player into the console using the included audio adaptor cable.
Q)AUDIO OUT / HEADPHONE JACK: Plug your headphones into this jack to listen to your music through the headphones.
NOTE: When headphones are plugged into the headphone jack the sound will no longer come out through the speakers.
R)ipod® CONTROls: Allows you to control your docked iPod® while working out.
15
IMPORTANT PRECAUTIONS INTRODUCTION
ASSEMBLY
BEFORE YOU BEGIN
BIKE OPERATION
LIMITED TROUBLESHOOTING CONDITIONING WARRANTY & MAINTENANCE GUIDELINES
B600_Rev.1.6.indd | 7/11/07 1:31:55 PM |