INTRODUCTION
C U S T O M S T R I D E ™ ADJUSTMENT
CONSOLE DISPLAY
INTRODUCTION
IMPORTANT PRECAUTIONS
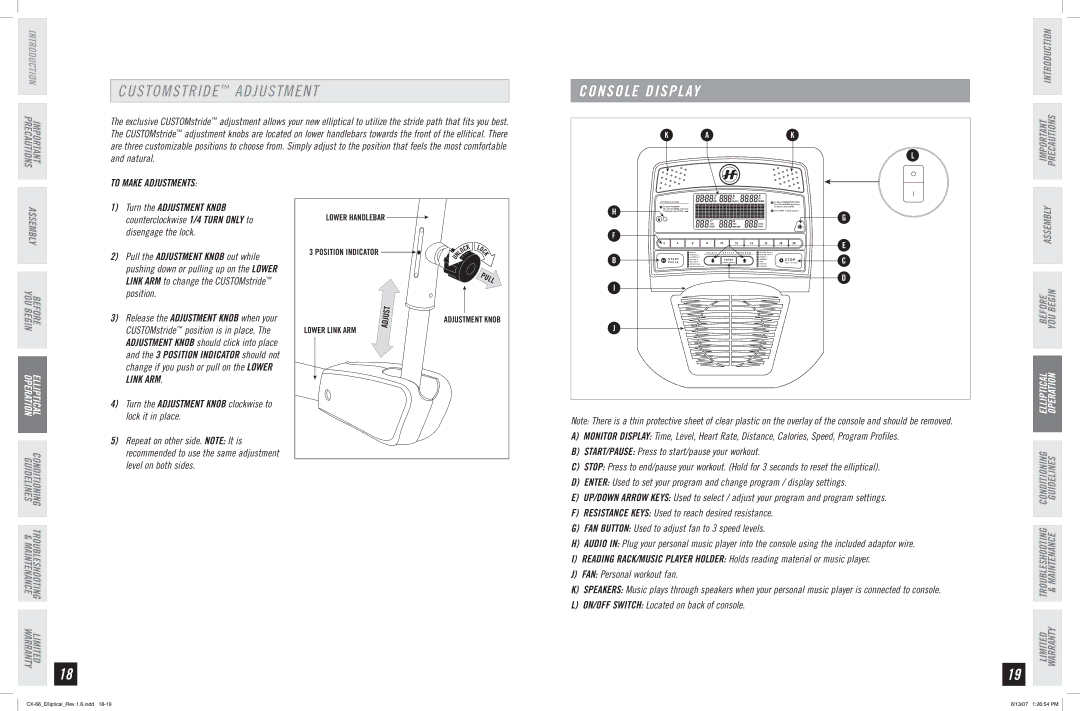
The exclusive CUSTOMstride™ adjustment allows your new elliptical to utilize the stride path that fits you best. The CUSTOMstride™ adjustment knobs are located on lower handlebars towards the front of the ellitical. There are three customizable positions to choose from. Simply adjust to the position that feels the most comfortable and natural.
K A
K
L
IMPORTANT PRECAUTIONS
ASSEMBLY
TO MAKE ADJUSTMENTS:
1) Turn the ADJUSTMENT KNOB |
counterclockwise 1/4 TURN ONLY to |
disengage the lock. |
LOWER HANDLEBAR ![]()
| I N S T R U C T I O N S |
|
| CALORIES |
| |
H | 1 To Select PROGRAM |
|
|
|
| |
| Use: UP and DOWN Arrow Keys. |
|
|
|
| |
| To Advance press ENTER. |
|
|
|
| |
|
|
|
|
| ||
|
|
|
|
|
|
|
|
|
|
|
|
|
|
|
|
|
|
|
|
|
|
|
|
|
|
|
|
|
|
|
| SET |
|
|
|
|
|
| LEVEL | PACE | WATTS |
|
|
|
| INCLINE |
| SPEED |
FL E V E L
2To Adjust PROGRAM SETTINGS Use: UP and DOWN Arrow Keys. To Advance press ENTER.
3Press START to begin program.
G
ASSEMBLY
YOU
2) Pull the ADJUSTMENT KNOB out while |
pushing down or pulling up on the LOWER |
LINK ARM to change the CUSTOMstride™ |
position. |
3 POSITION INDICATOR ![]()
![]()
|
| K |
| C | |
| O |
|
| L |
|
N |
| |
U |
|
|
LO C K
PULL
2 | 4 |
| 6 |
| 8 | 10 | 12 | 14 |
| 16 | 18 | 20 | ||
|
|
|
| 1 | MANUAL | S E L E C T | / A D J U S T | P R O G R A M | 8 | REVERSE TRAIN 1 |
|
| ||
|
|
|
| 2 | INTERVALS 1 |
|
|
|
|
| 9 | REVERSE TRAIN 2 |
|
|
|
|
| S T A R T | 3 | INTERVALS 2 |
|
|
|
| 10 | RANDOM 1 |
| S T O P | |
|
|
| 4 | ROLLING 1 |
| ENTER |
|
| 11 | RANDOM 2 |
| |||
B | P A U S E | 5 | ROLLING 2 |
| CHANGE DISPLAY |
|
| 12 | RACE |
| H O L D T O R E S E T | |||
6 | WEIGHT LOSS |
|
|
| 13 | CUSTOM 1 |
| |||||||
|
|
|
| 7 | WEIGHT LOSS PLUS |
|
|
|
| 14 | CUSTOM 2 |
|
| |
I
E
C D
BEGIN
BEFORE
BEGIN
ELLIPTICAL
OPERATION
CONDITIONING TROUBLESHOOTING LIMITED
GUIDELINES & MAINTENANCE WARRANTY
18
3) | Release the ADJUSTMENT KNOB when your |
| CUSTOMstride™ position is in place. The |
| ADJUSTMENT KNOB should click into place |
| and the 3 POSITION INDICATOR should not |
| change if you push or pull on the LOWER |
| LINK ARM. |
4) | Turn the ADJUSTMENT KNOB clockwise to |
| lock it in place. |
5) | Repeat on other side. NOTE: It is |
| recommended to use the same adjustment |
| level on both sides. |
| ADJUST | ADJUSTMENT KNOB |
|
| |
LOWER LINK ARM |
|
|
J
Note: There is a thin protective sheet of clear plastic on the overlay of the console and should be removed.
A)Monitor Display: Time, Level, Heart Rate, Distance, Calories, Speed, Program Profiles.
B)START/PAUSE: Press to start/pause your workout.
C)STOP: Press to end/pause your workout. (Hold for 3 seconds to reset the elliptical).
D)ENTER: Used to set your program and change program / display settings.
E)up/down ARROW KEYS: Used to select / adjust your program and program settings.
F)RESISTANCE Keys: Used to reach desired resistance.
G)FAN BUTTON: Used to adjust fan to 3 speed levels.
H)AUDIO IN: Plug your personal music player into the console using the included adaptor wire.
I)Reading Rack/MUSIC PLAYER HOLDER: Holds reading material or music player.
J)Fan: Personal workout fan.
K)SPEAKERS: Music plays through speakers when your personal music player is connected to console.
L)ON/OFF Switch: Located on back of console.
19
BEFORE YOU
ELLIPTICAL OPERATION
LIMITED TROUBLESHOOTING CONDITIONING WARRANTY & MAINTENANCE GUIDELINES
6/13/07 1:26:54 PM |
