CLOCK AND TIMER

(on some models)

To Set the Clock

CLOCK

TIMER

ON/OFF

(Appearance may vary)

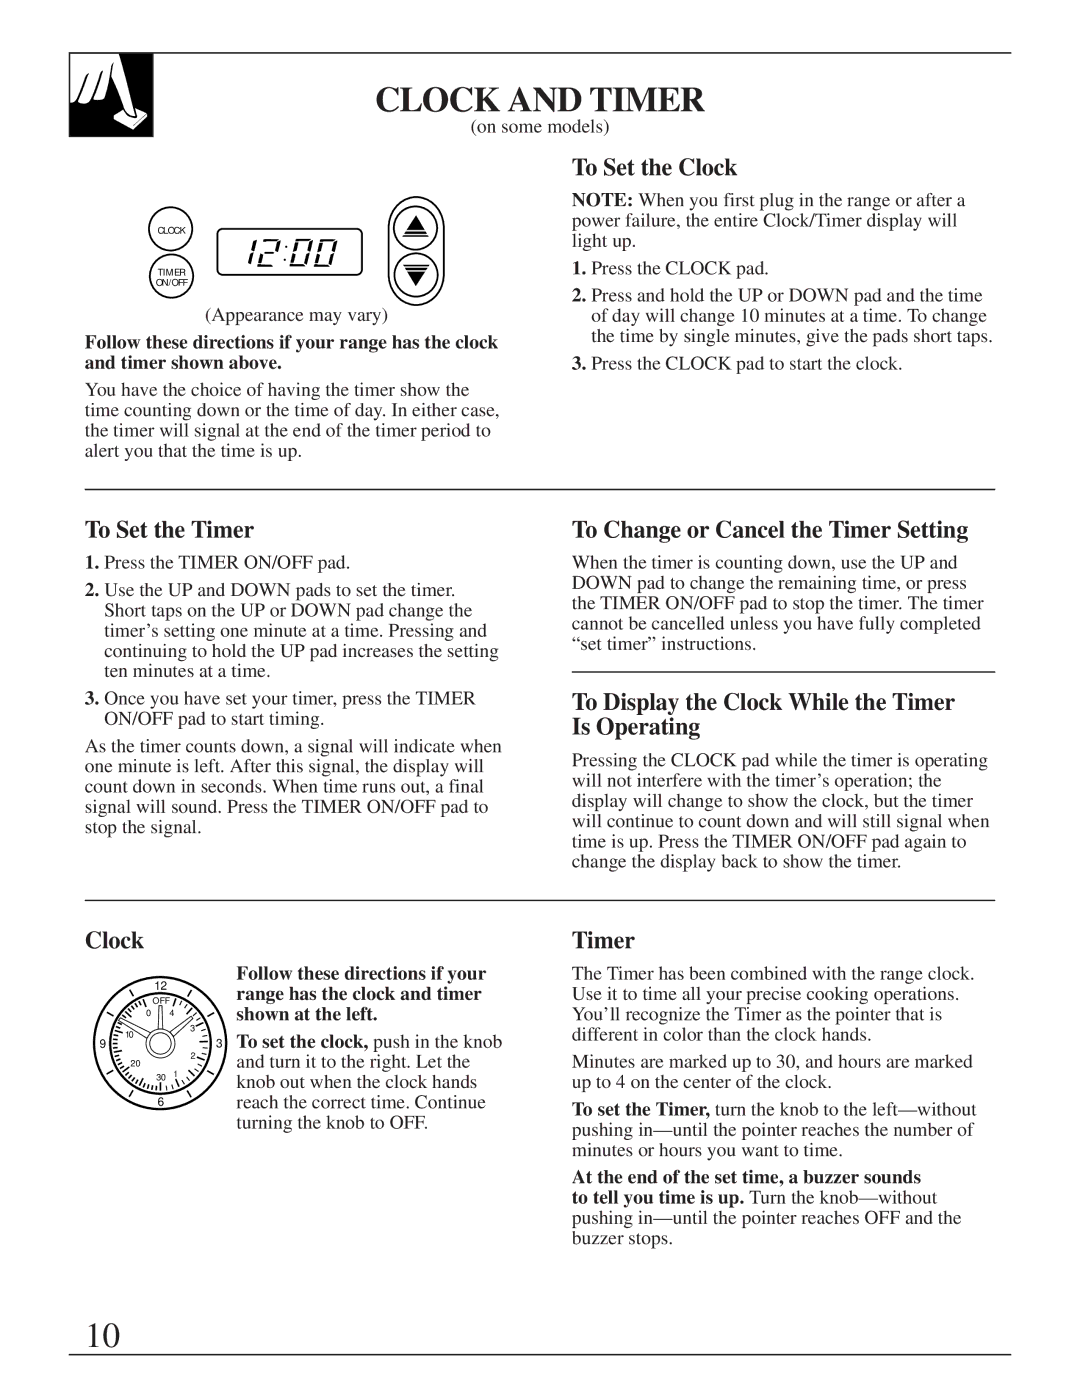
Follow these directions if your range has the clock and timer shown above.

You have the choice of having the timer show the time counting down or the time of day. In either case, the timer will signal at the end of the timer period to alert you that the time is up.

NOTE: When you first plug in the range or after a power failure, the entire Clock/Timer display will light up.

1.Press the CLOCK pad.

2.Press and hold the UP or DOWN pad and the time of day will change 10 minutes at a time. To change the time by single minutes, give the pads short taps.

3.Press the CLOCK pad to start the clock.

To Set the Timer

To Change or Cancel the Timer Setting

1.Press the TIMER ON/OFF pad.

2.Use the UP and DOWN pads to set the timer. Short taps on the UP or DOWN pad change the timer’s setting one minute at a time. Pressing and continuing to hold the UP pad increases the setting ten minutes at a time.

When the timer is counting down, use the UP and DOWN pad to change the remaining time, or press the TIMER ON/OFF pad to stop the timer. The timer cannot be cancelled unless you have fully completed “set timer” instructions.

3.Once you have set your timer, press the TIMER ON/OFF pad to start timing.

As the timer counts down, a signal will indicate when one minute is left. After this signal, the display will count down in seconds. When time runs out, a final signal will sound. Press the TIMER ON/OFF pad to stop the signal.

To Display the Clock While the Timer Is Operating

Pressing the CLOCK pad while the timer is operating will not interfere with the timer’s operation; the display will change to show the clock, but the timer will continue to count down and will still signal when time is up. Press the TIMER ON/OFF pad again to change the display back to show the timer.

Clock

12

OFF

0 4

Follow these directions if your range has the clock and timer shown at the left.

Timer

The Timer has been combined with the range clock. Use it to time all your precise cooking operations. You’ll recognize the Timer as the pointer that is

10

3

different in color than the clock hands.

9

20

2

Minutes are marked up to 30, and hours are marked

30 1

6

3 To set the clock, push in the knob

and turn it to the right. Let the

knob out when the clock hands

reach the correct time. Continue

turning the knob to OFF.

up to 4 on the center of the clock.

To set the Timer, turn the knob to the left—without pushing in—until the pointer reaches the number of minutes or hours you want to time.

At the end of the set time, a buzzer sounds to tell you time is up. Turn the knob—without pushing in—until the pointer reaches OFF and the buzzer stops.

10

Page 10
Image 10
Hotpoint RGB501, RGB628, RGB535, RGB533, RGB532, RGB530, RGB525, RGB526, RGB524, RGB508, RGB528 Clock and Timer

RGB501, RGB528, RGB508, RGB524, RGB526 specifications

Hotpoint, a brand known for its innovative kitchen appliances, has recently introduced several new gas range models: the RGB628, RGB535, RGB533, RGB532, and RGB530. These ranges combine functionality with contemporary design, making them an ideal addition to any home.

The Hotpoint RGB628 features a spacious cooking surface with five burners, allowing for versatile meal preparation. It incorporates a powerful 17,000 BTU burner, ideal for boiling water rapidly or searing meats. Additionally, the range comes equipped with a large oven capacity, suitable for baking multiple dishes simultaneously. Its built-in broiler provides high-temperature cooking, ensuring perfectly browned meats and casseroles.

The RGB535 model is designed with energy efficiency in mind. It features an advanced ignition system that provides a reliable spark for consistent ignition of the burners. This model also offers a self-cleaning oven option, making maintenance simpler for busy families. It has a sleek stainless steel finish that not only enhances its aesthetic appeal but also ensures durability and ease of cleaning.

Moving to the RGB533, this model emphasizes user convenience with its easy slide-out shelves that allow for smooth loading and unloading of your dishes. It also has an optional convection cooking feature that enhances the cooking experience by promoting even heat distribution for perfectly baked goods. The RGB533 also includes a built-in temperature probe that ensures precise cooking, taking the guesswork out of your culinary creations.

The RGB532 stands out for its compact design, ideal for smaller kitchens without sacrificing functionality. Despite its size, it boasts a full-width oven that accommodates various cooking needs. The model also features a continuous grates design, enabling easier movement of pots and pans across the burners.

Lastly, the RGB530 is a budget-friendly choice that doesn’t compromise on quality. It comes with basic yet essential features, making it great for first-time home chefs. With its four burners and a spacious oven, it allows users to prepare a variety of dishes efficiently.

All these Hotpoint models come equipped with safety features such as a flame failure device, ensuring peace of mind while cooking. With their variety of options, advanced features, and user-friendly designs, the RGB628, RGB535, RGB533, RGB532, and RGB530 are remarkable additions to the cooking landscape, catering to diverse culinary needs and preferences. Whether you are an experienced chef or just starting out, Hotpoint delivers versatility, efficiency, and quality in each of these gas ranges.