Maintenance & Service Guide
Maintenance & Service Guide
Iii
About This Book
Iv About This Book
Table of contents
Serial ATA Sata Drive Guidelines and Features
Troubleshooting Without Diagnostics 122
Backup and Recovery 165
Models 194 195
Country-specific requirements 193
Page
Overview
Product Features
Page
Component
Front components
1Front components
2Side components
Side components
3Rear components
Rear components
6Adjusting swivel Product Features
Adjusting the tilt/swivel base
Height adjustable/recline stand optional
To install the height adjustable stand
Activating the Windows operating system
Activating and Customizing the Software
Activating and customizing the software in Windows
Customizing the monitor display
Downloading Windows 7 updates
Installing or upgrading device drivers
Click Settings Change PC Settings
Downloading Windows 8 updates
Computer Setup F10 Utilities
Computer Setup F10 Utility
Using Computer Setup F10 Utilities
1Computer Setup-File
Computer Setup-File
Computer Setup F10 Utility
2Computer Setup-Storage
Computer Setup-Storage
Max eSATA Speed
Removable Media Boot
Storage Options ESATA Port
Sata Emulation
DPS Self-Test
Boot Order
Shortcut to Temporarily Override Boot Order
3Computer Setup-Security
Computer Setup-Security
Slot Security
Network Boot
Device Security
USB Security
Security
Virtualization Technology Directed I/O
System Security
DriveLock Security
Secure Boot
Management
Computer Setup-Power
4Computer Setup-Power
Option Description OS Power
Thermal
Hardware Power
Option Heading Power-On Options
Computer Setup-Advanced
5Computer Setup-Advanced for advanced users
Device Options
Bios Power-On
Onboard Devices
Bus Options
AMT Configuration
Recovering the Configuration Settings
VGA Configuration
How to access and run HP PC Hardware Diagnostics Uefi
HP PC Hardware Diagnostics
Why run HP PC Hardware Diagnostics Uefi
Downloading HP PC Hardware Diagnostics to a USB device
Sata Hard Drive Cables
Serial ATA Sata Drive Guidelines and Features
Serial ATA Hard Drive Characteristics
Sata Hard Drives
Smart ATA Drives
Routine Care and Disassembly Preparation
Relative Humidity Event 55% 40% 10%
Electrostatic discharge information
Generating static
Preventing electrostatic damage to equipment
Method Voltage
Personal grounding methods and equipment
Grounding the work area
Static Shielding Protection Levels
Recommended materials and equipment
Operating Guidelines
Routine Care
General cleaning safety precautions
Cleaning the computer case
Cleaning the keyboard
Cleaning the mouse
Service Considerations
Cleaning the display
Hard drives
Cables and connectors
Tools and software requirements
Screws
Lithium coin cell battery
Preparing to disassemble the computer
Removal and Replacement Procedures All-in One AIO Chassis
Device Security System Audio
Solving Audio Problems
6Solving Audio Problems
Sound cuts in and out Cause Solution
Control Panel, and then select Device Manager
142 Troubleshooting Without Diagnostics
Line-in jack is not functioning properly Cause Solution
Control Panel , and then select Device Manager
Solving Printer Problems
7Solving Printer Problems
Printer will not print Cause Solution
144 Troubleshooting Without Diagnostics
Printer will not turn on Cause Solution
Printer prints garbled information Cause Solution
8Solving Keyboard Problems
Solving Keyboard and Mouse Problems
Solving Keyboard and Mouse Problems 145
9Solving Mouse Problems
146 Troubleshooting Without Diagnostics
Security USB Security
Solving Hardware Installation Problems
Solving Hardware Installation Problems 147
10Solving Hardware Installation Problems
Computer will not start Cause Solution
148 Troubleshooting Without Diagnostics
Wake-on-LAN feature is not functioning Cause Solution
Solving Network Problems
11Solving Network Problems
150 Troubleshooting Without Diagnostics
Manager
Network status link light never flashes Cause Solution
Diagnostics reports a failure Cause Solution
152 Troubleshooting Without Diagnostics
New network card will not boot Cause Solution
Solving Memory Problems
Memory count during Post is wrong Cause Solution
154 Troubleshooting Without Diagnostics
12Solving Memory Problems
Out of memory error Cause Solution
Cause Solution
Solving Processor Problems
13Solving Processor Problems
Poor performance is experienced Cause Solution
Security Network Boot
Solving CD-ROM and DVD Problems
156 Troubleshooting Without Diagnostics
14Solving CD-ROM and DVD Problems
Cannot eject compact disc tray-load unit Cause Solution
Movie will not play in the DVD drive Cause Solution
USB flash drive not found identified Cause Solution
Solving USB Flash Drive Problems
158 Troubleshooting Without Diagnostics
15Solving USB Flash Drive Problems
Solving USB Flash Drive Problems
Unable to connect to the Internet Cause Solution
Solving Front Panel Component Problems
Solving Internet Access Problems
160 Troubleshooting Without Diagnostics
Click Internet Options
Solving Internet Access Problems 161
Select Start Control Panel
162 Troubleshooting Without Diagnostics
Solving Software Problems
Verify that the software is certified by Microsoft for your
Contacting Customer Support
System Restore
Backup and Recovery
Restoring and recovering in Windows
Backup and Recovery
System Recovery
System Recovery when Windows is not responding
Creating recovery media
Page
Using recovery media
Backing up your information
Backup and recovery in Windows
Using the Windows recovery tools
Performing a system recovery
Follow the on-screen instructions
Using f11 recovery tools
Page
Post Error Messages
Control panel message Description Recommended action
Post Error Messages
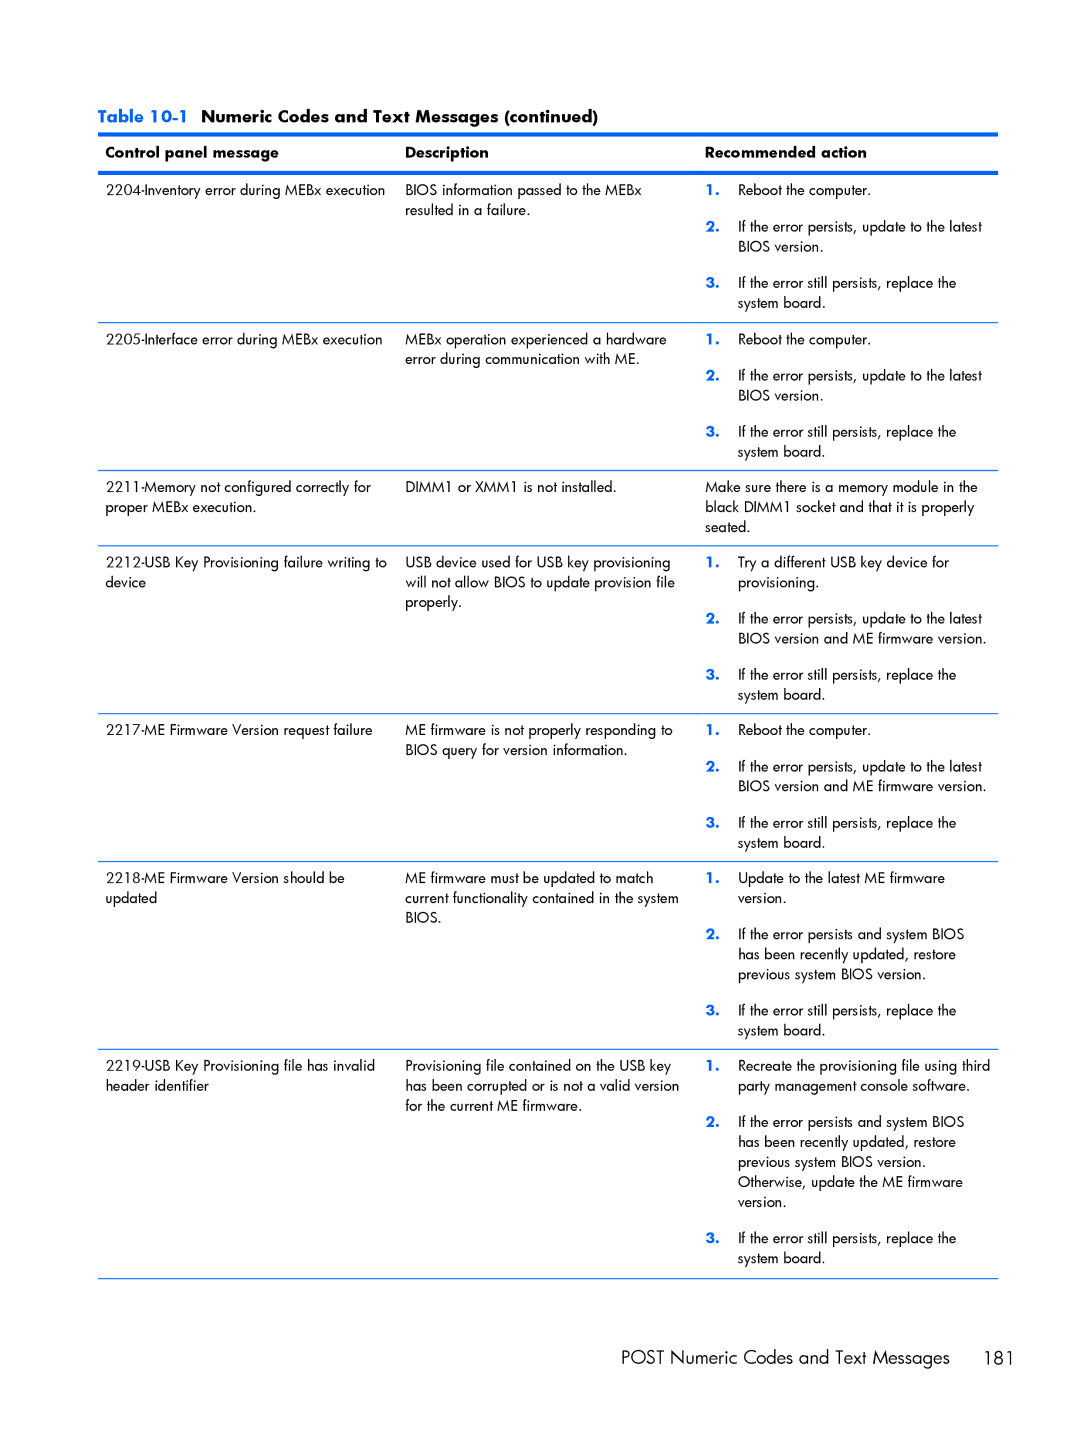
Post Numeric Codes and Text Messages
1Numeric Codes and Text Messages
Post Numeric Codes and Text Messages
Verify monitor is attached and turned
Save Changes and Exit. Reenter
Under Storage DPS Self-test
Change Storage Storage Options
Sata Emulation to IDE, and select File
Post Error Messages
If the error persists, update to the latest
Bios version and ME firmware version
Keyboard failure while Network Server
Possible Cause Recommended Action
Interpreting Post diagnostic front panel LEDs
2Diagnostic front panel LEDs and audible codes
Activity
For systems with integrated graphics, replace
Install a TXT capable processor
Cmos
Password Security and Resetting
Password Security and Resetting Cmos
Establishing a Setup or Power-on password
Resetting the Setup and Power-on password
Clearing and resetting the Cmos
Cmos button
Locate, press, and hold the Cmos button in for five seconds
General requirements
Power Cord Set Requirements
Japanese Power Cord Requirements
Country Accrediting Agency
Country-specific requirements
Models
Specifications
Appendix B Specifications
Table B-1Specifications
Models
Table B-2Specifications
Index
Safety precautions
Connectors on system board
Password