SERVICE AND ADJUSTMENTS
MANTENIMENTO
![]() WARNING: To avoid serious injury, before performing any service and adjustments:
WARNING: To avoid serious injury, before performing any service and adjustments:
1.Release control bar and stop engine.
2.Make sure the blade and all moving parts have completely stopped.
3.Disconnect spark plug wire from spark plug and place wire where it cannot come in contact with plug.
LAWN MOWER
TO ADJUST CUTTING HEIGHT
See “TO ADJUST CUTTING HEIGHT” in the Operation section of this manual.
REAR DEFLECTOR
The rear deflector, attached between the rear wheels of your mower, is provided to minimize the possibility that objects will be thrown out of the rear of the mower into the operator mowing position. If the deflector becomes damaged, it should be replaced.
Mowing | Mowing |
position | position |
Hairpin |
| Handle |
cotter |
| |
Mounting | bracket | |
| ||
pin | LOW POSITION | HIGH POSITION |
| ||
Lower handle ![]()
ANTES | DESPUES CADA | CADA | CADA ANTES DEL | |
DE CADA DE CADA | 10 | 25 HORAS O | 100 ALMACE- | |
USO | USO | HORAS TEMPORADA HORAS NAMIENTO | ||
Revisar si hay Sujetadores Sueltos
Limpiar/Inspeccionar el Recogedor de Césped *
Controlar los Neumáticos
Controlar las Ruedas Motrices ***
Limpiar la Segadora ****
Limpiar debajo la Cubierta de la Transmisión ***
Revisar las Correas y las Poleas Impulsadas ***
Revisar / Afilar / Cambiar la Cuchilla
Lubricación
Limpiar / Recargar la Batería **
Revisar el nivel del Aceite
Cambiar el Aceite del motor
Limpiar el Filtro de Aire
Inspeccionar el Silenciador
Cambiar la Bujía
Cambiar el Cartucho de Papel del Filtro de Aire
Vaciar el sistema del carburante
o añadir un estabilizador de carburante.
*![]()
![]()
![]()
![]()
![]()
![]()
![]()
![]()
![]()
![]()
![]()
![]()
![]()
![]()
![]()
![]()
![]()
![]()
![]()
![]()
![]()
![]()
![]()
![]()
![]()
![]()
![]()
![]()
![]()
![]()
![]()
![]()
![]()
![]()
![]()
![]()
![]()
![]()
![]()
![]()
![]()
![]()
![]()
![]()
![]()
![]()
![]()
![]()
![]()
![]()
![]()
![]()
![]()
![]()
![]()
**![]()
![]()
![]()
![]()
![]()
![]()
![]()
![]()
![]()
![]()
![]()
![]()
![]()
![]()
***![]()
![]()
![]()
![]()
![]()
![]()
![]()
![]()
![]()
![]()
![]()
![]()
![]()
![]()
![]()
![]()
![]()
![]()
![]()
![]()
![]()
![]()
![]()
![]()
![]()
![]()
![]()
![]()
![]()
![]()
![]()
![]()
![]()
![]()
![]()
![]()
![]()
![]()
![]()
****![]()
![]()
![]()
![]()
![]()
![]()
![]()
![]()
![]()
![]()
![]()
![]()
![]()
![]()
![]()
![]()
![]()
![]()
![]()
![]()
![]()
![]()
![]()
![]()
![]()
![]()
![]()
![]()
![]()
![]()
![]()
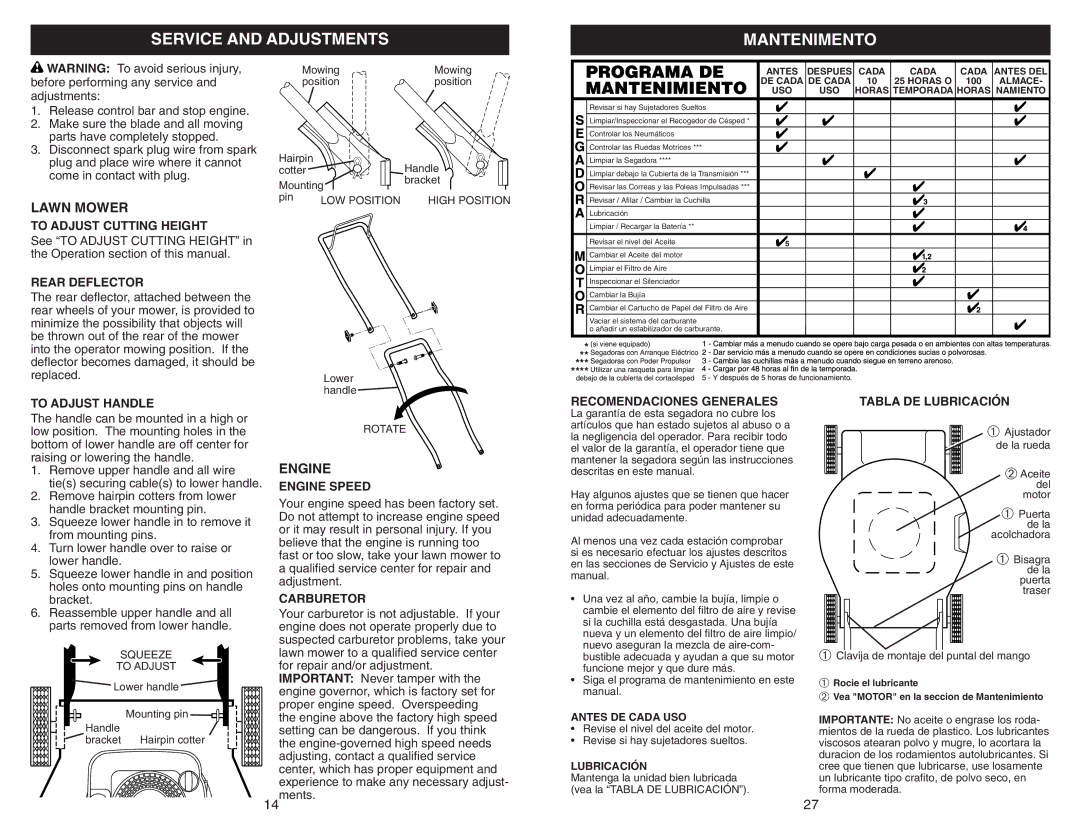
TO ADJUST HANDLE
The handle can be mounted in a high or low position. The mounting holes in the bottom of lower handle are off center for raising or lowering the handle.
1.Remove upper handle and all wire tie(s) securing cable(s) to lower handle.
2.Remove hairpin cotters from lower handle bracket mounting pin.
3.Squeeze lower handle in to remove it from mounting pins.
4.Turn lower handle over to raise or lower handle.
5.Squeeze lower handle in and position holes onto mounting pins on handle bracket.
6.Reassemble upper handle and all parts removed from lower handle.
SQUEEZE
TO ADJUST
Lower handle ![]()
| Mounting pin |
Handle |
|
bracket | Hairpin cotter |
ROTATE
ENGINE
ENGINE SPEED
Your engine speed has been factory set. Do not attempt to increase engine speed or it may result in personal injury. If you believe that the engine is running too fast or too slow, take your lawn mower to a qualified service center for repair and adjustment.
CARBURETOR
Your carburetor is not adjustable. If your engine does not operate properly due to suspected carburetor problems, take your lawn mower to a qualified service center for repair and/or adjustment. IMPORTANT: Never tamper with the engine governor, which is factory set for proper engine speed. Overspeeding the engine above the factory high speed setting can be dangerous. If you think the
RECOMENDACIONES GENERALES
La garantía de esta segadora no cubre los artículos que han estado sujetos al abuso o a la negligencia del operador. Para recibir todo el valor de la garantía, el operador tiene que mantener la segadora según las instrucciones descritas en este manual.
Hay algunos ajustes que se tienen que hacer en forma periódica para poder mantener su unidad adecuadamente.
Al menos una vez cada estación comprobar si es necesario efectuar los ajustes descritos en las secciones de Servicio y Ajustes de este manual.
•Una vez al año, cambie la bujía, limpie o cambie el elemento del filtro de aire y revise si la cuchilla está desgastada. Una bujía nueva y un elemento del filtro de aire limpio/ nuevo aseguran la mezcla de
•Siga el programa de mantenimiento en este manual.
ANTES DE CADA USO
•Revise el nivel del aceite del motor.
•Revise si hay sujetadores sueltos.
LUBRICACIÓN
Mantenga la unidad bien lubricada (vea la “TABLA DE LUBRICACIÓN”).
TABLA DE LUBRICACIÓN
➀ Ajustador
de la rueda
➁ Aceite del motor
➀ Puerta de la acolchadora
➀ Bisagra de la puerta traser
➀Clavija de montaje del puntal del mango
➀Rocie el lubricante
➁Vea "MOTOR" en la seccion de Mantenimiento
IMPORTANTE: No aceite o engrase los roda- mientos de la rueda de plastico. Los lubricantes viscosos atearan polvo y mugre, lo acortara la duracion de los rodamientos autolubricantes. Si cree que tienen que lubricarse, use losamente un lubricante tipo crafito, de polvo seco, en forma moderada.
14
27