2

1

4

1.

Front bagger tube

3

2.

Lower bagger tube


3.

1/4 x 50,8mm Carriage


Bolts


4.

1/4 Lock nut


5


3


2


6

1.

Front bagger tube

7

2.

1/4 x 50,8mm Carriage


Bolts


3.

1/4 Lock nut

1

4.

Vinyl Binding


5.

Dump handle tube

4

6.

Clevis pin

7.

Retainer spring

6MM (1/4") - 9MM (3/8")


2

1


3


1. Top Surfaces Even

2.Horizontal Adjustment Bracket

3.Vertical Adjustment Bracket

1

2


A


3


1.

Handle


2.

Retainer Spring

A


3.

Pin


4.

Plug


4

2

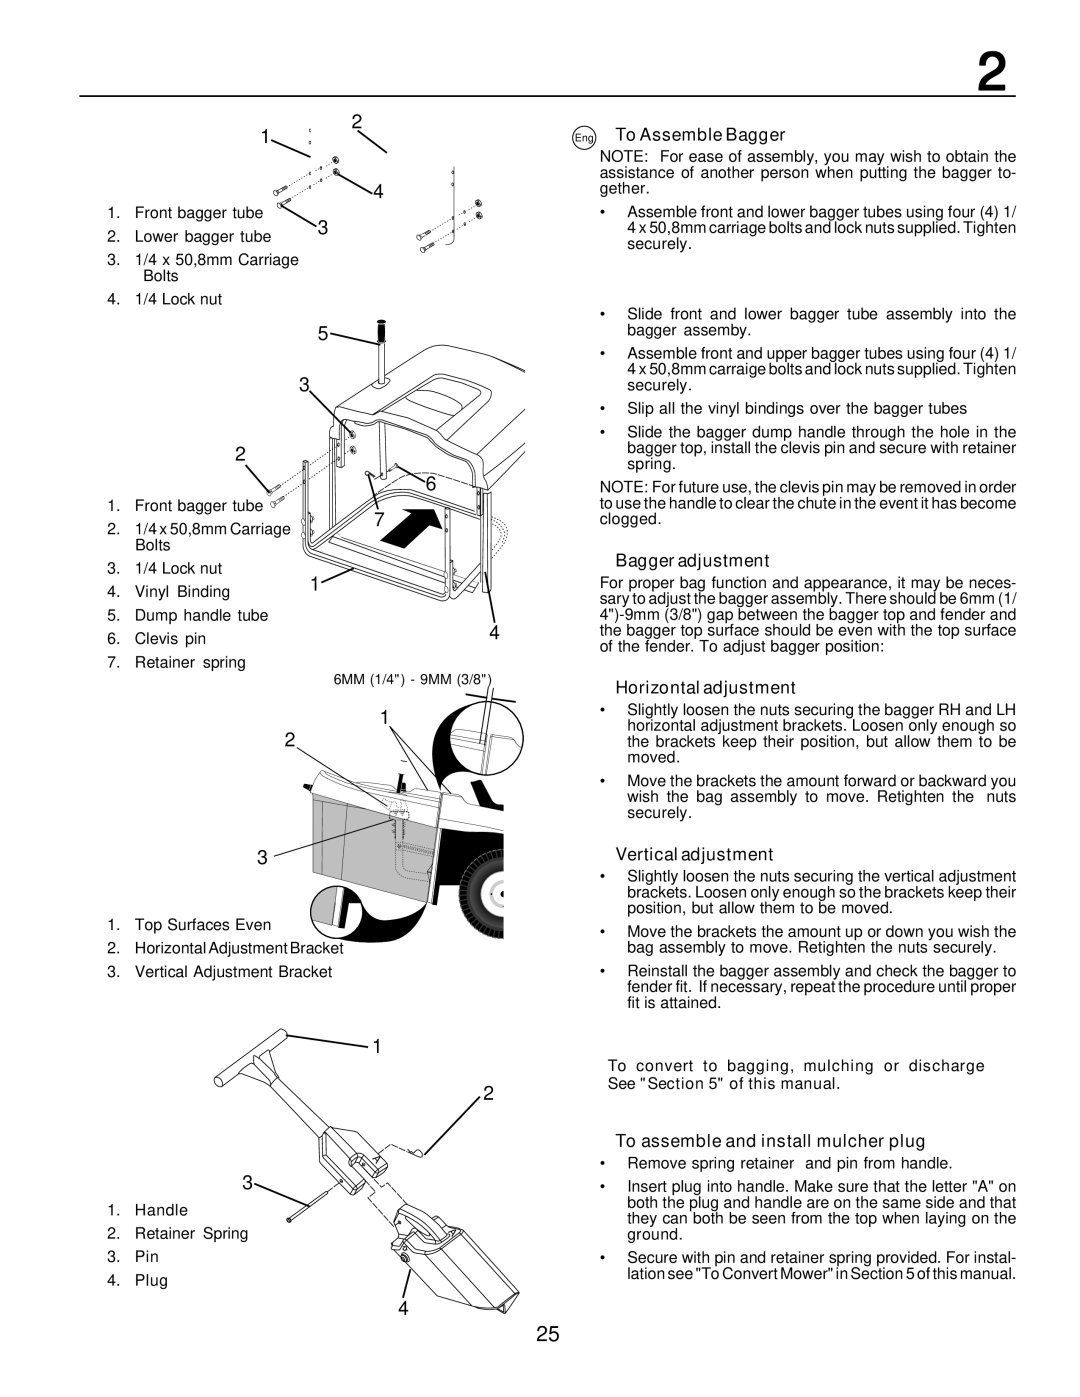
Eng To Assemble Bagger

NOTE: For ease of assembly, you may wish to obtain the assistance of another person when putting the bagger to- gether.

Assemble front and lower bagger tubes using four (4) 1/ 4 x 50,8mm carriage bolts and lock nuts supplied. Tighten securely.

Slide front and lower bagger tube assembly into the bagger assemby.

Assemble front and upper bagger tubes using four (4) 1/ 4 x 50,8mm carraige bolts and lock nuts supplied. Tighten securely.

Slip all the vinyl bindings over the bagger tubes

Slide the bagger dump handle through the hole in the bagger top, install the clevis pin and secure with retainer spring.

NOTE: For future use, the clevis pin may be removed in order to use the handle to clear the chute in the event it has become clogged.

Bagger adjustment

For proper bag function and appearance, it may be neces- sary to adjust the bagger assembly. There should be 6mm (1/ 4")-9mm (3/8") gap between the bagger top and fender and the bagger top surface should be even with the top surface of the fender. To adjust bagger position:

Horizontal adjustment

Slightly loosen the nuts securing the bagger RH and LH horizontal adjustment brackets. Loosen only enough so the brackets keep their position, but allow them to be moved.

Move the brackets the amount forward or backward you wish the bag assembly to move. Retighten the nuts securely.

Vertical adjustment

Slightly loosen the nuts securing the vertical adjustment brackets. Loosen only enough so the brackets keep their position, but allow them to be moved.

Move the brackets the amount up or down you wish the bag assembly to move. Retighten the nuts securely.

Reinstall the bagger assembly and check the bagger to fender fit. If necessary, repeat the procedure until proper fit is attained.

To convert to bagging, mulching or discharge See "Section 5" of this manual.

To assemble and install mulcher plug

Remove spring retainer and pin from handle.

Insert plug into handle. Make sure that the letter "A" on both the plug and handle are on the same side and that they can both be seen from the top when laying on the ground.

Secure with pin and retainer spring provided. For instal- lation see "To Convert Mower" in Section 5 of this manual.

25

Page 25
Image 25
Husqvarna CTH200 instruction manual Eng To Assemble Bagger, Bagger adjustment, Horizontal adjustment, Vertical adjustment

CTH200 specifications

The Husqvarna CTH200 is a powerful and versatile garden tractor designed to handle a variety of tasks with ease. Engineered for homeowners who value performance and durability, the CTH200 stands out with its robust build quality and advanced features that enhance usability and comfort.

At the heart of the CTH200 is a reliable and efficient engine. Featuring a Kohler 6000 Series engine, this tractor delivers impressive power and torque, ensuring optimal performance for mowing, towing, and other heavy-duty tasks. The engine is designed for increased fuel efficiency, allowing you to tackle your gardening duties without frequent refueling.

One of the standout features of the Husqvarna CTH200 is its cutting system. The tractor is equipped with a 42-inch cutting deck that provides a wide cutting swath, enabling faster mowing of larger lawns. The cutting deck is adjustable, allowing users to customize the cutting height to suit their preferences and specific lawn conditions. The innovative Air Induction Mowing Technology enhances airflow within the deck, resulting in a clean, even cut every time.

User comfort is a priority in the design of the CTH200. The fully adjustable ergonomic seat ensures that operators can find their ideal driving position, reducing fatigue during longer tasks. The easy-to-use control layout makes operating the tractor intuitive, allowing users to focus on the job at hand instead of fumbling with controls.

Another significant aspect of the CTH200 is its maneuverability. With a tight turning radius, this garden tractor can easily navigate around obstacles in your garden or yard. Additionally, the stamped steel cutting deck is both durable and lightweight, contributing to both ease of use and longevity.

For added versatility, the Husqvarna CTH200 supports a range of accessories and attachments, including baggers, mulchers, and snow blades. This adaptability makes the CTH200 a year-round tool for lawn maintenance and seasonal tasks, enhancing its value for homeowners.

Safety is also a key consideration, with features like an automatic blade engagement system that stops the blades when the operator leaves the seat. This ensures a higher level of safety, especially when using the tractor in busy family environments.

In conclusion, the Husqvarna CTH200 garden tractor combines power, efficiency, and comfort, making it an ideal choice for homeowners looking for a reliable solution to their lawn care needs. With its advanced features and robust design, it stands as a testament to Husqvarna's commitment to quality and innovation in outdoor power equipment.