Invacare CrossfireT7A Wheelchair
Invacare CrossfireT7A Wheelchair
Contents
Seat
ANTI-TIPPER
General
Symbols
Limited Warranty
General Guidelines
Safety
Wheelchair User
Stability Warning
Wheelchair Tie Down Restraints
Operating Information
Repair and Service Information
Seat Positioning Straps
Weight Training
Tire Pressure and Information
Label Locations
Overview
Serial Number Label Location
Component Identification
Typical Product Parameters
All specifications are approximate
70, 75, 80
Back Upholstery
Foldover
Casters
Safety/Handling of Wheelchairs
Safety/Handling of Wheelchairs
Stability and Balance
SAFETY/HANDLING of Wheelchairs
Reaching, Leaning and Bending Forward
Lengthening Wheelbase Shortening
Reaching, Leaning Backwards
Coping with Everyday Obstacles
Reaching, Leaning Bending Forward Backwards
Tipping Curbs
Tipping
Moving Up Stairs
Stairways
Stairways
Moving Down Stairs
Transferring To and From Other Seats
Escalators
Safety Inspection Checklist
Safety Inspection
Inspect Initially
Inspect/Adjust Weekly
Inspect/Adjust Periodically
Inspect/Adjust Monthly
Maintenance Maintenance Safety Precautions
Troubleshooting
Suggested Maintenance Procedures
Replacing/Repairing Caster Tire/Tube
Replacing/Repairing Rear Wheel Tire/Tube
Tire wear is excessive if
Footrest
Adjusting/Replacing Standard Footrest
Replacing the Footrest
Adjusting Footplate Angle
Adjusting the Footrest
AdjustmentsDepth
Adjusting Footplate Depth
Arms
Installing the Swingaway Padded Armrest Socket
Left Side Armrest Socket
Right Side Armrest Socket
Short Mounting
Plunger Pin
Adjusting Height
Installing/Removing/Adjusting the Swingaway Padded Armrest
Removing
Adjusting T-Arm Height
To remove the T-arm, reverse this procedure
Adjusting T-Arm Position
Unfolding/Folding the Back
Back
Detail C
Detail a Folding the Back Detail B Unfolding the Back
For this procedure, refer to Figure
Back Angle Adjustment
Repeat Steps 2-6 for remaining back cane
Detail D
Detail
Square will align with
Hole in adjustment
When installed
This orientation
Option
Back Upholstery Cover
Adjustable Tension Back Upholstery
The back upholstery cover is designed for three reasons
Adjustable Tension Back Upholstery
Adjusting the Tautness of the Back
Removing the Back Upholstery Cover
Removing the Adjustable Tension Back Upholstery
Installing the Lumbar Strap
Installing the Adjustable Tension Back Upholstery
Detail a Detail B
Installing the Back Upholstery Cover
Back Canes
Detail E
Removing/Installing Foldover Back Upholstery
Front Wheelchair
Installing Foldover Back Upholstery
Back Height Adjustment
Removing Foldover Back Upholstery
Back Cane
Hole Number
Installing
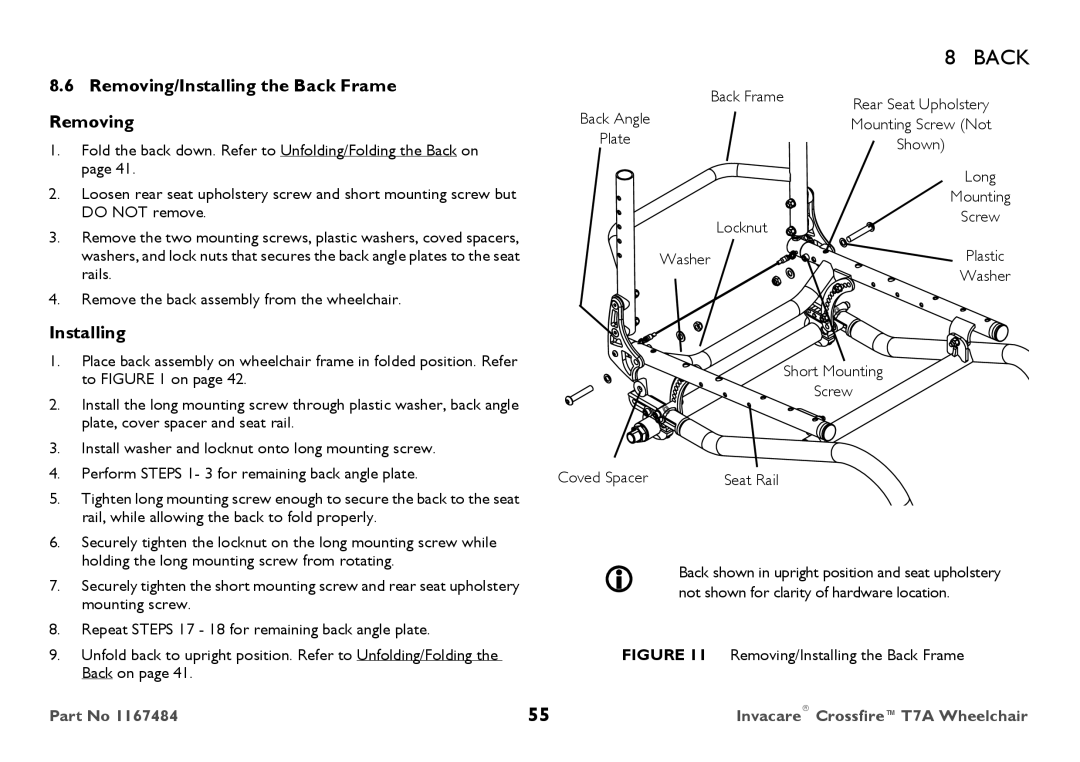
Removing/Installing the Back Frame
Replacing Seat Upholstery
Seat
Detail a
Seat Angle Adjustment
Detail a
Seat Angle Adjustment Invacare CrossfireT7A Wheelchair
Replacing the Wheel Lock
Replacing/Adjusting the Wheel Locks
Adjusting the Wheel Lock
Wheel Locks
Changing Wheel Lock Handle Position
Replacing/Adjusting the Wheel Locks
Wheel Lock
Detail a Wheel Lock in PUSH-TO-LOCK Configuration
Configuration
Converting From Pull-to-Lock to Push-to-Lock
Wheels
Removing/Installing Rear Wheels
Removing/Installing Rear Wheels
Adjusting Quick-Release Axles
Replacing Quad-Release Axles
Adjusting Quad-Release Handles In and/or Out
Removing Play from Rear Wheels
Adjusting Quad-Release Handle In and/or Out
Handrim Replacement
Removing Play from Rear Wheels
Handrim Replacement
Repairing/Replacing Rear Wheel, Tire/Tube
Adjusting Wheelbase Length, Adjusting Center Gravity COG
Adjusting Wheelbase Length, Adjusting Center of Gravity COG
Front Rear Wheelchair
Socket Screw Mounting Positions
Repositioning the Camber Tube Clamps
Repositioning the Camber Tube Clamps
Reversing the Camber Tube Clamp Direction
Repositioning the Camber Tube Clamp Socket Screws
Camber Tube Direction Facing Rear of Wheelchair
Occur
Facing Front of Wheelchair
Adjusting Wheelbase Width
Installing the Camber Tube
Removing/Installing the Camber Tube
Removing the Camber Tube
Detail a Correct Orientation for Each Camber Tube
Standright. behind the wheelchair to determine left or
Adjusting the Camber Tube
Detail a Side View
For this procedure, refer to on page 74 and Figure
Determining/Setting Toe In/Toe Out
Top View of Wheelchair
Top View of Wheelchair Adjusting Fork Tension
Adjusting Fork Tension
One mounting screw will not turn
Removing/Installing/Repositioning the Caster Assemblies
Standard Forks
Suspension Forks Removing the Caster
Removing the Caster
Installing the Caster
Installing the Caster
One Sided Fork
Removing Fork Assembly
Removing/Installing the Fork Assembly
Installing Fork Assembly
Detail C ONE Sided Fork
Removing/Installing the Elastomers Suspension Forks Only
Detail a Standard Fork
Detail B Suspension Fork
Removing/Installing the Elastomers Suspension Forks Only
Installing the Elastomer
Anti-Tipper
Adjusting/Replacing Anti-tipper
Replacing Anti-tipper
Adjusting Anti-tipper
Injury or property damage
Detail a ANTI-TIPPER
Adjustment Holes
211/8 Anti-Tipper
Canada
USA