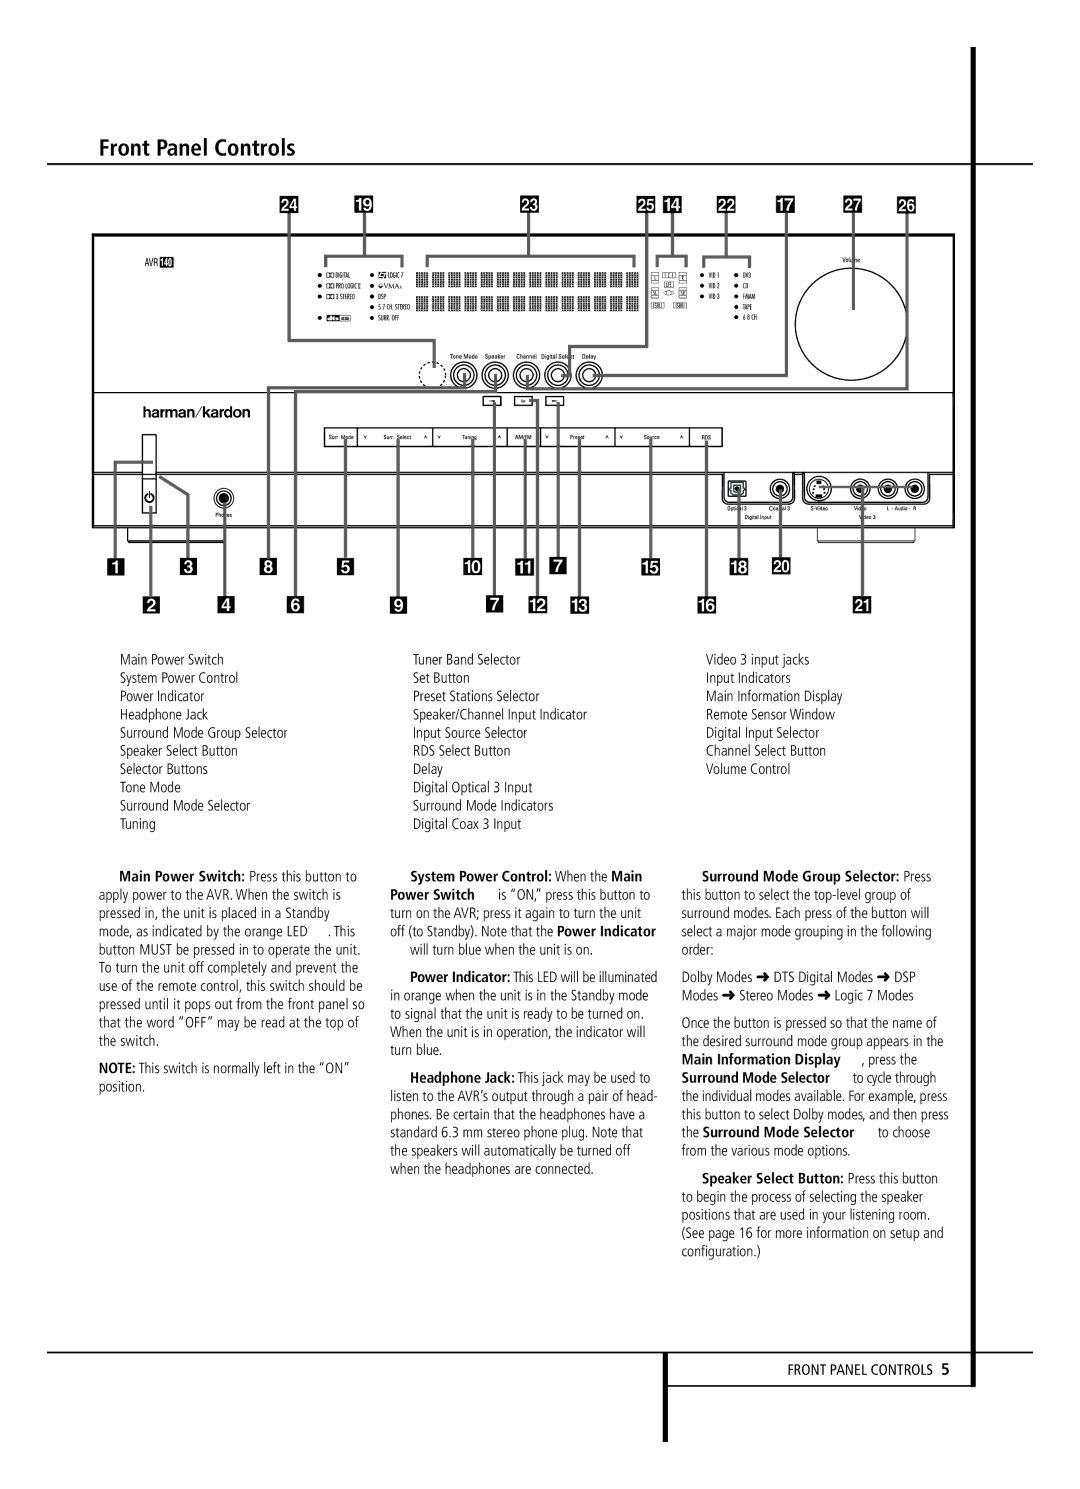
Front Panel Controls

1 Main Power Switch

!Tuner Band Selector

ÔVideo 3 input jacks

2 System Power Control

@Set Button

Input Indicators

3 Power Indicator

#Preset Stations Selector

ÒMain Information Display

4 Headphone Jack

$Speaker/Channel Input Indicator

ÚRemote Sensor Window

5 Surround Mode Group Selector

%Input Source Selector

ÛDigital Input Selector

6 Speaker Select Button

^RDS Select Button

ÙChannel Select Button

7 Selector Buttons

&Delay

ıVolume Control

8 Tone Mode

*Digital Optical 3 Input


9 Surround Mode Selector

(Surround Mode Indicators


)Tuning

ÓDigital Coax 3 Input


1Main Power Switch: Press this button to apply power to the AVR. When the switch is pressed in, the unit is placed in a Standby mode, as indicated by the orange LED 3. This button MUST be pressed in to operate the unit. To turn the unit off completely and prevent the use of the remote control, this switch should be pressed until it pops out from the front panel so that the word “OFF” may be read at the top of the switch.

NOTE: This switch is normally left in the “ON” position.

2System Power Control: When the Main Power Switch 1is “ON,” press this button to turn on the AVR; press it again to turn the unit off (to Standby). Note that the Power Indicator 3will turn blue when the unit is on.

3Power Indicator: This LED will be illuminated in orange when the unit is in the Standby mode to signal that the unit is ready to be turned on. When the unit is in operation, the indicator will turn blue.

4Headphone Jack: This jack may be used to listen to the AVR’s output through a pair of head- phones. Be certain that the headphones have a standard 6.3 mm stereo phone plug. Note that the speakers will automatically be turned off when the headphones are connected.

5Surround Mode Group Selector: Press this button to select the top-level group of surround modes. Each press of the button will select a major mode grouping in the following order:

Dolby Modes DTS Digital Modes DSP Modes Stereo Modes Logic 7 Modes

Once the button is pressed so that the name of the desired surround mode group appears in the Main Information Display Ò, press the Surround Mode Selector 9to cycle through the individual modes available. For example, press this button to select Dolby modes, and then press the Surround Mode Selector 9to choose from the various mode options.

6Speaker Select Button: Press this button to begin the process of selecting the speaker positions that are used in your listening room. (See page 16 for more information on setup and configuration.)

FRONT PANEL CONTROLS 5

Page 5
Image 5
JBL AVR 140 owner manual Front Panel Controls, Headphone Jack $Speaker/Channel Input Indicator

AVR 140 specifications

The JBL AVR 140 is an audio receiver that brings the excitement of a cinematic experience right into your living room. Designed with a sleek and modern aesthetic, this receiver combines advanced technology with user-friendly features, making it an excellent choice for both audiophiles and casual users.

One of the standout features of the AVR 140 is its impressive power output. This receiver delivers an impressive 100 watts per channel at 8 ohms, ensuring that it can easily drive large speakers and fill any room with high-quality sound. Its ability to reproduce audio with clarity and depth makes it a popular choice for home theater setups.

The AVR 140 is equipped with a range of audio formats that cater to various listening preferences. It supports Dolby Digital, DTS, and Pro Logic II, allowing users to immerse themselves in multi-dimensional soundscapes. This versatility ensures that whether you're watching movies, listening to music, or playing video games, the audio experience remains engaging.

Connectivity options are abundant with the JBL AVR 140. It features multiple HDMI inputs, allowing you to connect several devices such as Blu-ray players, gaming consoles, and streaming devices all at once. Additionally, it includes composite and component video inputs, ensuring compatibility with a wide variety of devices. The built-in AM/FM tuner also allows users to enjoy radio broadcasts without the need for additional equipment.

The AVR 140 incorporates advanced technologies that enhance the overall audio experience. One notable feature is the Audyssey setup, which calibrates the receiver based on your room's acoustics. This automatic calibration process optimizes speaker placement and ensures balanced sound across all channels.

With a user-friendly interface and an easy-to-navigate remote control, operating the JBL AVR 140 is straightforward. Its on-screen display helps guide users through various settings and configurations, making it accessible even for those who may not be technologically inclined.

In summary, the JBL AVR 140 is a versatile and powerful audio receiver that features a robust power output, support for multiple audio formats, extensive connectivity options, and advanced calibration technologies. Whether for movies, music, or gaming, it delivers an exceptional audio experience that elevates your entertainment setup to new heights. With its combination of quality, performance, and user-friendliness, the JBL AVR 140 stands out as a fantastic choice for anyone seeking to enhance their home audio experience.