Testing Procedures

!WARNING

To avoid risk of electrical shock, personal injury or death; disconnect power and gas to range before servicing, unless testing requires power and/or gas.

Feature

Access Procedure

Tone Options

Press the Setup pad, then press the right ATM

Determines cook tones, timer

pad until TONES displays. Press the left ATM

tones and volume settings.

pad to select TONES options.

12-Hour Shutoff

Press the Setup pad, then press the right ATM

Disables 12-hour shutoff,

pad until 12HR SHUTOFF displays. Press the

allowing the oven to operate

left ATM pad to select 12-HOUR SHUTOFF

indefinitely.

settings.

Cook Tones

Press the Setup pad, then press the right ATM

Determines the number and

pad until TONES displays. Press the left ATM

duration of cook time reminder

pad. Press the left ATM pad again to select

chimes.

COOK TONES settings.


Timers Tones

Press the Setup pad, then press the right ATM

Determines the number and

pad until TONES displays. Press the left ATM

duration of timer reminder

pad. Press the right ATM pad to scroll to

chimes.

TIMERS TONES. Press the left ATM pad to


select TIMERS TONES settings.


Volume

Press the Setup pad, then press the right ATM

Determines volumes of cook

pad until TONES displays. Press the left ATM

and timer tones.

pad to select VOLUME settings.


Energy Saver Mode

Press the Setup pad, then press the right ATM

Enables a 1 watt standby

pad until ENERGY SAVER displays. Press

feature. If no pad is pressed

the left ATM pad to select ENERGY SAVER

within 5 minutes, the control

mode settings.

enters into a sleep mode.


Demo Mode

Press the Setup pad, then press the right ATM

Enables a 1 watt standby

pad until DEMO displays. Press the left ATM

feature. If no pad is pressed

pad to select DEMO mode settings.

within 5 minutes, the control


enters into a sleep mode.


Service Mode

Press the Setup pad, then press the right ATM

Enables access to service

pad until SERVICE displays. Press the left

menus.

ATM pad to select SERVICE menu options.

Test Access

Press the Setup pad, then press the right ATM

Enables access to service

pad until SERVICE displays. Press the left

menus.

ATM pad to select SERVICE menu options.


Faults Access

Press the Setup pad, then press the right ATM

Displays the 10 most recent

pad until SERVICE displays. Press the left

faults produced by the controller.

ATM pad to select SERVICE menu options.


Software Versions Access

Press the Setup pad, then press the right ATM

Displays the software and

pad until SERVICE displays. Press the left

EEPROM revision levels.

ATM pad to select SERVICE menu options.


Display Test

Press the Setup pad, then press the right ATM

Illuminates all lamps on the

pad until SERVICE displays. Press the left

control.

ATM pad to select SERVICE menu options.


Control Lockout

Press the Back and Setup pads

Disables the touch keypad

simultaneously for 5 seconds to lock.

control and locks the oven cavity


door.


Modification Procedure

Press the right ATM pad to scroll to the desired tone to modify. Press Setup to exit.

Press the left ATM pad to turn on 12-hour shutoff, or the right ATM pad to turn off 12-hour shutoff. Press Setup to exit.

Press the left ATM pad to select 1 – 30 (1 chime every 30 seconds after the initial 4 chimes), or press the right ATM pad to scroll to 1 – 60 (1 chime every 60 seconds after the initial 4 chimes) or 1 BEEP (no additional chimes after the initial 4 chimes). Press the left ATM pad to select the desired setting. Press Setup to exit.

Press the left ATM pad to select 2 – 30, or 2 chimes every 30 seconds for up to 5 minutes (after the initial chime), or press the right ATM pad to scroll to 2 – 60, or 2 chimes every 60 seconds for up to 30 minutes (after the initial chime), or 1 BEEP (no additional chimes after the initial chime). Press the left ATM pad to select the desired setting. Press Setup to exit.

Press the right ATM pad until VOLUME displays. Press the left ATM pad. Press the left ATM pad to select HIGH, or the right ATM pad to scroll to MEDIUM or LOW. Press the left ATM pad to select. Press Setup to exit.

Press the left ATM pad to enter the energy saver mode or the right ATM pad to exit the energy saver mode.

Press the left ATM pad to enable the DEMO mode or the right ATM pad to exit the DEMO mode. Once the DEMO mode begins, press any key to exit. Press Setup to exit, also.

Press and hold the Back and Enter pads for 5 seconds to enter SERVICE menu options. Press Setup to exit.

Press and hold the Back and Enter pads for 5 seconds to enter SERVICE menu options. Press the right ATM pad to scroll to TEST menu. Press the left ATM pad to select TEST options. Press Setup to exit.

Press and hold the Back and Enter pads for 5 seconds to enter SERVICE menu options. Press the right ATM pad to scroll to the FAULTS menu. Press the left ATM pad to select FAULTS options. Press Setup to exit.

Press and hold the Back and Enter pads for 5 seconds to enter SERVICE menu options. Press the right ATM pad to scroll to the VERSIONS menu. Press the left ATM pad to view. Press Setup to exit.

Press and hold the Back and Enter pads for 5 seconds to enter SERVICE menu options. Press the right ATM pad to scroll to DISPLAY TEST. Press the left ATM pad. Press Setup to exit. Press the Back and Setup pads simultaneously for 5 seconds to unlock.

20

16026923

© 2006 Maytag Services

Page 20
Image 20
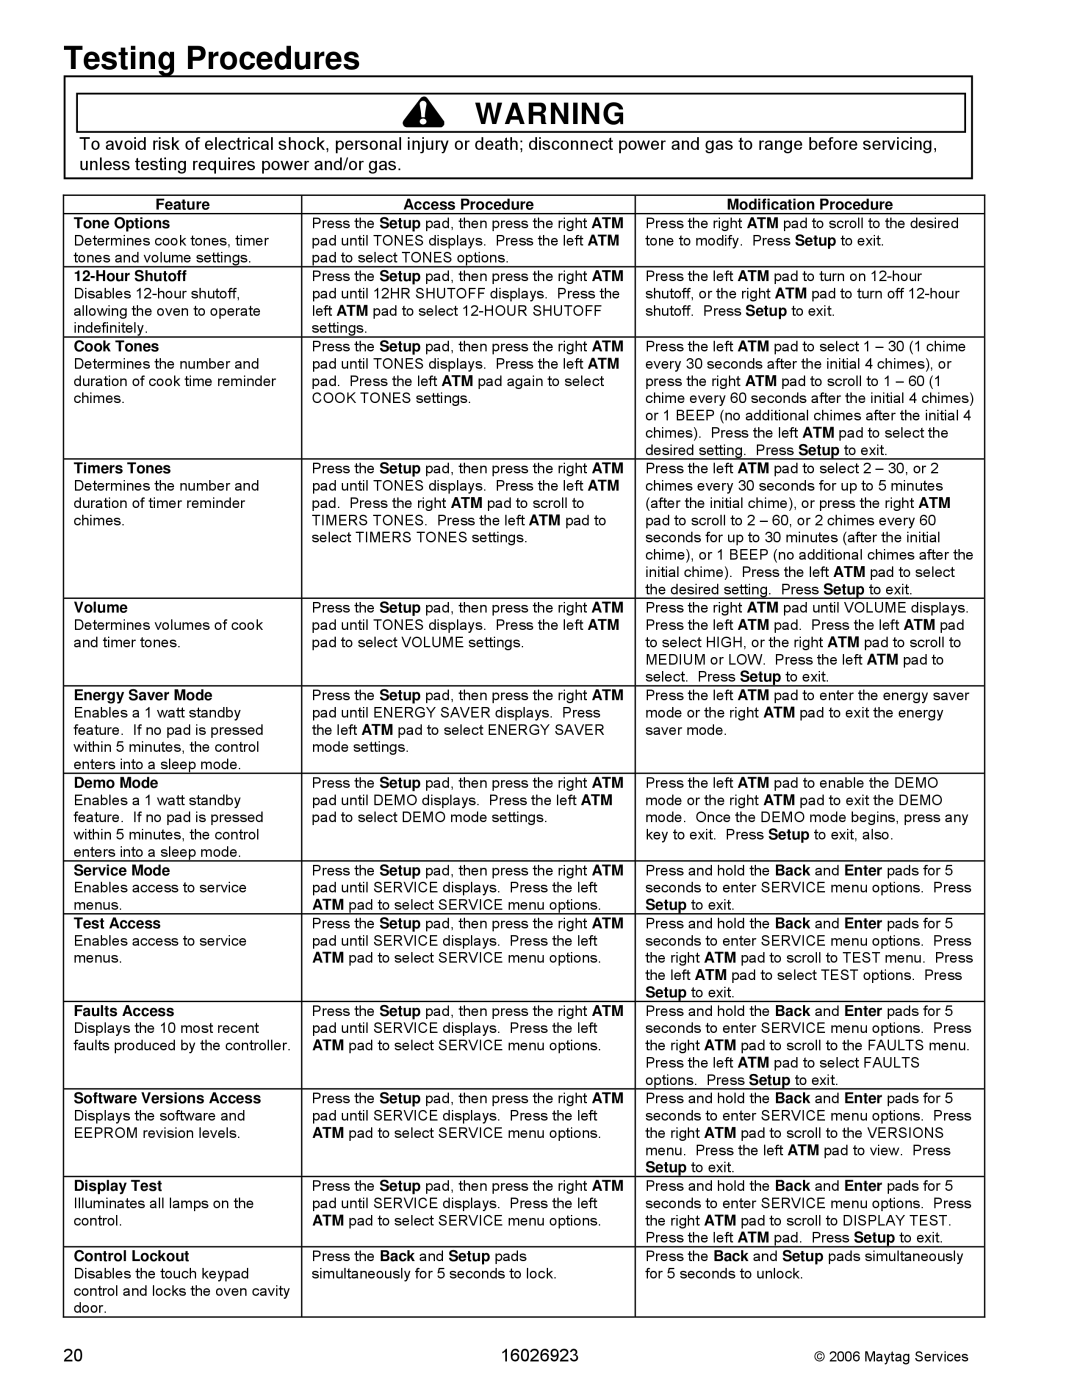
Jenn-Air JGS9900BD manual Feature Access Procedure Tone Options, Hour Shutoff, Cook Tones, Timers Tones, Volume, Demo Mode

JGS9900BD, JGS8860BD, JGS8850BD, JGS8750BD specifications

The Jenn-Air JGS8750BD, JGS8850BD, JGS8860BD, and JGS9900BD are a series of high-performance gas cooktops designed for culinary enthusiasts who value precision and sophistication. These models are distinguished by their robust construction, modern aesthetics, and a range of innovative features that streamline the cooking process.

One of the key features across these models is the professional-grade burners. The JGS8750BD, for instance, boasts a powerful 20,000 BTU burner, perfect for high-heat searing and rapid boiling. In contrast, the JGS8850BD offers a versatile 15,000 BTU burner, catering to a variety of cooking needs, including simmering and sautéing. For more delicate tasks, the JGS8860BD showcases a 5,000 BTU burner designed for simmering sauces and cooking delicate dishes with precision.

Another notable characteristic of these cooktops is the incorporation of the Jenn-Air® Turbo Flame™ technology. This feature provides an exceptional level of control, allowing chefs to achieve the desired temperature with accuracy. This technology is particularly valuable for those who require consistent heat for intricate recipes and techniques.

The seamless stainless-steel design not only elevates the appearance of any kitchen but also offers easy cleaning and maintenance. The high-quality grates found on these models are designed for durability and stability, ensuring pots and pans remain securely in place during cooking. Additionally, the continuous surface grates facilitate effortless sliding of cookware from one burner to another.

The JGS9900BD stands out with its advanced electronic ignition system, which ensures that the burners ignite quickly and reliably, minimizing downtime in the kitchen. Safety is also a priority across these models, featuring flame failure detection that automatically shuts off the gas supply if a flame goes out.

In terms of size, these cooktops cater to different kitchen configurations, with varying configurations to suit individual preferences and space constraints. Whether you're an avid home cook or a professional chef, the Jenn-Air JGS8750BD, JGS8850BD, JGS8860BD, and JGS9900BD combine superior technology with elegant design, making them a valuable addition to any modern kitchen. This series exemplifies Jenn-Air's commitment to quality, performance, and aesthetics, ensuring an elevated cooking experience for all users.