Generally speaking, the content recorded on a DVD is separated into large units referred to as “titles”. A unique number called a “title number” is assigned to each of these titles, and as a result, any title can be immediately accessed using its title number. In addition, each title can be divided into smaller units referred to as “chapters”. Similarly, a unique number called a “chapter number” is assigned to each of these chapters, and this allows any chapter to be immediately accessed using its chapter number.
Each recording made to a disc is stored as a single title. In this, each pressing of the STOP button to leave Recording mode constitutes a different recording. (This action is also referred to as “title closing”.)
One of six numbers referred to as “region codes” is assigned to DVD content to control the global regions in which this content may be viewed. If a DVD’s region code does not correspond to the region code of the DVD player being used, it will not be possible to play the disc.
●This DVD recorder assigns the region code “ALL” to the discs that it records.
●It will not be possible to play discs to which region codes have been assigned.
OPERATE
1
| AUDIO | | | TITLE | CHAPTER | | |
5 | CH1 | DOLBY DIGITAL | | | | | |
| LPCM MPEG | | | | | |
CH2 | | | | | | |
| PHONES | REV | STOP | PLAY | FWD | PAUSE | REC |
8 | | | | | | | |
BUSY
OPEN/CLOSE
OPTION DV Y/C LINE
SET UP
It is also possible to insert chapter marks to partition titles at the desired points by pressing the REC button while recording. It is possible to automatically add a chapter mark when recording is temporarily stopped by pressing the PAUSE button. (Set from the menu.) In addition, this DVD recorder can also be used to automatically insert chapter marks at regular intervals. (CHAPTER CREATION menu settings will be required for this function.)
Disc
| | Title 1 | | | | | Title 2 |
| | | | | | | | | | |
Chapter 1 | | Chapter 2 | | Chapter 3 | | | | Chapter 1 | | Chapter 2 |
| | | | | |
| | | | | | | | | | |
| | | | | | | | | | |
●Before a title is closed, it will be possible to modify the style used for chapter menu display, to change the thumbnails used, and to input thumbnail names.
●Before a disc is finalized, it will be possible to modify the style used for the title menu and to input title names.
Screen Sizes
This DVD recorder is capable of recording video content for wide- screen TVs (i.e., with a 16:9 aspect ratio).
In addition, signals for normal content with a 4:3 aspect ratio, for squeezed content (i.e., where the left and right are compressed), and for letterbox content (i.e., where the top and bottom of the screen are black) can be recorded as is.
●Thumbnail creation method for use in the title/chapter menu during wide-signal input can be selected in THUMBNAIL FORM of the DVD MENU screen. (☞ Page 66)
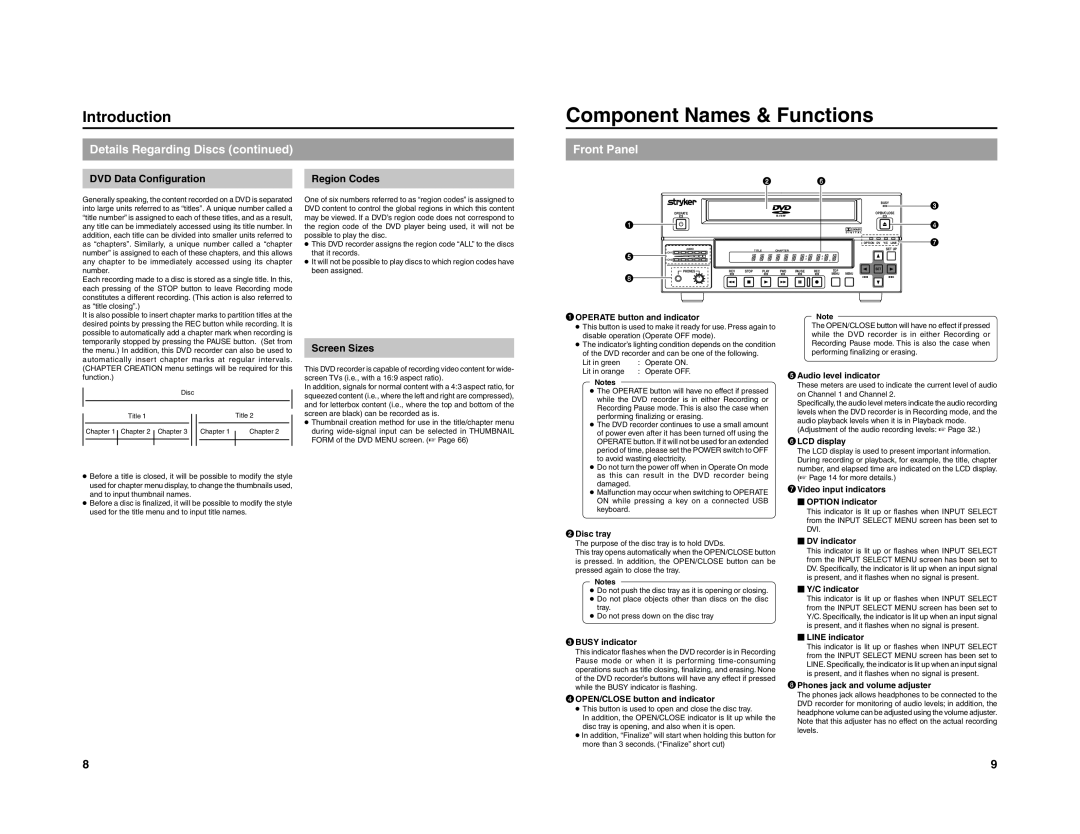
1OPERATE button and indicator
●This button is used to make it ready for use. Press again to disable operation (Operate OFF mode).
●The indicator’s lighting condition depends on the condition of the DVD recorder and can be one of the following.
Lit in green | : | Operate ON. |
Lit in orange | : | Operate OFF. |
Notes
●The OPERATE button will have no effect if pressed while the DVD recorder is in either Recording or Recording Pause mode. This is also the case when performing finalizing or erasing.
●The DVD recorder continues to use a small amount of power even after it has been turned off using the OPERATE button. If it will not be used for an extended period of time, please set the POWER switch to OFF to avoid wasting electricity.
●Do not turn the power off when in Operate On mode as this can result in the DVD recorder being damaged.
●Malfunction may occur when switching to OPERATE ON while pressing a key on a connected USB keyboard.
2Disc tray
The purpose of the disc tray is to hold DVDs.
This tray opens automatically when the OPEN/CLOSE button is pressed. In addition, the OPEN/CLOSE button can be pressed again to close the tray.
Notes
●Do not push the disc tray as it is opening or closing.
●Do not place objects other than discs on the disc tray.
●Do not press down on the disc tray
Note
The OPEN/CLOSE button will have no effect if pressed while the DVD recorder is in either Recording or Recording Pause mode. This is also the case when performing finalizing or erasing.
5Audio level indicator
These meters are used to indicate the current level of audio on Channel 1 and Channel 2.
Specifically, the audio level meters indicate the audio recording levels when the DVD recorder is in Recording mode, and the audio playback levels when it is in Playback mode.
(Adjustment of the audio recording levels: ☞ Page 32.)
6LCD display
The LCD display is used to present important information. During recording or playback, for example, the title, chapter number, and elapsed time are indicated on the LCD display. (☞ Page 14 for more details.)
7Video input indicators
�OPTION indicator
This indicator is lit up or flashes when INPUT SELECT from the INPUT SELECT MENU screen has been set to DVI.
�DV indicator
This indicator is lit up or flashes when INPUT SELECT from the INPUT SELECT MENU screen has been set to DV. Specifically, the indicator is lit up when an input signal is present, and it flashes when no signal is present.
�Y/C indicator
This indicator is lit up or flashes when INPUT SELECT from the INPUT SELECT MENU screen has been set to Y/C. Specifically, the indicator is lit up when an input signal is present, and it flashes when no signal is present.
3BUSY indicator
This indicator flashes when the DVD recorder is in Recording Pause mode or when it is performing time-consuming operations such as title closing, finalizing, and erasing. None of the DVD recorder’s buttons will have any effect if pressed while the BUSY indicator is flashing.
4OPEN/CLOSE button and indicator
●This button is used to open and close the disc tray.
In addition, the OPEN/CLOSE indicator is lit up while the disc tray is opening, and also when it is open.
●In addition, “Finalize” will start when holding this button for more than 3 seconds. (“Finalize” short cut)
�LINE indicator
This indicator is lit up or flashes when INPUT SELECT from the INPUT SELECT MENU screen has been set to LINE. Specifically, the indicator is lit up when an input signal is present, and it flashes when no signal is present.
8Phones jack and volume adjuster
The phones jack allows headphones to be connected to the DVD recorder for monitoring of audio levels; in addition, the headphone volume can be adjusted using the volume adjuster. Note that this adjuster has no effect on the actual recording levels.