44

Changing Chapter Menus (THUMBNAIL EDIT Screen)

This DVD recorder can automatically create title and chapter menus as recording operations are started and stopped.
Title and chapter menus are created using the following.
Chapter thumbnails : The frames at which chapter marks have been inserted are used as thumbnails.
Title thumbnails : The frames at the start of individual recordings are used as thumbnails. As a result, a title’s thumbnail is
the same as that of its first chapter.
Display style : Menus are created using the style set using the DVD MENU screen. (Styles determine factors such as
thumbnail positioning and background)
After chapter menus have been created in this way, it will be possible to modify thumbnails and styles, or to insert new names and
comments.
In specific terms, the editing of chapter menus is carried out using the THUMBNAIL EDIT screen that appears when recording of a
title is ended.
Opening the THUMBNAIL EDIT Screen
MENU
STYLE TYPE1
THUMNAIL FORM NORMAL
CAPTER PATERN 1
TITLE PATERN 1
DISC IN ACTION TITLE
TITLE END NEXT TITLE
DVD MENU TYPE TOP
EDIT MENU ENABLE
DVD MENU
DVD MENU Screen Set EDIT MENU from the DVD MENU screen to ENABLE.
The THUMBNAIL EDIT screen will appear automatically whenever moving to
Stop mode from Recording mode or Recording Pause mode.
Note
If EDIT MENU from the DVD MENU screen is set to DISABLE, the THUMBNAIL
EDIT screen will not be displayed. In such a case, title and chapter menus are
created using preset settings.
THUMBNAIL EDIT screen
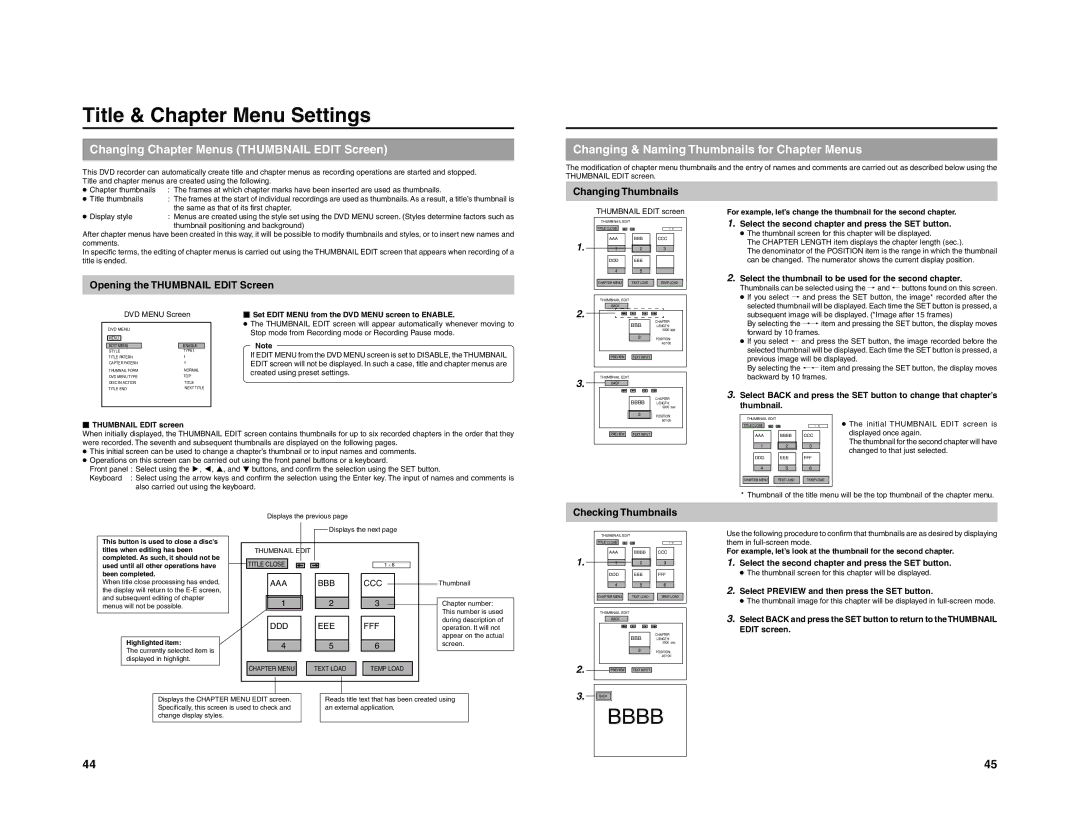
When initially displayed, the THUMBNAIL EDIT screen contains thumbnails for up to six recorded chapters in the order that they
were recorded. The seventh and subsequent thumbnails are displayed on the following pages.
This initial screen can be used to change a chapter’s thumbnail or to input names and comments.
Operations on this screen can be carried out using the front panel buttons or a keyboard.
Front panel: Select using the t,8,6, and 7 buttons, and confirm the selection using the SET button.
Keyboard :Select using the arrow keys and confirm the selection using the Enter key. The input of names and comments is
also carried out using the keyboard.
1AAA2BBB3CCC4DDD5EEE6FFF
TITLE CLOSE
CHAPTER MENU TEXT LOAD TEMP LOAD
THUMBNAIL EDIT
1 - 6
Displays the next page
Thumbnail
Displays the previous page
Highlighted item:
The currently selected item is
displayed in highlight.
This button is used to close a disc’s
titles when editing has been
completed. As such, it should not be
used until all other operations have
been completed.
When title close processing has ended,
the display will return to the E-E screen,
and subsequent editing of chapter
menus will not be possible.
Displays the CHAPTER MENU EDIT screen.
Specifically, this screen is used to check and
change display styles.
Reads title text that has been created using
an external application.
Chapter number:
This number is used
during description of
operation. It will not
appear on the actual
screen.

Title & Chapter Menu Settings

45

Changing & Naming Thumbnails for Chapter Menus

The modification of chapter menu thumbnails and the entry of names and comments are carried out as described below using the
THUMBNAIL EDIT screen.
Changing Thumbnails
For example, let’s change the thumbnail for the second chapter.
1.
Select the second chapter and press the SET button.
The thumbnail screen for this chapter will be displayed.
The CHAPTER LENGTH item displays the chapter length (sec.).
The denominator of the POSITION item is the range in which the thumbnail
can be changed. The numerator shows the current display position.
2.
Select the thumbnail to be used for the second chapter.
Thumbnails can be selected using the and©buttons found on this screen.
If you select and press the SET button, the image* recorded after the
selected thumbnail will be displayed. Each time the SET button is pressed, a
subsequent image will be displayed. (*Image after 15 frames)
By selecting the ††item and pressing the SET button, the display moves
forward by 10 frames.
If you select ©and press the SET button, the image recorded before the
selected thumbnail will be displayed. Each time the SET button is pressed, a
previous image will be displayed.
By selecting the ©©item and pressing the SET button, the display moves
backward by 10 frames.
3.
Select BACK and press the SET button to change that chapter’s
thumbnail.
The initial THUMBNAIL EDIT screen is
displayed once again.
The thumbnail for the second chapter will have
changed to that just selected.
*Thumbnail of the title menu will be the top thumbnail of the chapter menu.
1
AAA
2
BBBB
3
CCC
4
DDD
5
EEE
6
FFF
TITLE CLOSE
CHAPTER MENU TEXT LOAD TEMP LOAD
THUMBNAIL EDIT
1 - 6
Checking Thumbnails
Use the following procedure to confirm that thumbnails are as desired by displaying
them in full-screen mode.
For example, let’s look at the thumbnail for the second chapter.
1.
Select the second chapter and press the SET button.
The thumbnail screen for this chapter will be displayed.
2.
Select PREVIEW and then press the SET button.
The thumbnail image for this chapter will be displayed in full-screen mode.
3.
Select BACK and press the SET button to return to the THUMBNAIL
EDIT screen.
1
AAA
2
BBB
3
CCC
4
DDD
5
EEE
TITLE CLOSE
CHAPTER MENU TEXT LOAD TEMP LOAD
THUMBNAIL EDIT
1 - 6
THUMBNAIL EDIT screen
2
BBB
BACK
PREVIEW TEXT INPUT
THUMBNAIL EDIT
CHAPTER
LENGTH:
5000 sec
POSITION:
40/100
2
BBBB
BACK
PREVIEW TEXT INPUT
THUMBNAIL EDIT
CHAPTER
LENGTH:
5000 sec
POSITION:
50/100
3.
2.
1.
1
AAA
2
BBBB
3
CCC
4
DDD
5
EEE
6
FFF
TITLE CLOSE
CHAPTER MENU TEXT LOAD TEMP LOAD
THUMBNAIL EDIT
1 - 6
2
BBB
BACK
PREVIEW TEXT INPUT
THUMBNAIL EDIT
CHAPTER
LENGTH:
5000 sec
POSITION:
40/100
BACK
BBBB
3.
2.
1.