Settings & Controls for Recording

Erasing All Data From a DVD-RW Disc

Pre-Recording Settings

DISC menu screen

DISC MENU


MENU


FINALIZE

CANCEL


CANCEL DISC FINALIZATION

CANCEL


AUTO FINALIZE

OFF


AUTO CANCEL DISC FINALIZ.

OFF


DISC ERASE ( QUICK )


EXECUTE


DISC ERASE ( FULL )

CANCEL


LAST TITLE ERASE

CANCEL

DISC ERASE(QUICK)

Note

When either a new DVD-RW or one that has been erased on another machine is inserted, quick erase starts up.

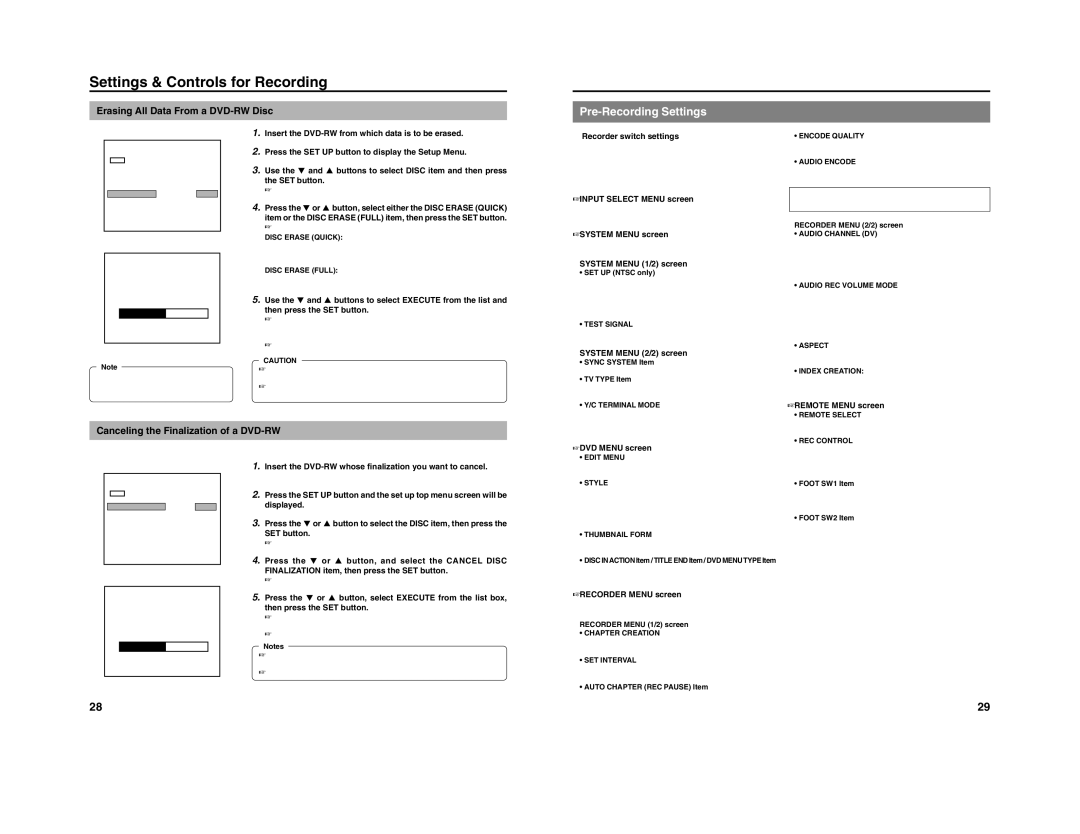
1.Insert the DVD-RW from which data is to be erased.

2.Press the SET UP button to display the Setup Menu.

3.Use the 7 and 6 buttons to select DISC item and then press the SET button.

The DISC menu screen will appear.

4.Press the 7 or 6 button, select either the DISC ERASE (QUICK) item or the DISC ERASE (FULL) item, then press the SET button.

The setting value list box is displayed.

DISC ERASE (QUICK): Only the disc control area is erased. (Quick Erase) Compared with Full Erase the time to erase is shorter.

DISC ERASE (FULL): All areas of the disc are erased. (Full Erase) This setting is recommended for repeated use of a disc.

5.Use the 7 and 6 buttons to select EXECUTE from the list and then press the SET button.

The erasing of data will begin.

The message “DISC ERASE” appears and the state of progress is displayed using a progress bar.

When all data has been erased, the progress bar will disappear.

CAUTION

All of the data recorded to the disc will be erased in this process. Before starting, therefore, confirm that no important data is stored on this disc.

Under no circumstances should the power be turned off or the power cord disconnected while data is being erased.

Recorder switch settings

Use the AUDIO INPUT LEVEL switch on the DVD recorder’s rear panel to select the reference input level for analog audio (i.e., +4 dB or –8 dB).

The following screens are used to make settings relevant to recording. (Screen setting methods: Page 58)

INPUT SELECT MENU screen

This screen is used to select the audio and video signals to be used. For more details, refer to page 62.

SYSTEM MENU screen

The SYSTEM MENU screen contains two different pages of parametes.

SYSTEM MENU (1/2) screen

SET UP (NTSC only)

This parameter is set when an analog video signal (i.e., composite or YC separate) is being input to the DVD recorder. Specifically, a setting is made to reflect whether or not the input signal is a setup signal. SETUP should be set to ON if it is a setup signal, or to OFF if it is not.

TEST SIGNAL

Set this parameter to ON when the color bar output by the DVD recorder’s internal signal generator is to be recorded.

SYSTEM MENU (2/2) screen

• SYNC SYSTEM Item

For selecting the synchronization method for this unit.

• TV TYPE Item

For selecting the NTSC or PAL mode.

This unit will be rebooted when settings are changed.

• Y/C TERMINAL MODE

This parameter indicates whether the Y/C IN terminal’s

specification is S1 or S2. (Specifically, it selects the recording

ENCODE QUALITY

This parameter is used to set the quality for encording (or compressing) video data.

AUDIO ENCODE

This parameter is used to set the format for encoding (or compressing) audio data.

For more details regarding the encoding of audio and video, refer to pages 31.

RECORDER MENU (2/2) screen

• AUDIO CHANNEL (DV)

This parameter is to be set when recording an audio signal

from the DV IN/OUT terminal.

Specifically, it indicates whether the signals from channels 1

and 2 or from channels 3 and 4 are to be recorded. (Only

with sampling frequency of 32 kHz)

• AUDIO REC VOLUME MODE

This parameter is used to select the method for adjustment

of audio recording levels. Specifically, both channels can be

adjusted while maintaining the same level (BOTH), or each

channel can be adjusted independently (INDEPENDENCE).

For more details regarding methods for the adjustment of

audio recording levels, refer to page 32.

• ASPECT

This parameter is used to set the aspect for recorded video.

(AUTO, 4:3, LETTER, or SQUEEZE)

• INDEX CREATION:

Set whether to insert indexes automatically at record start

points and recording pause point.

REMOTE MENU screen

• REMOTE SELECT

This parameter should be set to OFF when not controlling

Canceling the Finalization of a DVD-RW

When adding an extra recording to a finalized DVD-RW, cancel the finalization.

method for the wide-screen discrimination signal.)

DVD MENU screen

• EDIT MENU

the DVD recorder via the DV IN/OUT terminal.

• REC CONTROL

This parameter indicates whether or not the REC CONTROL

panel is to be displayed constantly on-screen when a

DISC menu screen

DISC MENU


MENU


FINALIZE


CANCEL


CANCEL DISC FINALIZATION


EXECUTE


AUTO FINALIZE


OFF


AUTO CANCEL DISC FINALIZ.


OFF


DISC ERASE ( QUICK )


CANCEL


DISC ERASE ( FULL )


CANCEL


LAST TITLE ERASE


CANCEL

1.

Insert the DVD-RW whose finalization you want to cancel.

2.

Press the SET UP button and the set up top menu screen will be


displayed.

3.

Press the 7 or 6 button to select the DISC item, then press the


SET button.


The DISC menu screen is displayed.

4.

Press the 7 or 6 button, and select the CANCEL DISC


FINALIZATION item, then press the SET button.


The setting value list box is displayed.

This parameter indicates whether or not a screen for menu

editing is to be displayed during title closing and finalizing.

• STYLE

This screen is used to select the arrangement and

background style for thumbnails displayed on the tops menu.

This DVD recorder can store eight individual style type (i.e.,

TYPE1 through TYPE8), and the most suitable type should

be selected here.

• THUMBNAIL FORM

This parameter selects the method to be used for thumbnail

conversion when recording a wide-screen signal.

• DISC IN ACTION Item / TITLE END Item / DVD MENU TYPE Item

This is used to set the status of a disc created when finalizing. Set

this before recording to a blank disc. (Refer to pages 65 and 66.)

recordable disc has been inserted.

Set this to ON when using a keyboard.

• FOOT SW1 Item

Set this to any mode other than OFF when turning ON/OFF

recording using an external switch that is connected to the

FOOT SW1 terminal at the rear of this unit.

• FOOT SW2 Item

Set this to any mode other than OFF when writing chapters

or indexes using an external switch that is connected to the

FOOT SW2 terminal at the rear of this unit.

Please see page 69 for details

CANCELING DISC FINALIZATION

5. Press the 7 or 6 button, select EXECUTE from the list box,

then press the SET button.

Cancellation of finalization starts.

Execution status will be displayed on a progress bar.

When complete, the progress bar disappears.

Notes

When canceling finalization the TOP MENU created when finalizing is deleted.

Discs finalized on another machine cannot be cancelled.

RECORDER MENU screen

The RECORDER MENU screen contains two different pages of parameters.

RECORDER MENU (1/2) screen

CHAPTER CREATION

This parameter indicates whether chapters are to be created automatically or manually.

SET INTERVAL

This parameter is set the time interval for automatic chapter creation and is set in units of minutes.

AUTO CHAPTER (REC PAUSE) Item

Set whether to automatically insert a chapter when recording

28

is paused.

29


Page 20
Image 20
JVC BD-X201M manual Settings & Controls for Recording, Pre-Recording Settings, Erasing All Data From a DVD-RW Disc

BD-X201M specifications

The JVC BD-X201M is a high-performance professional Blu-ray Disc player that showcases a blend of advanced technologies and features, making it a valuable asset for broadcasting, production, and home entertainment applications. This model stands out for its ability to handle a wide array of formats while providing exceptional playback quality.

One of the standout features of the BD-X201M is its support for Ultra HD Blu-ray, allowing for playback of 4K content at resolutions up to 3840 x 2160. This capability ensures that users can enjoy stunning visuals with four times the detail of standard Full HD. The player also supports HDR (High Dynamic Range) and 10-bit color depth, which significantly enhances the color accuracy and contrast, creating more lifelike images.

The BD-X201M integrates JVC's proprietary image processing technology, which optimizes video quality by reducing noise and enhancing clarity. Additionally, the player features advanced scaling capabilities, allowing for upscaling of lower-resolution content to near 4K quality. This ensures that users can enjoy a broad range of content with the highest possible fidelity.

In terms of audio, the JVC BD-X201M supports various surround sound formats, including Dolby Atmos and DTS:X, providing an immersive audio experience that complements its stunning video output. The player is equipped with balanced and unbalanced audio outputs, allowing flexibility in how the audio connects to professional sound systems.

Connectivity is another area where the BD-X201M excels. It comes with HDMI outputs, USB ports, and a host of other interfaces suitable for integration into professional setups. It also includes IP streaming capabilities, enabling users to stream content over a network, thus providing convenience in content management and distribution.

The user interface of the BD-X201M is designed for intuitive navigation, making it easy for users to access their media libraries. It also incorporates customizable settings to cater to different environments, whether for a professional theater or home use.

In summary, the JVC BD-X201M is a feature-rich Blu-ray player that combines advanced imaging and audio technologies with versatile connectivity options. Its ability to handle 4K HDR content, coupled with professional audio formats, makes it an ideal choice for both home cinema enthusiasts and professionals in the entertainment industry. Its robust build quality and performance capabilities ensure that it meets the demands of any high-quality viewing experience.