Title & Chapter Menu Settings

Changing & Checking Title Menu Styles & Names (continued)

Checking the Title Menu Screen

Changing Names for the Title Menu

TITLE MENU EDIT screen

TITLE MENU

FINALIZE

PRESET STYLE

TITLE TEXT INPUT

1. TITLE MENU PREVIEW

EXIT

TITLE MENU PREVIEW screen

3.

BACK


1


01

02

03


03/08

TITLE MENU EDIT screen

TITLE MENU

4. FINALIZE

PRESET STYLE

TITLE TEXT INPUT

TITLE MENU PREVIEW

EXIT

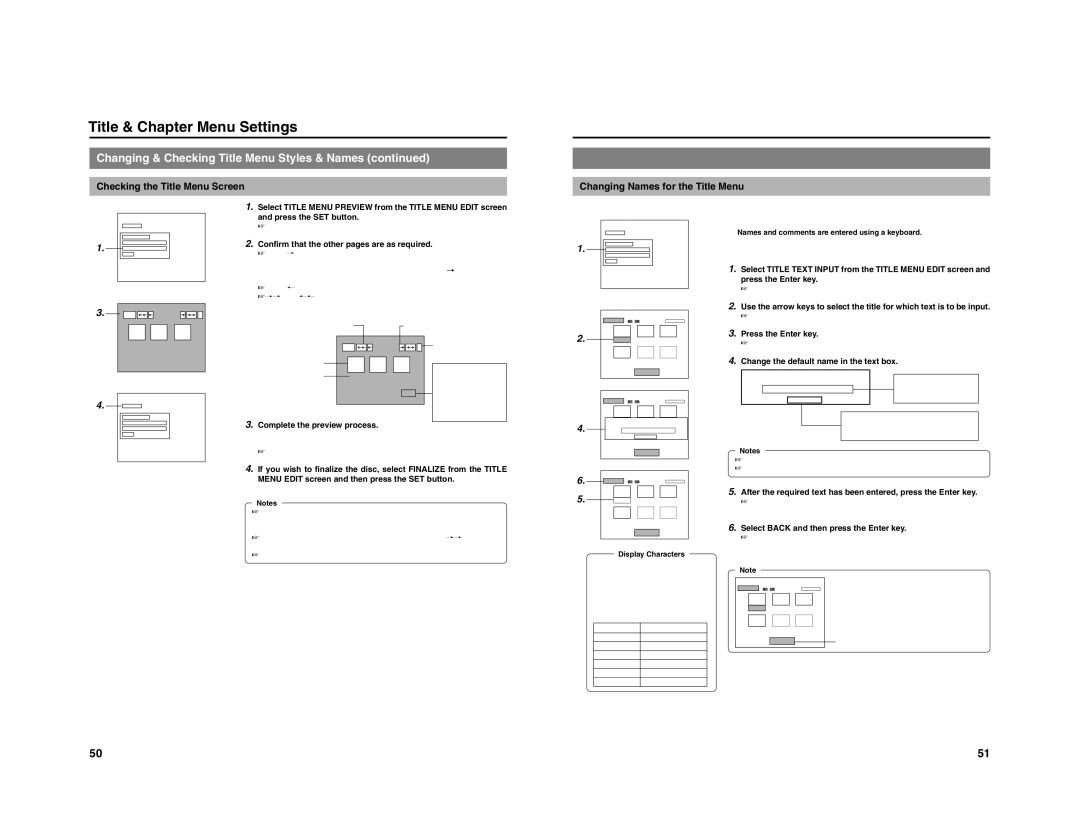
1.Select TITLE MENU PREVIEW from the TITLE MENU EDIT screen and press the SET button.

The TITLE MENU EDIT screen will appear.

2.Confirm that the other pages are as required.

Select from the TITLE MENU PREVIEW screen and press the SET button to move to the next page. Starting with the first page of the title menu, the display will move forward through the pages each time ¥ is selected and the SET button is pressed.

Select © and press the SET button to move to the previous page.

†† and ©© can be used in combination with the SET button to skip forward or back in units of ten pages.

Displays the previous page


Displays the next page


BACK


1

Displays the page


number

Thumbnail

01

02

03


The denominator

Background


shows the total


number of


03/08

thumbnails, and the


numerator shows the


number of thumbnails


currently created.

3.Complete the preview process.

To do this, select BACK from the TITLE MENU PREVIEW screen and press the SET button.

The TITLE MENU EDIT screen will reappear.

TITLE MENU EDIT screen

TITLE MENU


FINALIZE


1.


PRESET STYLE


TITLE TEXT INPUT


TITLE MENU PREVIEW


EXIT


TITLE TEXT INPUT screen

TITLE TEXT INPUT


BACK


1 - 6

AAA

BBB

CCC

2.


DDD


TEXT LOAD


TITLE TEXT INPUT


BACK


1 - 6


AAA

BBB

CCC

4.


TITLE INPUT


DDDaugust


CANCEL


TEXT LOAD


Each title will be automatically assigned with a recording date/time and ENCODE QUALITY.

Use the following procedure to enter manually names for titles in the title menu.

Names and comments are entered using a keyboard.

Set KEYBOARD STYLE from the SYSTEM MENU (1/2) screen in accordance with the keyboard’s input language.

The following description assumes that all operations are carried out by keyboard.

1.Select TITLE TEXT INPUT from the TITLE MENU EDIT screen and press the Enter key.

The TITLE TEXT INPUT screen is displayed.

2.Use the arrow keys to select the title for which text is to be input.

The currently selected title is highlighted.

3.Press the Enter key.

A box for inputting text will appear.

4.Change the default name in the text box.


TITLE INPUT


Enter a name for the title.


(Names can be up to 20


august


characters in length.)


CANCEL


Select CANCEL and press the Enter key to


close the text box without applying the


name or comment that has been entered.


Notes

The ¥ mark will become a backslash.

4.If you wish to finalize the disc, select FINALIZE from the TITLE MENU EDIT screen and then press the SET button.

(Page 52)

Notes

Up to 20 seconds may be required per page to display the PREVIEW screen. More time may be required depending on the number of thumbnails per page.

During creation of preview displays, jump by selecting the †† button can only be made to the page being created.

A maximum of 33 pages can be created for the Title Menu.

6.

TITLE TEXT INPUT


BACK


1 - 6


AAA

BBB

CCC

5.

august


DDD


TEXT LOAD


Display Characters

If text cannot be entered, press the CTRL key (right side) on the keyboard.

5.

After the required text has been entered, press the Enter key.


The text box will close.


The name just entered will be applied to the selected title.

6.

Select BACK and then press the Enter key.


The TITLE MENU EDIT screen will reappear.

The characters displayed in title and chapter menus depend on the title or chapter pattern that has been selected. A preview allows actual display characters to be confirmed. Note that at the time of purchase, display characters will be as follows.

PATTERN No. Display characters

117 x 2 (34)

217 x 2 (34)

332 x 4 (128)

450 (Included Title No.)

525 (Included Title No.)

6

Note


TITLE TEXT INPUT


BACK


1 - 6

AAA

BBB

CCC

DDD


TEXT LOAD


If you select TEXT LOAD from the TITLE MENU screen and then press the SET button, title text created using an external application will be read into the DVD recorder for use as a title name.

TEXT LOAD

50

51

Page 31
Image 31
JVC BD-X201M manual Press the Enter key, Change the default name in the text box

BD-X201M specifications

The JVC BD-X201M is a high-performance professional Blu-ray Disc player that showcases a blend of advanced technologies and features, making it a valuable asset for broadcasting, production, and home entertainment applications. This model stands out for its ability to handle a wide array of formats while providing exceptional playback quality.

One of the standout features of the BD-X201M is its support for Ultra HD Blu-ray, allowing for playback of 4K content at resolutions up to 3840 x 2160. This capability ensures that users can enjoy stunning visuals with four times the detail of standard Full HD. The player also supports HDR (High Dynamic Range) and 10-bit color depth, which significantly enhances the color accuracy and contrast, creating more lifelike images.

The BD-X201M integrates JVC's proprietary image processing technology, which optimizes video quality by reducing noise and enhancing clarity. Additionally, the player features advanced scaling capabilities, allowing for upscaling of lower-resolution content to near 4K quality. This ensures that users can enjoy a broad range of content with the highest possible fidelity.

In terms of audio, the JVC BD-X201M supports various surround sound formats, including Dolby Atmos and DTS:X, providing an immersive audio experience that complements its stunning video output. The player is equipped with balanced and unbalanced audio outputs, allowing flexibility in how the audio connects to professional sound systems.

Connectivity is another area where the BD-X201M excels. It comes with HDMI outputs, USB ports, and a host of other interfaces suitable for integration into professional setups. It also includes IP streaming capabilities, enabling users to stream content over a network, thus providing convenience in content management and distribution.

The user interface of the BD-X201M is designed for intuitive navigation, making it easy for users to access their media libraries. It also incorporates customizable settings to cater to different environments, whether for a professional theater or home use.

In summary, the JVC BD-X201M is a feature-rich Blu-ray player that combines advanced imaging and audio technologies with versatile connectivity options. Its ability to handle 4K HDR content, coupled with professional audio formats, makes it an ideal choice for both home cinema enthusiasts and professionals in the entertainment industry. Its robust build quality and performance capabilities ensure that it meets the demands of any high-quality viewing experience.