English

Common Operations

Setting the Clock

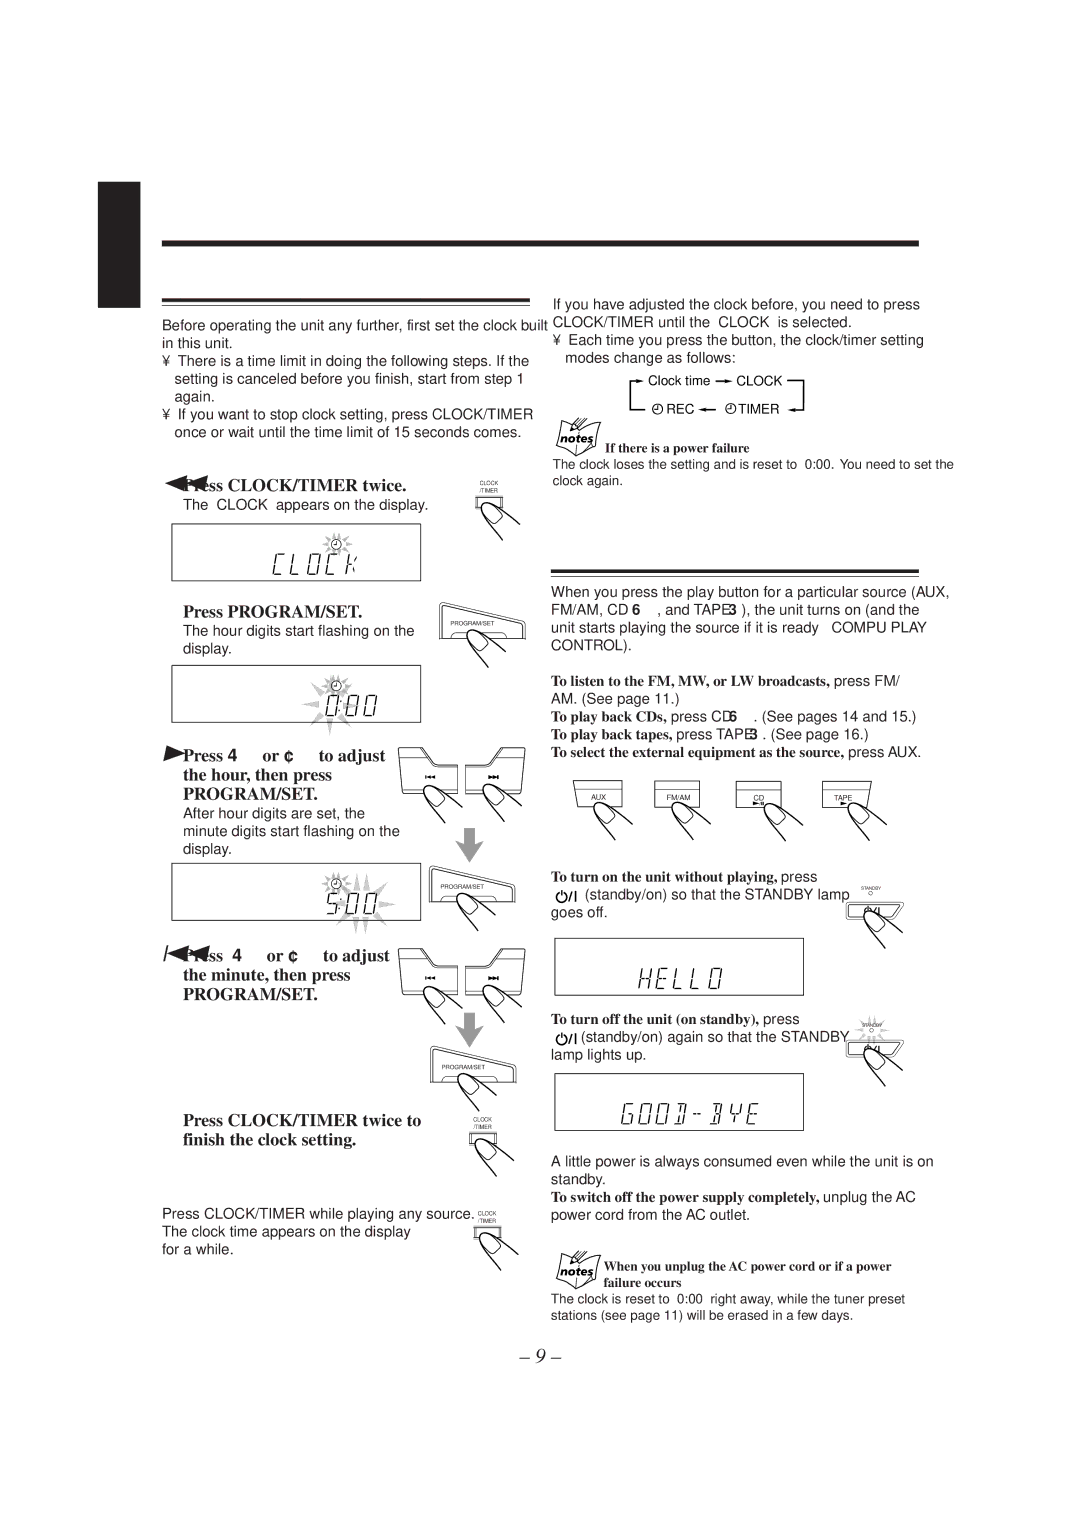
Before operating the unit any further, first set the clock built in this unit.

There is a time limit in doing the following steps. If the setting is canceled before you finish, start from step 1 again.

If you want to stop clock setting, press CLOCK/TIMER once or wait until the time limit of 15 seconds comes.

To adjust the clock again

If you have adjusted the clock before, you need to press CLOCK/TIMER until the “CLOCK” is selected.

Each time you press the button, the clock/timer setting modes change as follows:

Clock time CLOCK

REC TIMER

If there is a power failure

The clock loses the setting and is reset to “0:00.” You need to set the

1 Press CLOCK/TIMER twice.

The “CLOCK” appears on the display.

2 Press PROGRAM/SET.

The hour digits start flashing on the display.

3 Press 4or ¢to adjust the hour, then press

PROGRAM/SET.

After hour digits are set, the minute digits start flashing on the display.

CLOCK /TIMER

PROGRAM/SET

clock again.

Turning On the Power and Selecting the Sources

When you press the play button for a particular source (AUX, FM/AM, CD 6, and TAPE 3), the unit turns on (and the unit starts playing the source if it is ready — COMPU PLAY CONTROL).

To listen to the FM, MW, or LW broadcasts, press FM/

AM. (See page 11.)

To play back CDs, press CD 6. (See pages 14 and 15.) To play back tapes, press TAPE 3. (See page 16.)

To select the external equipment as the source, press AUX.


AUX

FM/AM


CD


TAPE


PROGRAM/SET

To turn on the unit without playing, press

(standby/on) so that the STANDBY lamp

STANDBY

4 Press 4or ¢to adjust the minute, then press

PROGRAM/SET.


PROGRAM/SET

5 Press CLOCK/TIMER twice to

/TIMER


CLOCK

finish the clock setting.


goes off.

To turn off the unit (on standby), press

STANDBY

(standby/on) again so that the STANDBY lamp lights up.

A little power is always consumed even while the unit is on standby.

To check the clock time


To switch off the power supply completely, unplug the AC

Press CLOCK/TIMER while playing any source.

/TIMER

power cord from the AC outlet.


CLOCK


The clock time appears on the display


for a while.


When you unplug the AC power cord or if a power


failure occurs


The clock is reset to “0:00” right away, while the tuner preset


stations (see page 11) will be erased in a few days.

– 9 –

Page 14
Image 14
JVC CA-MXJ150R manual Common Operations, Setting the Clock, Turning On the Power and Selecting the Sources

CA-MXJ150R specifications

The JVC CA-MXJ150R is a compact, feature-rich mini audio system designed for music lovers who appreciate high-quality sound and versatility in a manageable format. With its sleek design and powerful performance, the CA-MXJ150R caters to a wide range of audio needs, from casual listening to more immersive home audio experiences.

One of the standout features of the CA-MXJ150R is its robust amplification system. With 20 watts of RMS power per channel, this mini audio system can fill a room with rich, detailed sound and strong bass performance. The incorporation of a high-quality 2-way speaker system ensures that listeners enjoy a well-balanced audio output, allowing them to appreciate the various nuances in their favorite tracks.

The CA-MXJ150R supports a variety of media formats, making it incredibly versatile. It features a CD player that can handle standard CDs and CD-R/RW formats, allowing users to enjoy their physical music collections. Additionally, a built-in AM/FM tuner provides access to a wide range of radio stations, and the digital tuning feature ensures quick and accurate station selection. For those who prefer digital music, the system comes equipped with USB connectivity, enabling users to play music directly from USB flash drives.

Another important aspect of the JVC CA-MXJ150R is its compatibility with Bluetooth technology. This allows wireless streaming from smartphones, tablets, and other Bluetooth-enabled devices, making it easy to enjoy a playlist without being tethered to the audio system. This feature is particularly valuable for users who favor digital music services, as it opens up access to a seemingly endless library of songs.

The CA-MXJ150R also includes an auxiliary input for connecting external devices, such as MP3 players or other audio sources. This adds to its flexibility, enabling users to tailor their listening experience to their preferences. Additionally, the system's LED display provides clear visibility of the current track, audio settings, and other functions, enhancing usability.

Overall, the JVC CA-MXJ150R combines quality sound, modern connectivity options, and user-friendly features in a compact design that appeals to a broad audience. Whether for a casual get-together or personal enjoyment, this audio system proves to be a reliable companion for all music enthusiasts.