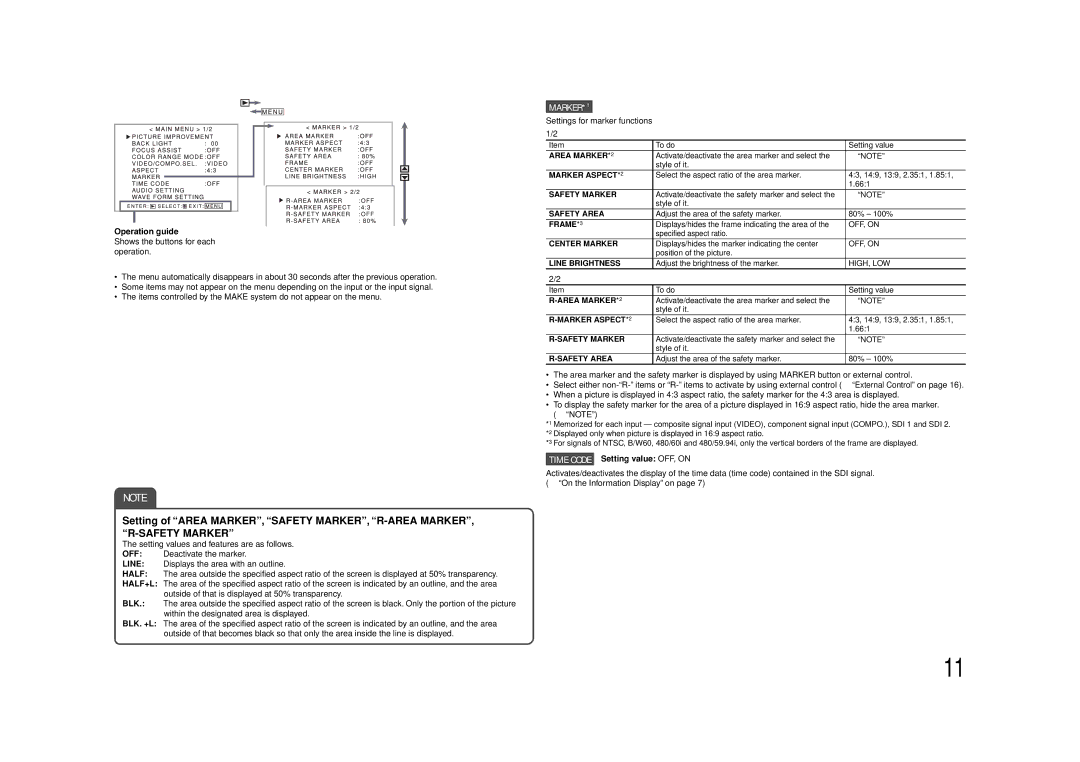
Operation guide

Shows the buttons for each operation.

The menu automatically disappears in about 30 seconds after the previous operation.

Some items may not appear on the menu depending on the input or the input signal.

The items controlled by the MAKE system do not appear on the menu.

NOTE

Setting of “AREA MARKER”, “SAFETY MARKER”, “R-AREA MARKER”,

“R-SAFETY MARKER”

The setting values and features are as follows.

OFF: Deactivate the marker.

LINE: Displays the area with an outline.

HALF: The area outside the specified aspect ratio of the screen is displayed at 50% transparency.

HALF+L: The area of the specified aspect ratio of the screen is indicated by an outline, and the area outside of that is displayed at 50% transparency.

BLK.: The area outside the specified aspect ratio of the screen is black. Only the portion of the picture within the designated area is displayed.

BLK. +L: The area of the specified aspect ratio of the screen is indicated by an outline, and the area

outside of that becomes black so that only the area inside the line is displayed.

MARKER*1

Settings for marker functions 1/2

Item

To do

Setting value

AREA MARKER*2

Activate/deactivate the area marker and select the

“NOTE”


style of it.


MARKER ASPECT*2

Select the aspect ratio of the area marker.

4:3, 14:9, 13:9, 2.35:1, 1.85:1,


1.66:1

SAFETY MARKER

Activate/deactivate the safety marker and select the

“NOTE”


style of it.


SAFETY AREA

Adjust the area of the safety marker.

80% – 100%

FRAME*3

Displays/hides the frame indicating the area of the

OFF, ON


specified aspect ratio.


CENTER MARKER

Displays/hides the marker indicating the center

OFF, ON


position of the picture.


LINE BRIGHTNESS

Adjust the brightness of the marker.

HIGH, LOW

2/2


Item

To do

Setting value

R-AREA MARKER*2

Activate/deactivate the area marker and select the

“NOTE”


style of it.


R-MARKER ASPECT*2

Select the aspect ratio of the area marker.

4:3, 14:9, 13:9, 2.35:1, 1.85:1,


1.66:1

R-SAFETY MARKER

Activate/deactivate the safety marker and select the

“NOTE”


style of it.


R-SAFETY AREA

Adjust the area of the safety marker.

80% – 100%

The area marker and the safety marker is displayed by using MARKER button or external control.

Select either non-“R-” items or “R-” items to activate by using external control (“External Control” on page 16).

When a picture is displayed in 4:3 aspect ratio, the safety marker for the 4:3 area is displayed.

To display the safety marker for the area of a picture displayed in 16:9 aspect ratio, hide the area marker.

(“NOTE”)

*1 Memorized for each input — composite signal input (VIDEO), component signal input (COMPO.), SDI 1 and SDI 2. *2 Displayed only when picture is displayed in 16:9 aspect ratio.

*3 For signals of NTSC, B/W60, 480/60i and 480/59.94i, only the vertical borders of the frame are displayed.

TIME CODE Setting value: OFF, ON

Activates/deactivates the display of the time data (time code) contained in the SDI signal. (“On the Information Display” on page 7)

11

Page 33
Image 33
JVC DT-V9L3DY specifications Safety Marker

DT-V9L3D, DT-V9L3DY specifications

The JVC DT-V9L3D and DT-V9L3DY are high-performance broadcast-grade monitors designed for professional video production environments. With their advanced technologies and features, these monitors provide exceptional color accuracy, sharpness, and detail, making them an ideal choice for both studio and on-location setups.

One of the standout features of the DT-V9L3D and DT-V9L3DY is their 9-inch LCD display with a native resolution of 1920x1080 pixels. This high-definition display ensures that content creators can view their footage in stunning clarity. The monitors utilize IPS technology, which delivers wide viewing angles and consistent color reproduction across the screen. This is particularly beneficial for collaborative work in multi-user environments where multiple professionals need to view the same content simultaneously.

In terms of color accuracy, the JVC DT-V9L3D and DT-V9L3DY monitors excel with their ability to reproduce 100% of the sRGB color space. This level of precision is crucial for cinematographers and video editors who require accurate color representation for grading and correction tasks. Moreover, the monitors come equipped with various color calibration tools, allowing users to calibrate the display to match specific standards or preferences, ensuring consistent results across different viewing devices.

Both models are equipped with a variety of input options, including HDMI, SDI, and RGB connections. The DT-V9L3DY variant additionally supports 3G-SDI input, which is particularly useful for handling high-bandwidth video signals often required in professional broadcast settings. This versatility in connectivity makes these monitors suitable for different production workflows, whether in traditional studio environments or during mobile shoots.

Another notable characteristic is the built-in waveform monitor and vector scope functionality. These tools enable users to precisely analyze their video signals, making it easier to adjust exposure, color balance, and other key aspects of the footage in real time. This integrated functionality reduces the need for separate equipment and streamlines the workflow, making the JVC DT-V9L3D and DT-V9L3DY highly efficient solutions for video production.

In addition to their technical features, the design of the monitors is user-friendly, with intuitive controls and a compact form factor. Their lightweight design makes them easy to transport and mount in various setups. Overall, the JVC DT-V9L3D and DT-V9L3DY stand out as reliable, high-quality monitors that cater to the demands of professionals seeking exceptional performance and accuracy in their video production projects.