32


 SPECIAL
 FEAT
FEAT URES
URES

Turn on the TV and select the VIDEO channel (or AV mode).
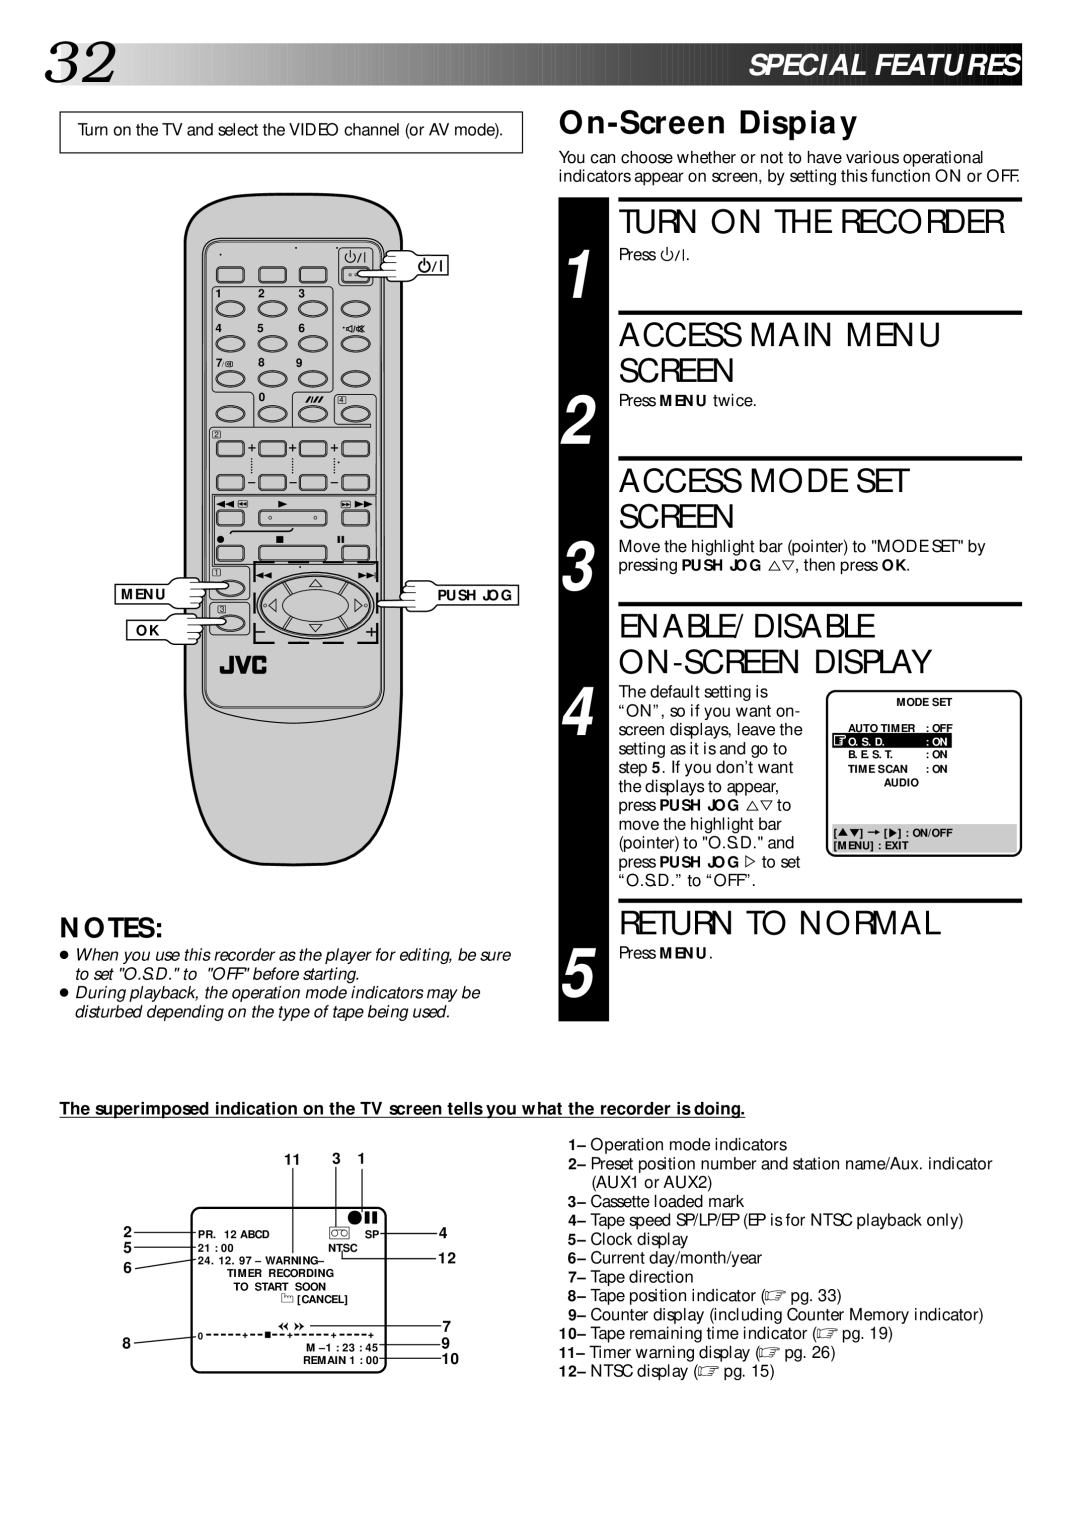
On-Screen Dispiay
You can choose whether or not to have various operational indicators appear on screen, by setting this function ON or OFF.
1 | 2 | 3 |
4 | 5 | 6 |
7/ | 8 | 9 |
| 0 | 4 |
2 |
|
|
1 | 3 | Á |
¦ | 7 | 8 |
1 | 4 | ¢ |
| ||
MENU |
| PUSH JOG |
3 |
|
|
OK |
|
|
1
2
3
TURN ON THE RECORDER
Press ![]()
![]()
![]() .
.
ACCESS MAIN MENU SCREEN
Press MENU twice.
ACCESS MODE SET SCREEN
Move the highlight bar (pointer) to "MODE SET" by pressing PUSH JOG %Þ, then press OK.
ENABLE/DISABLE ON-SCREEN DISPLAY
4
The default setting is “ON”, so if you want on- screen displays, leave the setting as it is and go to step 5. If you don’t want the displays to appear, press PUSH JOG %Þto move the highlight bar (pointer) to "O.S.D." and press PUSH JOG % to set “O.S.D.” to “OFF”.
MODE SET
AUTO TIMER | : OFF |
O. S. D. | : ON |
B. E. S. T. | : ON |
TIME SCAN | : ON |
AUDIO |
|
[5°] = [5] : ON/OFF
[MENU] : EXIT
NOTES:
●When you use this recorder as the player for editing, be sure to set "O.S.D." to "OFF" before starting.
●During playback, the operation mode indicators may be disturbed depending on the type of tape being used.
5
RETURN TO NORMAL
Press MENU.
The superimposed indication on the TV screen tells you what the recorder is doing.
11 3 1
|
|
|
|
|
|
|
|
|
|
|
|
|
|
|
|
2 |
| PR. 12 ABCD |
|
|
|
| q6 |
|
| 4 | |||||
|
|
| ] SP |
|
| ||||||||||
5 |
| 21 : 00 |
|
| NTSC |
|
|
| 12 | ||||||
|
|
|
|
| |||||||||||
|
|
|
|
|
|
|
|
| |||||||
6 |
| 24. 12. 97 – WARNING– |
|
|
|
| |||||||||
|
|
|
| ||||||||||||
|
| TIMER RECORDING |
|
|
|
|
|
|
| ||||||
|
|
| TO START SOON |
|
|
|
|
|
|
| |||||
|
|
|
|
| [CANCEL] |
|
|
|
|
|
|
| |||
|
|
|
|
|
|
|
|
|
|
|
| 7 | |||
| 0 | + | + | + |
| + |
|
| |||||||
8 |
|
|
|
|
| 9 | |||||||||
|
|
|
| M |
|
| |||||||||
|
|
|
|
|
| ||||||||||
|
|
|
|
| REMAIN 1 : 00 |
|
| 10 | |||||||
|
|
|
|
|
|
| |||||||||
1– Operation mode indicators
2– Preset position number and station name/Aux. indicator (AUX1 or AUX2)
3– Cassette loaded mark
4– Tape speed SP/LP/EP (EP is for NTSC playback only) 5– Clock display
6– Current day/month/year 7– Tape direction
8– Tape position indicator (☞ pg. 33)
9– Counter display (including Counter Memory indicator) 10– Tape remaining time indicator (☞ pg. 19)
11– Timer warning display (☞ pg. 26) 12– NTSC display (☞ pg. 15)