6![]()
![]()
![]()
![]()
![]()
![]()
![]()
![]()
![]()
![]()
![]()
![]()
![]()
![]()
![]()
![]()
![]()
![]()
![]()
![]()
![]()
![]()
![]()
![]()
![]()
![]()
![]()
![]()
![]()
![]()
![]()
![]()
![]()
![]()
![]()
![]()
![]()
![]()


 Q
Q
 UICK
UICK SET
SET
 UP
UP
 GUIDE (
 cont.)
STEP
3
AUTO SET UP
SET THE TUNER CHANNELS, CLOCK, GUIDE PROGRAM NUMBERS AND VIDEO CHANNEL*
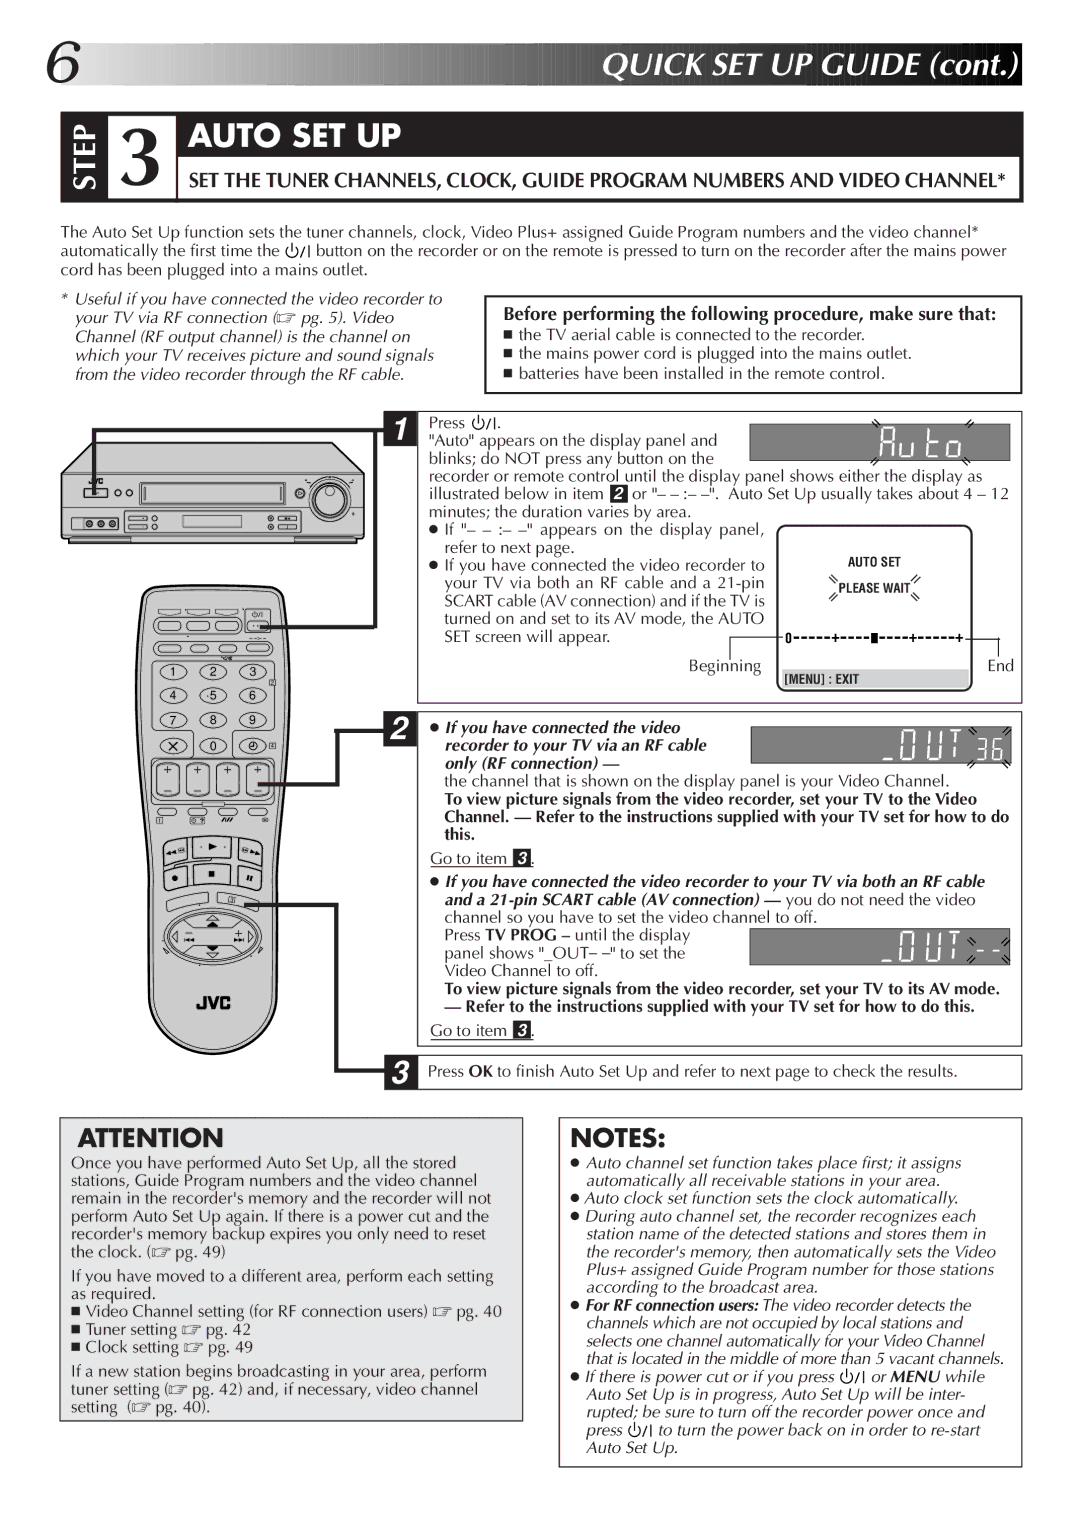
The Auto Set Up function sets the tuner channels, clock, Video Plus+ assigned Guide Program numbers and the video channel*
automatically the first time the ![]()
![]()
![]() button on the recorder or on the remote is pressed to turn on the recorder after the mains power cord has been plugged into a mains outlet.
button on the recorder or on the remote is pressed to turn on the recorder after the mains power cord has been plugged into a mains outlet.
*Useful if you have connected the video recorder to your TV via RF connection (☞ pg. 5). Video Channel (RF output channel) is the channel on which your TV receives picture and sound signals from the video recorder through the RF cable.
Before performing the following procedure, make sure that:
■the TV aerial cable is connected to the recorder.
■the mains power cord is plugged into the mains outlet.
■batteries have been installed in the remote control.
1 |
– |
1 | 2 | 3 |
|
|
|
| 2 |
4 | 5 | 6 |
|
7 | 8 | 9 | 2 |
| 0 |
| |
|
| 4 |
1
3
Press ![]()
![]()
![]() . "Auto" appears on the display panel and
. "Auto" appears on the display panel and
blinks; do NOT press any button on the
recorder or remote control until the display panel shows either the display as illustrated below in item 2 or "–
● If "– |
|
|
|
|
|
|
|
|
| |
refer to next page. |
| AUTO SET |
|
|
|
|
| |||
● If you have connected the video recorder to |
|
|
|
|
|
| ||||
your TV via both an RF cable and a |
| PLEASE WAIT |
|
|
|
| ||||
SCART cable (AV connection) and if the TV is |
|
|
|
|
|
|
|
|
| |
turned on and set to its AV mode, the AUTO |
| + |
|
| + | + |
|
|
| |
SET screen will appear. |
| 0 |
|
|
|
|
| |||
|
|
|
|
|
|
|
|
|
| |
Beginning |
|
|
|
|
|
| End | |||
[MENU] : EXIT |
|
| ||||||||
|
|
|
|
|
|
| ||||
● If you have connected the video ![]() recorder to your TV via an RF cable
recorder to your TV via an RF cable![]()
![]() only (RF connection) —
only (RF connection) —![]() the channel that is shown on the display panel is your Video Channel.
the channel that is shown on the display panel is your Video Channel.
To view picture signals from the video recorder, set your TV to the Video Channel. — Refer to the instructions supplied with your TV set for how to do this.
Go to item 3 .
●If you have connected the video recorder to your TV via both an RF cable
and a
Press TV PROG – until the display panel shows "_OUT–
To view picture signals from the video recorder, set your TV to its AV mode.
—Refer to the instructions supplied with your TV set for how to do this. Go to item 3 .
Press OK to finish Auto Set Up and refer to next page to check the results.
ATTENTION
Once you have performed Auto Set Up, all the stored stations, Guide Program numbers and the video channel remain in the recorder's memory and the recorder will not perform Auto Set Up again. If there is a power cut and the recorder's memory backup expires you only need to reset the clock. (☞ pg. 49)
If you have moved to a different area, perform each setting as required.
■Video Channel setting (for RF connection users) ☞ pg. 40
■Tuner setting ☞ pg. 42
■Clock setting ☞ pg. 49
If a new station begins broadcasting in your area, perform tuner setting (☞ pg. 42) and, if necessary, video channel setting (☞ pg. 40).
NOTES:
●Auto channel set function takes place first; it assigns automatically all receivable stations in your area.
●Auto clock set function sets the clock automatically.
●During auto channel set, the recorder recognizes each station name of the detected stations and stores them in the recorder's memory, then automatically sets the Video Plus+ assigned Guide Program number for those stations according to the broadcast area.
●For RF connection users: The video recorder detects the channels which are not occupied by local stations and selects one channel automatically for your Video Channel that is located in the middle of more than 5 vacant channels.
●If there is power cut or if you press ![]()
![]()
![]() or MENU while Auto Set Up is in progress, Auto Set Up will be inter- rupted; be sure to turn off the recorder power once and
or MENU while Auto Set Up is in progress, Auto Set Up will be inter- rupted; be sure to turn off the recorder power once and
press ![]()
![]()
![]() to turn the power back on in order to
to turn the power back on in order to
