JVC HR-S9900U manual 20 EN, Connect DBS receiver to VCR, How to control the DBS receiver

Models: HR-S9900U

1 88
Download 88 pages 62.1 Kb
Page 20
Image 20

20 EN

INITIAL SETTINGS (cont.)

DBS Receiver Control Setting

Suggested location

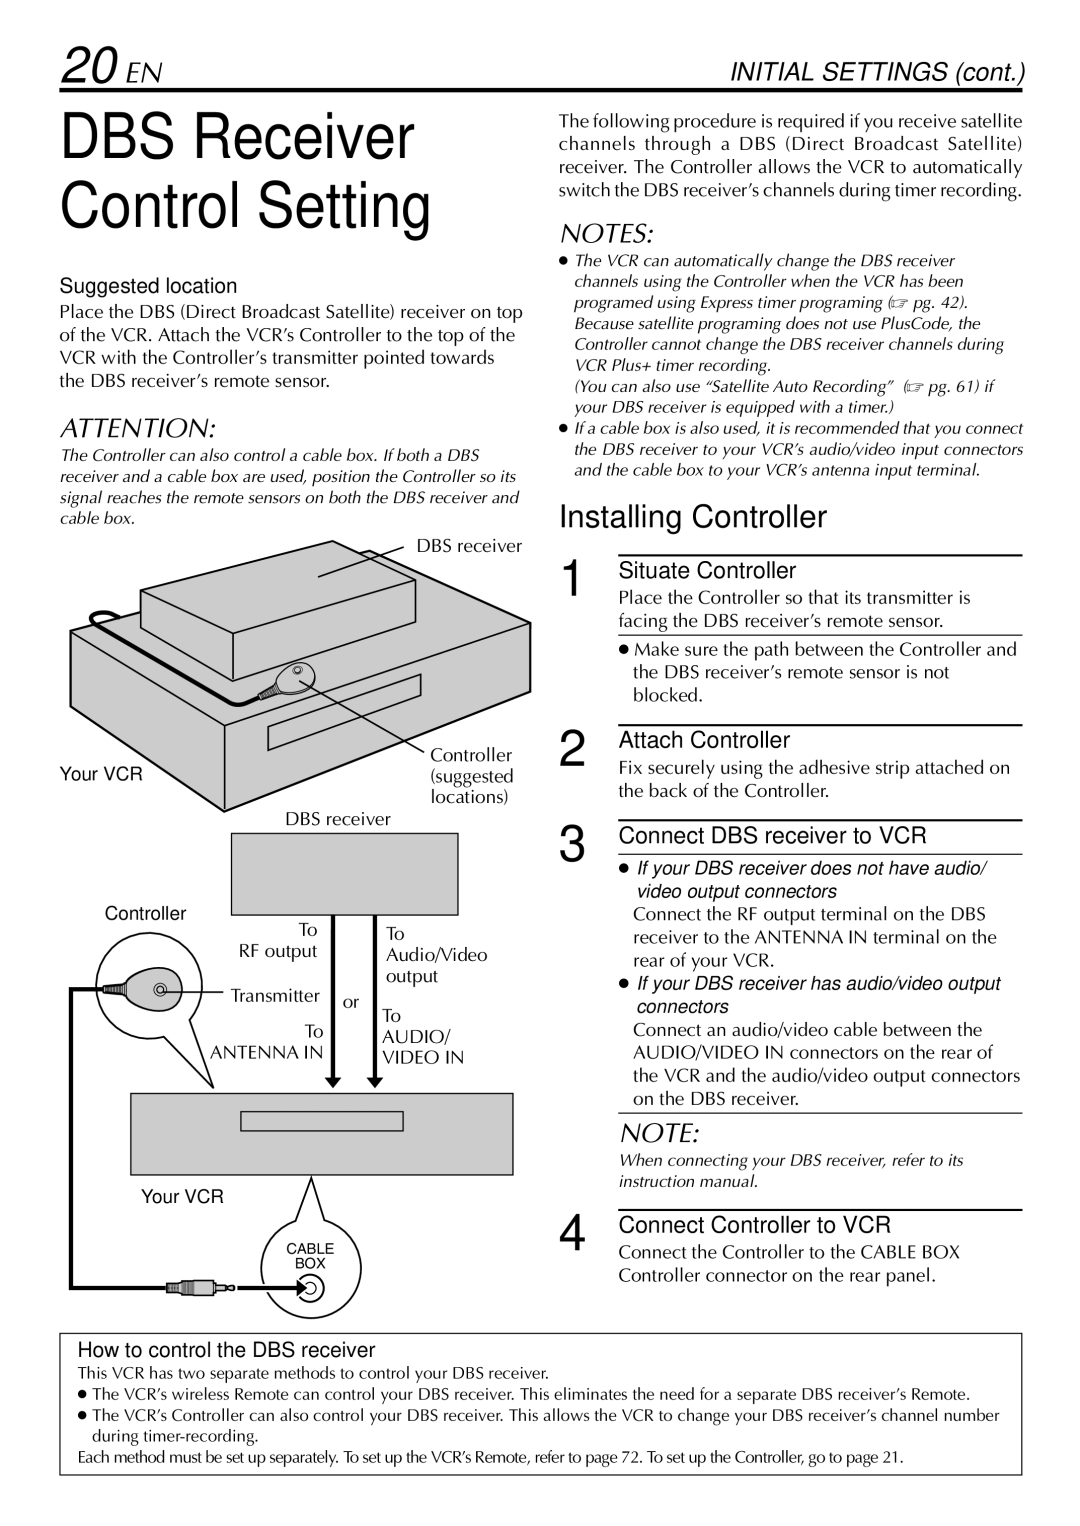
Place the DBS (Direct Broadcast Satellite) receiver on top of the VCR. Attach the VCR’s Controller to the top of the VCR with the Controller’s transmitter pointed towards the DBS receiver’s remote sensor.

ATTENTION:

The Controller can also control a cable box. If both a DBS receiver and a cable box are used, position the Controller so its signal reaches the remote sensors on both the DBS receiver and cable box.

DBS receiver

The following procedure is required if you receive satellite channels through a DBS (Direct Broadcast Satellite) receiver. The Controller allows the VCR to automatically switch the DBS receiver’s channels during timer recording.

NOTES:

The VCR can automatically change the DBS receiver channels using the Controller when the VCR has been programed using Express timer programing ( pg. 42). Because satellite programing does not use PlusCode, the Controller cannot change the DBS receiver channels during VCR Plus+ timer recording.

(You can also use “Satellite Auto Recording” ( pg. 61) if your DBS receiver is equipped with a timer.)

If a cable box is also used, it is recommended that you connect the DBS receiver to your VCR’s audio/video input connectors and the cable box to your VCR’s antenna input terminal.

1Installing Controller

Situate Controller

Controller

Your VCR(suggested

locations)

DBS receiver

Controller


To

To

RF output

Audio/Video

Transmitter

output

or

To

To

AUDIO/

ANTENNA IN

VIDEO IN

Your VCR

CABLE

BOX

Place the Controller so that its transmitter is facing the DBS receiver’s remote sensor.

Make sure the path between the Controller and the DBS receiver’s remote sensor is not

2blocked.

Attach Controller

Fix securely using the adhesive strip attached on

3the back of the Controller.

Connect DBS receiver to VCR

If your DBS receiver does not have audio/ video output connectors

Connect the RF output terminal on the DBS receiver to the ANTENNA IN terminal on the rear of your VCR.

If your DBS receiver has audio/video output connectors

Connect an audio/video cable between the AUDIO/VIDEO IN connectors on the rear of the VCR and the audio/video output connectors on the DBS receiver.

NOTE:

When connecting your DBS receiver, refer to its

4instruction manual.

Connect Controller to VCR

Connect the Controller to the CABLE BOX

Controller connector on the rear panel.

How to control the DBS receiver

This VCR has two separate methods to control your DBS receiver.

The VCR’s wireless Remote can control your DBS receiver. This eliminates the need for a separate DBS receiver’s Remote.

The VCR’s Controller can also control your DBS receiver. This allows the VCR to change your DBS receiver’s channel number during timer-recording.

Each method must be set up separately. To set up the VCR’s Remote, refer to page 72. To set up the Controller, go to page 21.

Page 20
Image 20
JVC HR-S9900U manual 20 EN, Connect DBS receiver to VCR, How to control the DBS receiver

HR-S9900U specifications

The JVC HR-S9900U is a high-end VCR that exemplifies advanced technology and design, catering to avid collectors and home theater enthusiasts alike. Introduced in the late 1990s, this model stands out for its impressive array of features, making it a sought-after device for those who appreciate high-quality video playback and recording.

One of the defining characteristics of the HR-S9900U is its S-VHS (Super VHS) capability, which significantly enhances the resolution and quality of recorded tapes. This technology allows for a sharper and more detailed image compared to standard VHS, making it ideal for preserving home videos and important recordings. The VCR also supports S-VHS ET, which enables the playback of S-VHS tapes in standard VHS players, ensuring compatibility across different formats.

The HR-S9900U features dual playback heads, which improve the tracking accuracy and overall picture quality. This dual-head design not only enhances the clarity of the video but also minimizes artifacts like noise and distortion commonly found in conventional VHS playback. Coupled with advanced digital noise reduction technology, the VCR produces cleaner and clearer images even on older tapes.

Another key highlight of the HR-S9900U is its extensive editing functionalities. It includes features such as high-speed search and frame advance, which allow users to edit and create their own compilations with precision. Additionally, the model is equipped with the "Jog Shuttle" control for precise frame-by-frame navigation, making it easier to find and cut specific moments when editing.

The build quality of the HR-S9900U deserves mention; it features a solid construction that provides durability and a professional feel. The user-friendly interface is complemented by a remote control, which adds convenience for managing playback and recording settings from a distance.

In terms of connectivity, the JVC HR-S9900U includes multiple input and output ports such as S-Video, Composite Video, and Audio outputs. This versatility allows users to connect to various display devices, ensuring compatibility with modern televisions and audio systems.

Overall, the JVC HR-S9900U is a remarkable example of video recording technology from its era. With its S-VHS capabilities, dual-head design, and thoughtful editing features, it remains a valuable option for enthusiasts who value video fidelity and functionality in their home recording systems. Whether preserving cherished memories or curating a video library, the HR-S9900U continues to deliver exceptional performance.