EN 61

Satellite Auto Recording24

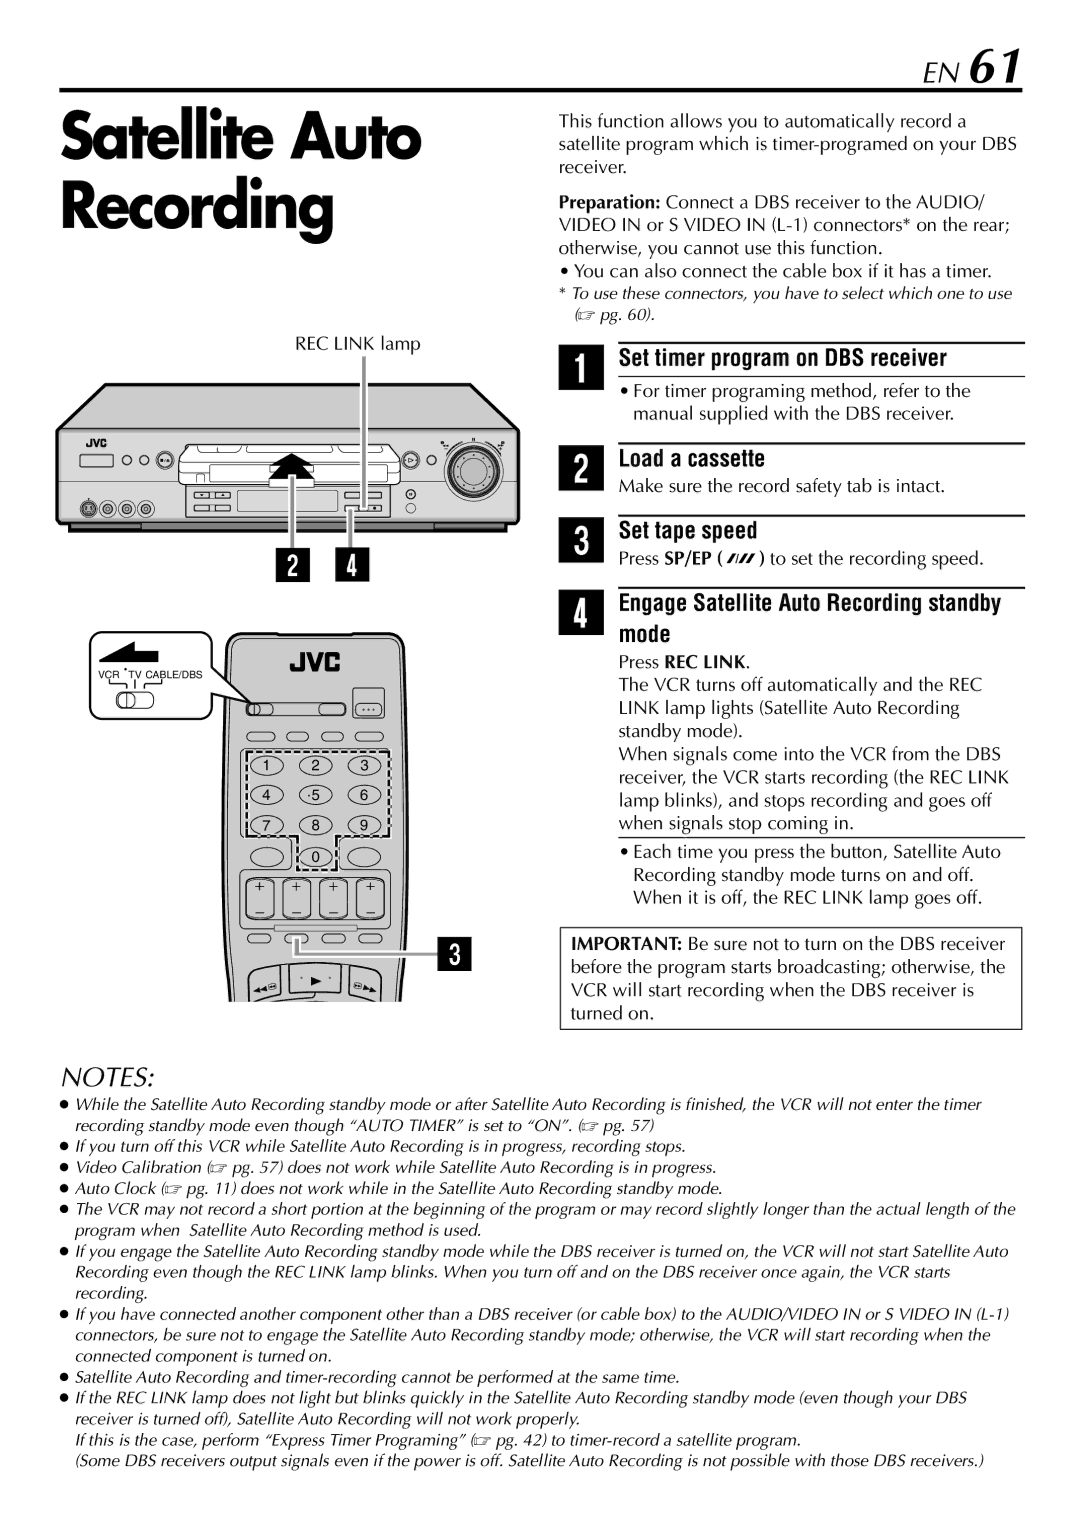
REC LINK lamp

This function allows you to automatically record a satellite program which is timer-programed on your DBS receiver.

Preparation: Connect a DBS receiver to the AUDIO/ VIDEO IN or S VIDEO IN (L-1) connectors* on the rear; otherwise, you cannot use this function.

You can also connect the cable box if it has a timer.

*To use these connectors, you have to select which one to use

1( pg. 60).

Set timer program on DBS receiver


• For timer programing method, refer to the


2manual supplied with the DBS receiver.


Load a cassette


3Make sure the record safety tab is intact.


Set tape speed


4Press SP/EP (

) to set the recording speed.


Engage Satellite Auto Recording standby


mode


VCR TV CABLE/DBS


3

Press REC LINK.


The VCR turns off automatically and the REC


LINK lamp lights (Satellite Auto Recording


standby mode).


1

2

3

When signals come into the VCR from the DBS

receiver, the VCR starts recording (the REC LINK

4

5

6

lamp blinks), and stops recording and goes off

7

8

9

when signals stop coming in.


0


• Each time you press the button, Satellite Auto


Recording standby mode turns on and off.


When it is off, the REC LINK lamp goes off.


IMPORTANT: Be sure not to turn on the DBS receiver


before the program starts broadcasting; otherwise, the


VCR will start recording when the DBS receiver is


turned on.


NOTES:

While the Satellite Auto Recording standby mode or after Satellite Auto Recording is finished, the VCR will not enter the timer recording standby mode even though “AUTO TIMER” is set to “ON”. ( pg. 57)

If you turn off this VCR while Satellite Auto Recording is in progress, recording stops.

Video Calibration ( pg. 57) does not work while Satellite Auto Recording is in progress.

Auto Clock ( pg. 11) does not work while in the Satellite Auto Recording standby mode.

The VCR may not record a short portion at the beginning of the program or may record slightly longer than the actual length of the program when Satellite Auto Recording method is used.

If you engage the Satellite Auto Recording standby mode while the DBS receiver is turned on, the VCR will not start Satellite Auto Recording even though the REC LINK lamp blinks. When you turn off and on the DBS receiver once again, the VCR starts recording.

If you have connected another component other than a DBS receiver (or cable box) to the AUDIO/VIDEO IN or S VIDEO IN (L-1) connectors, be sure not to engage the Satellite Auto Recording standby mode; otherwise, the VCR will start recording when the connected component is turned on.

Satellite Auto Recording and timer-recording cannot be performed at the same time.

If the REC LINK lamp does not light but blinks quickly in the Satellite Auto Recording standby mode (even though your DBS receiver is turned off), Satellite Auto Recording will not work properly.

If this is the case, perform “Express Timer Programing” ( pg. 42) to timer-record a satellite program.

(Some DBS receivers output signals even if the power is off. Satellite Auto Recording is not possible with those DBS receivers.)

Page 61
Image 61
JVC HR-S9900U manual Set timer program on DBS receiver

HR-S9900U specifications

The JVC HR-S9900U is a high-end VCR that exemplifies advanced technology and design, catering to avid collectors and home theater enthusiasts alike. Introduced in the late 1990s, this model stands out for its impressive array of features, making it a sought-after device for those who appreciate high-quality video playback and recording.

One of the defining characteristics of the HR-S9900U is its S-VHS (Super VHS) capability, which significantly enhances the resolution and quality of recorded tapes. This technology allows for a sharper and more detailed image compared to standard VHS, making it ideal for preserving home videos and important recordings. The VCR also supports S-VHS ET, which enables the playback of S-VHS tapes in standard VHS players, ensuring compatibility across different formats.

The HR-S9900U features dual playback heads, which improve the tracking accuracy and overall picture quality. This dual-head design not only enhances the clarity of the video but also minimizes artifacts like noise and distortion commonly found in conventional VHS playback. Coupled with advanced digital noise reduction technology, the VCR produces cleaner and clearer images even on older tapes.

Another key highlight of the HR-S9900U is its extensive editing functionalities. It includes features such as high-speed search and frame advance, which allow users to edit and create their own compilations with precision. Additionally, the model is equipped with the "Jog Shuttle" control for precise frame-by-frame navigation, making it easier to find and cut specific moments when editing.

The build quality of the HR-S9900U deserves mention; it features a solid construction that provides durability and a professional feel. The user-friendly interface is complemented by a remote control, which adds convenience for managing playback and recording settings from a distance.

In terms of connectivity, the JVC HR-S9900U includes multiple input and output ports such as S-Video, Composite Video, and Audio outputs. This versatility allows users to connect to various display devices, ensuring compatibility with modern televisions and audio systems.

Overall, the JVC HR-S9900U is a remarkable example of video recording technology from its era. With its S-VHS capabilities, dual-head design, and thoughtful editing features, it remains a valuable option for enthusiasts who value video fidelity and functionality in their home recording systems. Whether preserving cherished memories or curating a video library, the HR-S9900U continues to deliver exceptional performance.