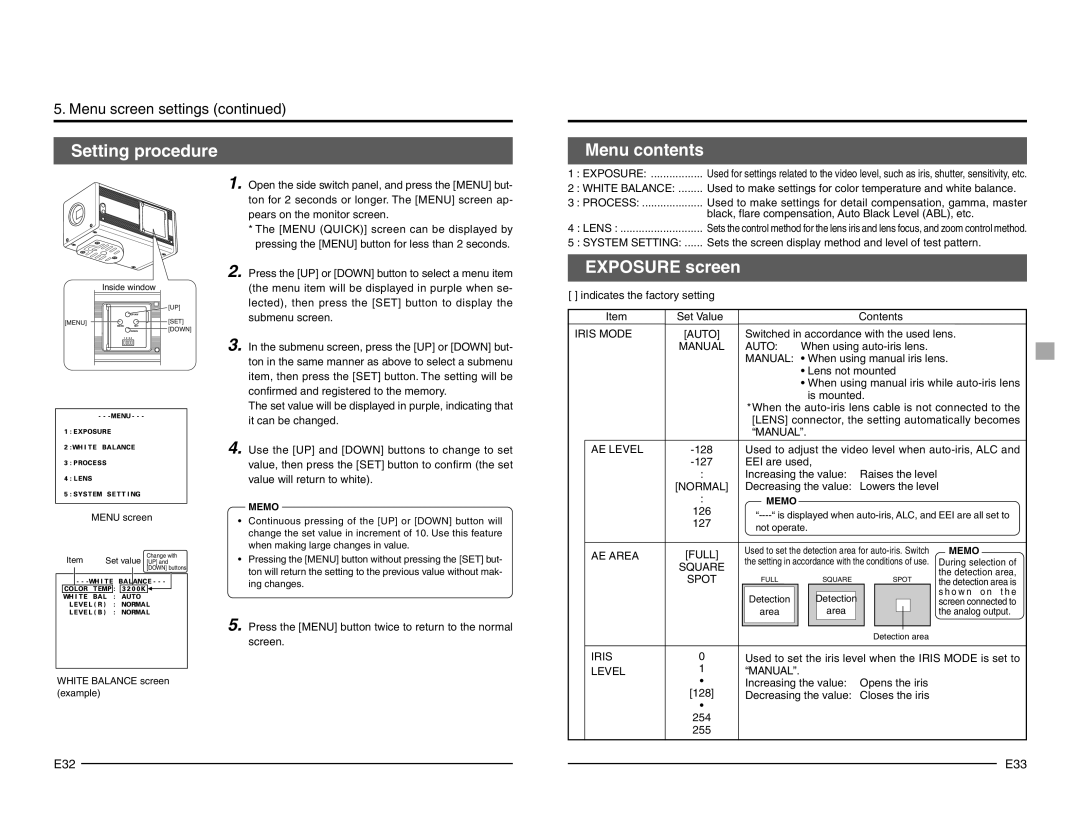
5. Menu screen settings (continued)
Setting procedure
1. | Open the side switch panel, and press the [MENU] but- |
| ton for 2 seconds or longer. The [MENU] screen ap- |
| pears on the monitor screen. |
| * The [MENU (QUICK)] screen can be displayed by |
| pressing the [MENU] button for less than 2 seconds. |
2. | Press the [UP] or [DOWN] button to select a menu item |
| Menu contents |
|
1 | : EXPOSURE: | Used for settings related to the video level, such as iris, shutter, sensitivity, etc. |
2 | : WHITE BALANCE: | Used to make settings for color temperature and white balance. |
3 | : PROCESS: | Used to make settings for detail compensation, gamma, master |
|
| black, flare compensation, Auto Black Level (ABL), etc. |
4 : LENS : | Sets the control method for the lens iris and lens focus, and zoom control method. | |
5 : SYSTEM SETTING: | Sets the screen display method and level of test pattern. | |
| EXPOSURE screen | |
Inside window |
| |
|
| [UP] |
| UP/AW |
|
[MENU] | SET | [SET] |
MENU | [DOWN] | |
| DOWN | |
1 2 | 3 4 |
|
MENU screen |
| (the menu item will be displayed in purple when se- |
| lected), then press the [SET] button to display the |
| submenu screen. |
3. | In the submenu screen, press the [UP] or [DOWN] but- |
| ton in the same manner as above to select a submenu |
| item, then press the [SET] button. The setting will be |
| confirmed and registered to the memory. |
| The set value will be displayed in purple, indicating that |
| it can be changed. |
4. | Use the [UP] and [DOWN] buttons to change to set |
| value, then press the [SET] button to confirm (the set |
| value will return to white). |
| MEMO |
• | Continuous pressing of the [UP] or [DOWN] button will |
| change the set value in increment of 10. Use this feature |
| when making large changes in value. |
[ ] indicates the factory setting | |
Item | Set Value |
IRIS MODE | [AUTO] |
| MANUAL |
AE LEVEL | |
| |
| : |
| [NORMAL] |
| : |
| 126 |
| 127 |
| Contents |
Switched in accordance with the used lens. | |
AUTO: | When using |
MANUAL: | • When using manual iris lens. |
| • Lens not mounted |
| • When using manual iris while |
| is mounted. |
*When the | |
[LENS] connector, the setting automatically becomes | |
“MANUAL”. | |
Used to adjust the video level when | |
EEI are used, | |
Increasing the value: Raises the level | |
Decreasing the value: Lowers the level | |
MEMO |
|
not operate. | |
Item | Set value | Change with |
[UP] and | ||
|
| [DOWN] buttons |
• | Pressing the [MENU] button without pressing the [SET] but- |
| ton will return the setting to the previous value without mak- |
| ing changes. |
5. | Press the [MENU] button twice to return to the normal |
AE AREA | [FULL] |
| SQUARE |
| SPOT |
Used to set the detection area for | ||||||
the setting in accordance with the conditions of use. | ||||||
FULL |
| SQUARE | SPOT | |||
|
|
|
|
|
|
|
Detection |
| Detection |
|
|
|
|
|
|
| ||||
area |
| area |
|
|
|
|
|
|
| ||||
|
|
|
|
|
|
|
|
|
|
|
|
|
|
MEMO |
|
|
During selection of | ||
the detection area, | ||
the detection area is | ||
s h o w n | o n | t h e |
screen connected to | ||
the analog output. | ||
screen. |
Detection area |
WHITE BALANCE screen (example)
IRIS | 0 | |
LEVEL | 1 | |
• | ||
| ||
| [128] | |
| • | |
| 254 | |
| 255 |
Used to set the iris level when the IRIS MODE is set to | |
“MANUAL”. |
|
Increasing the value: | Opens the iris |
Decreasing the value: | Closes the iris |
E32 | E33 |