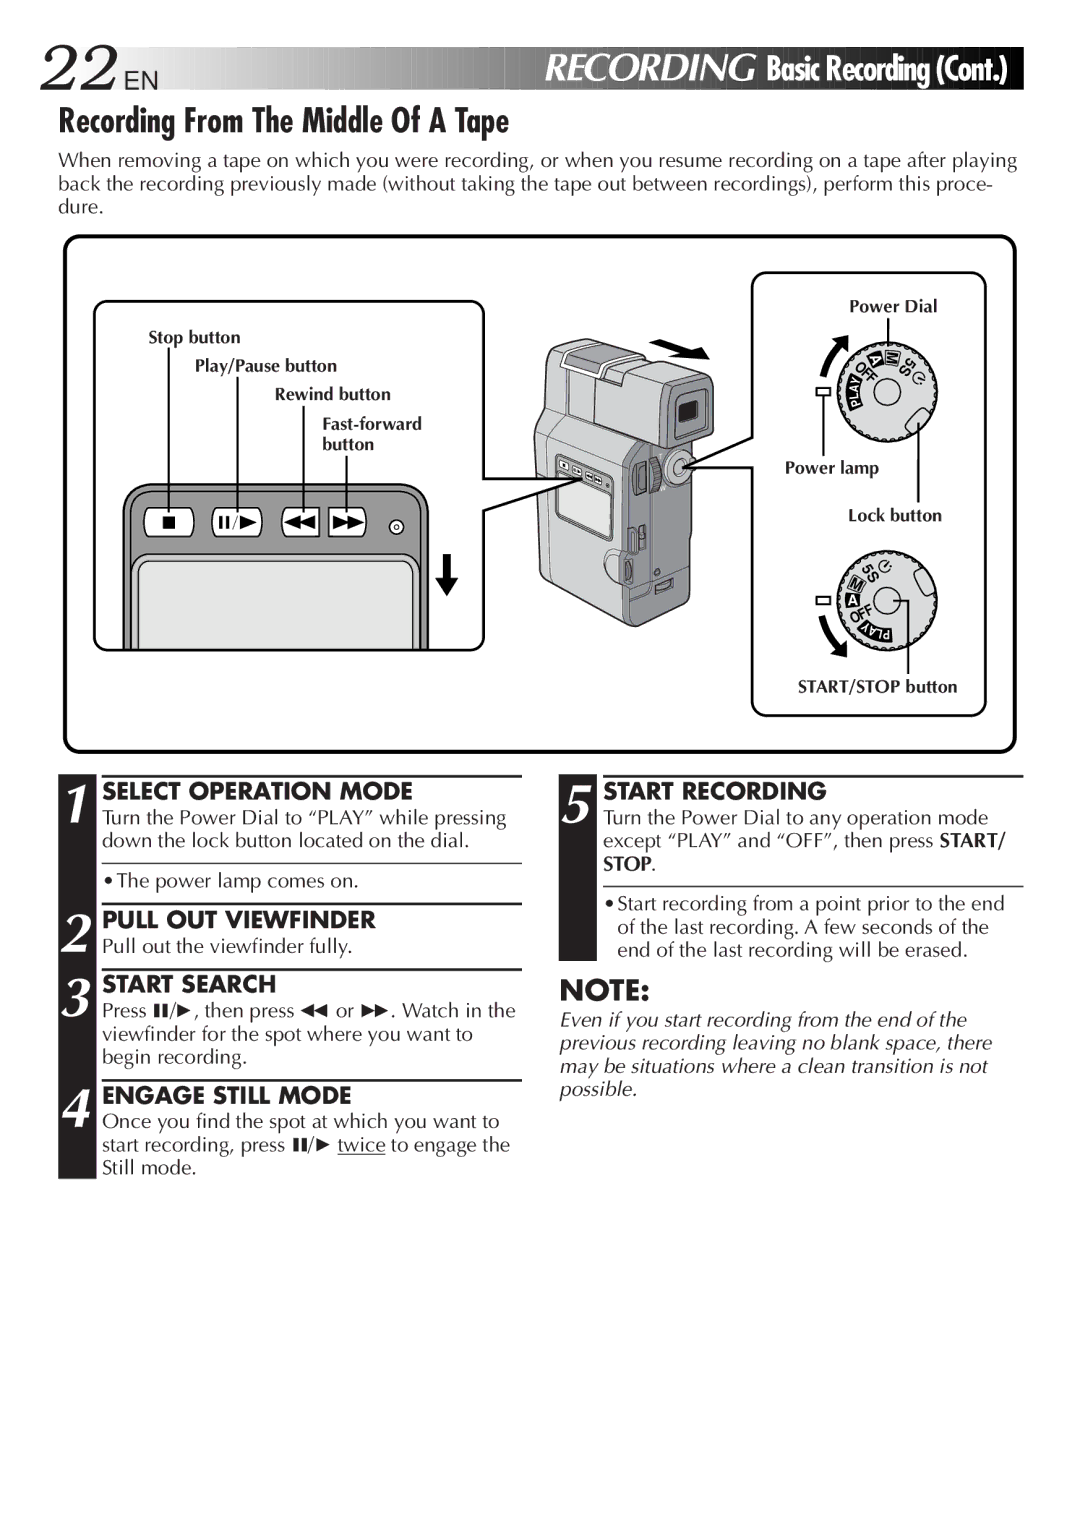
Main
DIGITAL VIDEO CAMERA
INSTRUCTIONS
ENGLISH
GR-DV3
WARNING: TO PREVENT FIRE OR SHOCK HAZARD, DO NOT EXPOSE THIS UNIT TO RAIN OR MOISTURE.
SAFETY PRECAUTIONS
CAUTION
The rating plate (serial number plate) of the AC Power Adapter/Charger is on its bottom.
5. Ventilation
6. Wall or Ceiling Mounting
IMPORTANT PRODUCT SAFETY INSTRUCTIONS
ATTENTION:
INSTALLATION
1. Grounding or Polarization
2. Power Sources
USE
1. Accessories
2. Product and Cart Combination
3. Water and Moisture
SERVICING
SAFETY PRECAUTIONS
Before recording an important scene . . .
PROVIDED ACCESSORIES
ABOUT DV
The data recorded on a tape is digital, but the output of this camcorder is analog.
3
The digital audio signal is recorded here.
4
Page
Page
Charging The Battery Pack
ATTACH
DETACH
SUPPLY POWER TO CHARGER
ATTACH BATTERY/BATTERIES
Installing The Battery Pack
OPEN BATTERY COVER
INSERT CHARGED BATTERY
CLOSE BATTERY COVER
Be careful not to drop the battery pack.
(Cont.)
CONNECT DC CORD TO CAMCORDER
CONNECT DC CORD TO AC POWER ADAPTER/CHARGER
Indoor Use
AC Power Adapter/ Charger AA-V68U
Date/Time Settings
ACCESS DATE/TIME MENU
INPUT DATE AND TIME
Regarding Built-in Rechargeable Battery
(Cont.) Loading/Unloading A Cassette
OPEN CASSETTE COVER
INSERT/REMOVE TAPE
** To protect valuable recordings . . .
Recording Mode Setting
SET RECORDING MODE
(Cont.) Grip Strap Attachment
ATTACH GRIP STRAP TO HAND STRAP EYELET
ATTACH GRIP STRAP TO SUB HAND STRAP EYELET
ADJUST LENGTH
Diopter Adjustment
TURN ON CAMCORDER
ADJUST DIOPTER
Tripod Mounting
Remote Control Unit
Installing The Battery
(Cont.)
Power Dial Position Function
Operation Mode
STOP RECORDING
Before starting recording, make sure you set the date and time (
pg. 13). Even if they dont appear during recording, you can display them during playback (
pg. 53).
Basic Recording
OR
Viewfinder Indications
PRESS IND.ON/OFF BUTTON
Tape Remaining Indicator
Brightness Control
ADJUST BRIGHTNESS
Recording From The Middle Of A Tape
Basic Recording (Cont.)
Time Code
The Time Code cannot be reset.
During fast-forwarding and rewinding, time code indication does not move smoothly.
When blank portion is recorded on a tape
Proper recording
Basic Recording (Cont.)
Zoom
Advanced Features
Displaying The Date And Time During Recording
ACCESS DATE/TIME MENU
CLOSE RECORDING MENU
END 5-SECOND MODE RECORDING
Scene (5-second recording)
Self-Timer
ENGAGE SELF-TIMER MODE
STOP SELF-TIMER RECORDING
END SELF-TIMER RECORDING
Snapshot
SELECT SNAPSHOT MODE
TAKE SNAPSHOT
If you press during Record-Standby . . .
If you press during Recording . . .
EN 29
*
Motor Drive mode:
Menus
Gain Up
Recording Mode, Wide Mode, Zoom Magnifica- tion, Stabilization and
CLOSE RECORDING MENU
REC MODE (Recording mode)
WIDE MODE
ZOOM (Zoom magnification)
DIS (Digital Image Stabilizer)
GAIN UP
ACCESS SYSTEM MENU
System Menu
Snapshot, Scene, Beep/Tally, Wind Cut, Sound Mode, ID numbers and Demonstration Mode.
CLOSE SYSTEM MENU
ON OFF 32kHz 06
FRAME MULTI 4 MULTI 9
PHOTO MODE
SCENE (5-Second Mode) (Z pg. 26)
pg. 43) and exposure control (
pg. 44) enter Full Auto operation.
BEEP/TALLY
FADE/WIPE Effects IMPORTANT:
If certain P.AE/Effects (
ACCESS FADER/WIPE MENU
SELECT EFFECT
OR . . .
W
Example WIPE SCROLL
ACTIVATE FADE IN OR WIPE IN
ACTIVATE FADE OUT OR WIPE OUT
FADE
Picture Wipe/Dissolve
Example
WIPE SCROLL
P
P
W
When
B
H
is selected, the camcorder chooses one of the fades/wipes at random.
W
B
B W
R
FADER AND WIPE MENU (cont.)
?
DISABLE P.AE/EFFECT
P.AE/Effects can be changed during recording or during Record-Standby.
P.AE/Effects IMPORTANT:
If certain Fades or Wipes (
ACCESS P.AE/EFFECT SELECT MENU
SELECT EFFECT
SLOW (Slow Shutter)
SLOW X4
When using Slow Shutter, the image takes on a strobe-like effect.
Use Slow Shutter only in dark areas.
The Manual Focus indication may appear and flash when Slow Shutter is in use.
Manual Focus Adjustment
END ADJUSTMENT OF FOCUS
To Change To Auto Focus . . .
After the Power Dial is set to OFF, Manual Focus is reset to AUTO.
Manual focus is recommended in the following situations:
Exposure Control
To Return To Automatic Exposure Control . . .
After the Power Dial is set to OFF, Exposure Control is reset to AUTO.
Manual exposure adjustment is recommended in the following situations:
When shooting using reverse lighting or when the background is too bright.
0 L
To Return To Automatic Iris Control . . .
Iris lock is recommended in the following situa- tions:
When shooting on a reflective natural background such as at the beach or when skiing.
When shooting objects under a spotlight.
White Balance Adjustment
ACCESS WHITE BALANCE ADJUST- MENT
CLOSE WHITE BALANCE ADJUST- MENT
To Return To Automatic White Balance . . .
To Change The Tint For Recording . . .
Manual White Balance Operation
SET MANUAL WHITE BALANCE
ENTER SETTING
EXIT MANUAL WHITE BALANCE ADJUSTMENT
REWIND TAPE
Basic Playback
Display
VIEWING RECORDING
END PLAYBACK
EN 49
To Perform High-Speed Search . . .
Still Playback
Slow-Motion Playback
The sound is not available during High-Speed Search.
Advanced Features
INFORMATION
ACCESS PLAYBACK EFFECT SELECT
SELECT PLAYBACK EFFECT
Classic Film, Monotone, Sepia and Strobe
Playback Effects
Advanced Features (Cont.)
Playback Menu
Synchro Comp
Time Code
Playback Sound (32 kHz, 48 kHz), Synchro Comp, Display
Playback Sound
TIME CODE (Displaying The Time Code During Playback)
DISPLAY (Displaying the Date During Playback)
Basic Connections
VCR/TV Connection (when connecting directly to the camcorder)
CONNECT CAMCORDER TO TV OR VCR
CONNECT VCR OUTPUT TO TV INPUT
SELECT TVS VIDEO MODE
VCR/TV Connection (using AC Charger Station*)
ATTACH AND LOCKS
Basic Connections (Cont.)
*
CONNECT AC CHARGER STATION TO TV OR VCR
If Using A VCR . . . go to step 4. If not . . . go to step 5.
CONNECT VCR OUTPUT TO TV INPUT
EN 57
Charging The Camcorder Battery Pack
Charging Two Battery Packs
Advanced Connections
Connection To A Video Unit Equipped With A DV Connector
CONNECT CAMCORDER TO PRINTER OR VIDEO UNIT EQUIPPED WITH DV INPUT CONNECTOR
CONNECT PRINTER TO PC
SUPPLY POWER
Dubbing
PAUSE RECORDING
EDITING
Digital Dubbing
To use this camcorder as a recorder . . .
3 1 6 789`
4
5
Brand Setting
SET REMOTE/VCR CODE
SET REMOTE TO OPERATE VCR
OPERATE VCR
Youre now ready to try Random Assemble Editing.
Random Assemble Editing
START SOURCE PLAYBACK
EXECUTE FADE/WIPE IN (IF NECESSARY)
SET EDIT-IN POINT
SET EDIT-OUT POINT
USE FADE WIPE ON SCENE TRANSITION (IF NECESSARY)
USE P.AE/EFFECT (IF NECESSARY)
REGISTER ADDITIONAL SCENES
PREPARE SOURCE TAPE
ENGAGE VCR'S RECORD-PAUSE MODE
START EDITING
STOP EDITING
For More Accurate Random Assemble Editing
Diagnosing VCRs against Camcorder Timing
PREPARE FOR R.A. EDIT
CHOOSE A SCENE
(Cont.)
EN 67
CLOSE MENU
ACCESS PLAYBACK MENU
INPUT CORRECTION DATA
Adjustment of VCRs against Camcorder Timing
Page
Page
Page
Page
Page
REMOVE POWER SUPPLY
CLEAN EXTERIOR
CLEAN LENS
AFTER USE
CLEAN VIEWFINDER
PUSH VIEWFINDER BACK IN
When using a cleaner or chemically treated cloth refer to the cautions of each product.
Cleaning The Camcorder
CONTROLS, INDICATIONS AND CONNECTORS
4 # %
!
0
9
^ * ) q w e
(
&tr y u
w
e
(Cont.)
1
@
2
3
Remote Control Unit (optional)
1
2
3
4
Indications During Recording
(Cont.)
1*2*3 5 6*7*4* 8* 0*
*
&
Indications During Playback And Digital Dubbing
INDICATIONS FUNCTION
Warning Indications
(Cont.)
TAPE! TAPE END SET DATE/TIME! E01 E06
CAUTIONS
It is normal for the battery pack to be warm after charging, or after use.
Recharging time is based on room temperature of 20C (68F).
The lower the temperature, the longer recharging takes.
Cassettes
CAUTIONS
Main Unit
INFORMATION:
SPECIFICATIONS
CAMCORDER
General
Video
Audio
GLOSSARY OF TERMS
INDEX
F
G
I
L
P
R
S
T
W