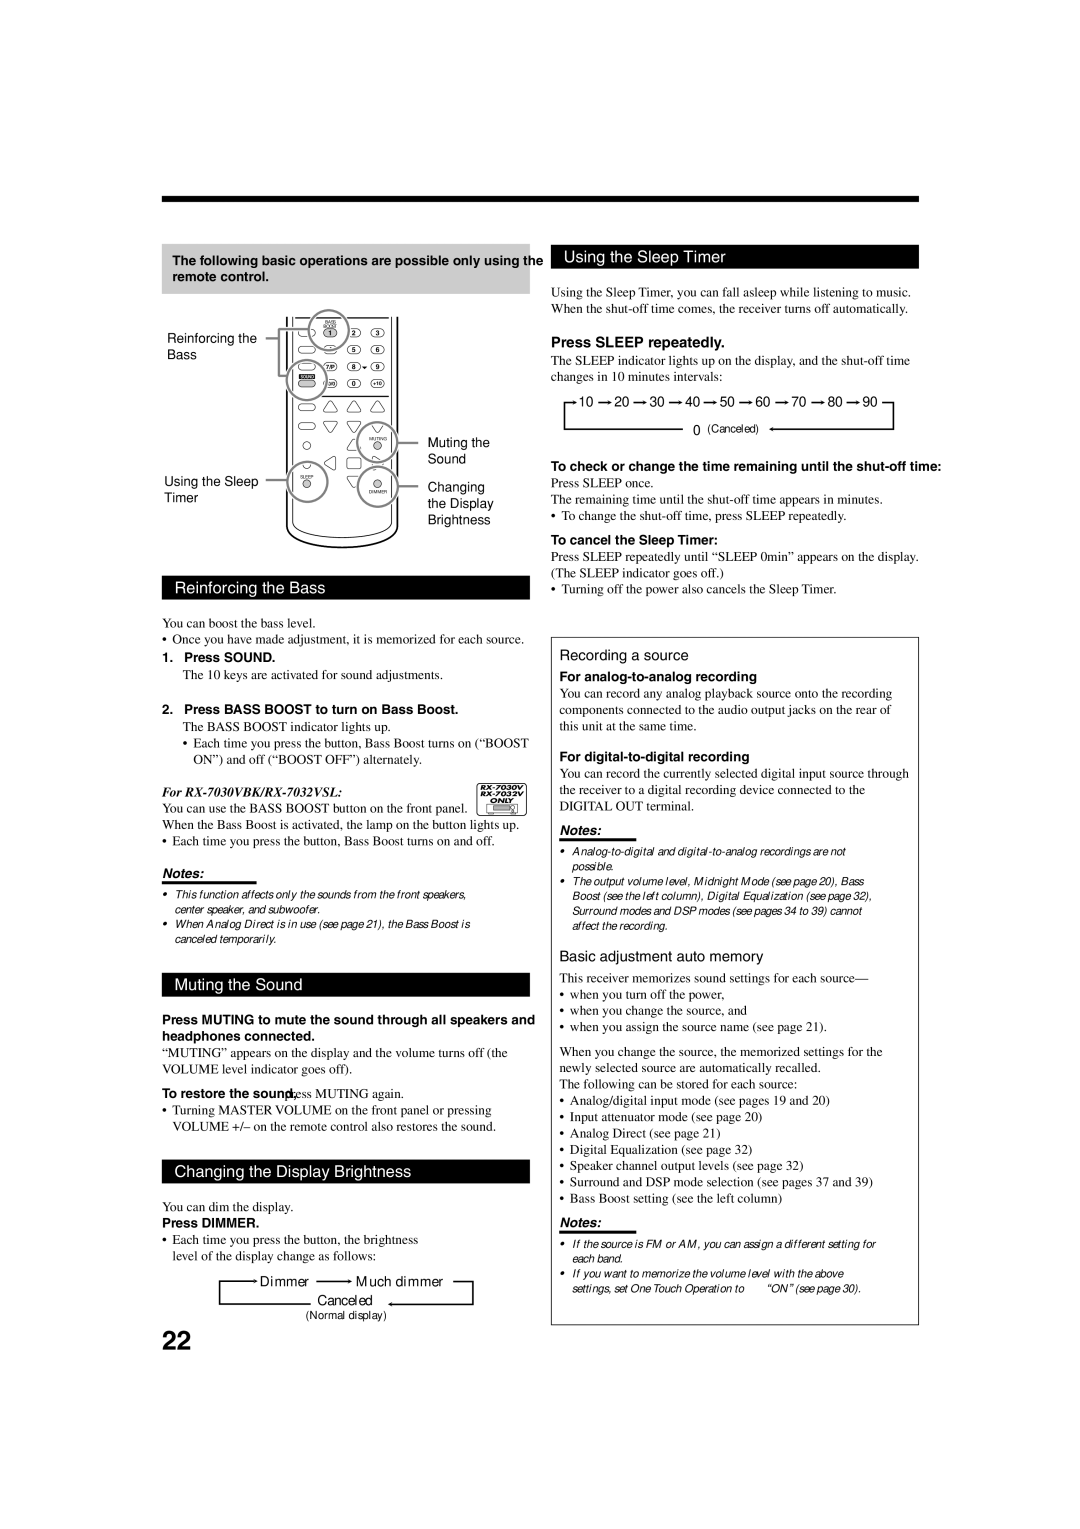
AUDIO/VIDEO CONTROL RECEIVER
RX-8030VBK RX-7030VBK/RX-7032VSL
A/V CONTROL RECEIVER
7/P 8 10/0 0 +10 CONTROL
Warnings, Cautions and Others
For Canada/pour Le Canada
For U.S.A
Table of Contents
Features
Precautions
Introduction
—ONLYfor RX-8030VBK
Parts Identification
Remote Control
How to open the front door
Front Panel
Display Window
u i o ; a s
1 2 3 4
67 8 9 0 - = ~ ! @
Rear Panel
Remote Control
RX-8030VBK
RX-7030VBK/RX-7032VSL
Supplied ×: Not supplied
Before Installation
Connecting the FM and AM Antennas
Checking the Supplied Accessories
Putting Batteries in the Remote Control
3 Insert the speaker signal cable
Connecting the Speakers
2 Open the speaker terminal
4 Close the speaker terminal
Connecting the subwoofer speaker
Placing speakers
the Speakers” on page
Front speakers and center speaker
Connecting Audio/Video Components
Enhancing your audio system
—Onlyfor RX-8030VBK
Analog Connections
CD player
RX-8030VBK RX-7030VBK/RX-7032VSL CD player
CD recorder
For RX-8030VBK
When using the digital input terminal
MD recorder
For RX-8030VBK
For RX-7030VBK/RX-7032VSL
VCRs
For RX-8030VBK
For RX-7030VBK/RX-7032VSL
TV and/or DBS tuner
DVD player
Connecting the Power Cord
Digital Connections
Notes
Daily Operational Procedure
1Turn on the power
3Adjust the volume
Turning On the Power
Adjusting the Volume
L C R
L C R
SUBWFR
Activating and Adjusting the
Selecting the Analog or Digital Input Mode
Selecting the Front Speakers
Subwoofer Sound
Setting the Dynamic Range
Attenuating the Input Signal
DGTL AUTO
DGTL D.D
Turning Analog Direct On and Off
Changing the Source Name
Making Sounds Natural
When changing the source name from “TV” to “DBS”
Using the Sleep Timer
Reinforcing the Bass
Muting the Sound
Changing the Display Brightness
Tuning in to Stations Manually
Using Preset Tuning
Receiving Radio Broadcasts
1. Press FM or AM to select the band
Selecting the FM Reception Mode
While listening to an FM station, press FM MODE
1. Press FM/AM to select the band
From the remote control
Basic Settings
Setting the Speakers Configuration Remote
1. Press QUICK SPEAKER SETUP
3. Press in MULTI JOG PUSH SET
Basic Setting Items
Speakers channels number and the size
Room size and the speaker distance
Notes
Basic Procedure
1. Press SETTING
3. Push in MULTI JOG PUSH SET
5.Press EXIT
LSB RSB
7Measuring unit—DISTUNIT
Notes
7Subwoofer output—SWFR OUTPUT
When “DIGITAL IN 1 DGTL IN COAX” is set to “DVD”
When “DIGITAL IN 1 DGTL IN COAX” is set to “CD”
When “DIGITAL IN 1 DGTL IN COAX” is set to “CDR”
When “DIGITAL IN 1 DGTL IN COAX” is set to “MD”
When “DIGITAL IN 1 DGTL IN COAX” is set to “DVD”
When “DIGITAL IN 1 DGTL IN COAX” is set to “CD”
When “DIGITAL IN
When “DIGITAL IN
Adjusting Sound
1. Press ADJUST
Basic Setting Items
Basic Procedure
Adjusting the Equalization Patterns
Adjusting the Speaker Output Levels
7Equalization adjustment—DIGITALEQ
7Adjustable speakers
7Adjustable parameters
1.Press SOUND
Using the Surround Modes
Reproducing Theater Ambience
Introducing the Surround Modes
Dolby Pro Logic
DTS*2
DTS Digital Surround
DTS Extended Surround DTS-ES
Surround Modes Applicable to the Various Software
3D HEADPHONE Mode—3DH PHONE
1 Virtual 6.1-channelsurround
2.Press SURROUND to activate the Surround mode
Activating the Surround Modes
PL II MOVIE PL II MUSICPRO LOGIC
NEO:6MUSIC NEO:6CINMA
Using the DSP Modes
Reproducing the Sound Field
Introducing the DSP Modes
DAP modes
Activating the DSP Modes
1.Select and play any sound source
ALL Channel Stereo mode
Monaural Film
Using the DVD MULTI Playback Mode
Activating the DVD MULTI Playback Mode
COMPU LINK Remote Control System
the same time
3. Press the play 3 button on the CD player
AV COMPU LINK Remote Control System
CONNECTIONS 1: AV COMPU LINK Connection
CONNECTIONS 2: Video Cable Connection
Notes
•See “CONNECTIONS 1” on the previous page
Operating JVC’s Audio/Video Components
Operating Audio Components
Tuner
Sound control section Amplifier
CD changer
Turntable
CD recorder
Cassette deck
Operating Video Components
For RX-8030VBK
DVD player
menu operations
Operating Other Manufacturers’ Video Equipment
1.Press and hold CATV/DBS
2.Press CATV/DBS CONTROL
1.Press and hold TV 2.Press TV/DBS
2.Press VCR 1 for RX-8030VBKor VCR for RX
7030VBK/RX-7032VSL
4. Release VCR 1 or VCR
1. Press and hold AUDIO 2 Press DVD
For TV
Troubleshooting
PROBLEM
SOLUTION
POSSIBLE CAUSE
Specifications
Amplifier
FM tuner IHF
AM tuner
RX-7030VBK/RX-7032VSL
Amplifier
Audio
Video
LIMITED WARRANTYAUDIO-2
WHAT YOU MUST DO FOR WARRANTY SERVICE
WHAT IS NOT COVERED
WHAT WE WILL DO
Authorized Service Centers
HOW TO LOCATE YOUR JVC SERVICE CENTER
Do not service the television yourself
Accessories
RX-7030VBK/RX-7032VSLAUDIO/VIDEO CONTROL RECEIVER
2003 VICTOR COMPANY OF JAPAN, LIMITED
0203NHMMDWJEIN
RX-8030VBK
English Français
AMPLI/TUNER DE COMMANDE AUDIO/VIDEO
RX-8030VBK RX-7030VBK
AUDIO/VIDEO CONTROL RECEIVER
Warnings, Cautions and Others
WARNING: TO REDUCE THE RISK OF FIRE
OR ELECTRIC SHOCK, DO NOT EXPOSE
THIS APPLIANCE TO RAIN OR MOISTURE
For Canada/pour Le Canada
For Canada/pour le Canada
For U.S.A
Caution: Proper Ventilation
Attention: Ventilation Correcte
RX-8030VBK/RX-7030VBK
English
Table of Contents
Features
Precautions
Introduction
English
Parts Identification
English
English
u i o
English
•SPEAKERS ON/OFF 2 button 3• SURROUND button
English
RX-8030VBK
RX-7030VBK
English
RX-8030VBK
RX-7030VBK
Differences between RX-8030VBKand RX-7030VBK
Before Installation
Connecting the FM and AM Antennas
Checking the Supplied Accessories
Putting Batteries in the Remote Control
3 Insert the speaker signal cable
Connecting the Speakers
English
2 Open the speaker terminal
After connecting the speakers, set the speaker
setting see page
“Setting the Speakers” on page
When one surround back speaker is connected
Connecting Audio/Video Components
Power amplifier
English
Audio component connections
English
CD player
RX-8030VBK/RX-7030VBK CD player
CD recorder
When using the digital input terminal
English
Video component connections
Video camera
English
VCRs
For RX-8030VBK
TV and/or DBS tuner
English
RX-8030VBK/RX-7030VBK
Connecting the Power Cord
•Do not touch the power cord with wet hands
English
Notes
Daily Operational Procedure
1Turn on the power
3Adjust the volume
Turning On the Power
Adjusting the Volume
From the remote control
L C R
L C R
Activating and Adjusting the
Selecting the Analog or Digital Input Mode
English
Selecting the Front Speakers
Setting the Dynamic Range
Attenuating the Input Signal
English
DGTL AUTO
When changing the source name from “TV” to “DBS”
When changing the source name from “TAPE” to “MD”
English
Turning Analog Direct On and Off
Using the Sleep Timer
Dimmer Much dimmer Canceled
English
Reinforcing the Bass
Tuning in to Stations Manually
Using Preset Tuning
Receiving Radio Broadcasts
English
Selecting the FM Reception Mode
While listening to an FM station, press FM MODE
From the remote control
English
Basic Settings
Setting the Speakers Configuration Remote
1. Press QUICK SPEAKER SETUP
English
Basic Setting Items
English
Speakers channels number and the size
Room size and the speaker distance
Basic Procedure
1. Press SETTING
7Subwoofer setting—SUBWOOFER
English
English
LSB RSB
7Measuring unit—DISTUNIT
Notes
When “DIGITAL IN 1 DGTL IN COAX” is set to “DVD”
When “DIGITAL IN 1 DGTL IN COAX” is set to “CD”
When “DIGITAL IN 1 DGTL IN COAX” is set to “CDR”
When “DIGITAL IN 1 DGTL IN COAX” is set to “MD”
When “DIGITAL IN 1 DGTL IN COAX” is set to “DVD”
When “DIGITAL IN 1 DGTL IN COAX” is set to “CD”
When “DIGITAL IN
When “DIGITAL IN
Adjusting Sound
Basic Setting Items
Basic Procedure
1. Press ADJUST
7Equalization adjustment—DIGITALEQ
7Adjustable speakers
English
Notes
7Adjustable parameters
English
Using the Surround Modes
English
Reproducing Theater Ambience
Introducing the Surround Modes
English
Dolby Pro Logic
DTS*2
DTS Digital Surround
English
Surround Modes Applicable to the Various Software
NONE
2.Press SURROUND to activate the Surround mode
English
Activating the Surround Modes
PL II MOVIE PL II MUSICPRO LOGIC
Using the DSP Modes
English
Reproducing the Sound Field
Introducing the DSP Modes
ALL Channel Stereo mode
English
Activating the DSP Modes
1.Select and play any sound source
Using the DVD MULTI Playback Mode
Activating the DVD MULTI Playback Mode
English
RX-8030VBK/RX-7030VBK
COMPU LINK Remote Control System
English
the same time
3. Press the play 3 button on the CD player
AV COMPU LINK Remote Control System
English
Notes
DO NOT connect to the TV with
English
•See “CONNECTIONS 1” on the previous page
Operating JVC’s Audio/Video Components
English
Operating Audio Components
Tuner
English
CD changer
Turntable
CD recorder
English
Operating Video Components
You can always perform the following operations
DVD player
Press and hold CATV/DBS
Press CATV/DBS CONTROL
Operating Other Manufacturers’ Video Equipment
English
2.Press VCR 1 for RX-8030VBKor VCR for RX 7030VBK
English
4. Release VCR 1 or VCR
1. Press and hold AUDIO 2 Press DVD
English
00*, 02,
Troubleshooting
English
The display does not light up
Specifications
English
Amplifier
FM tuner IHF
English
Amplifier
FM tuner IHF
AM tuner
EN, FR
2003 VICTOR COMPANY OF JAPAN, LIMITED
0203NHMMDWJEIN
VICTOR COMPANY OF JAPAN, LIMITED