CONNECTION/INSTALLATION

MENU SETTING

Auto white balance control adjustment

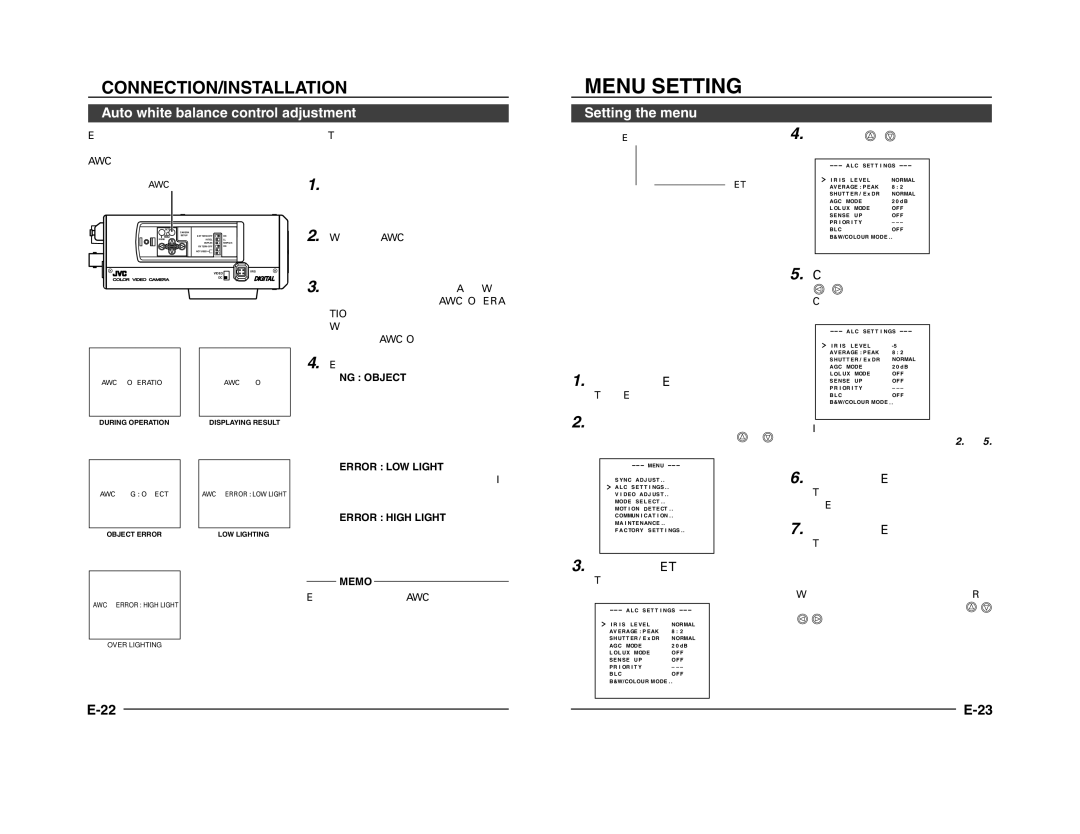
Each light source has its own colour temperature. Therefore, when the main light source lighting an object is changed, the white balance should be adjusted again by pressing the AWC button.

Setting the menu

MENU button

4.Use the , button to set the cursor (>) to a desired item.

A L C SE T T I NGS

AWC button

SET


CAMERA


AWC

SETUP

EXT TERM-OFF

ON

MENU


INT/GL

LL


DUPLEX

SIMPLEX


RX TERM-OFF

ON


NOT USED


IRIS


VIDEO


DC

1. Place a white object under the same lighting condition as the object to be shot and zoom in to fill the screen with white.

2. When the AWC button is pressed for approx. one sec., the white balance is adjusted for the object being recorded.

3. During the time when the Auto White function is operated, "AWC OPERA- TION" is displayed (for approx. 0.5 sec.). When the appropriate white balance is acquired, "AWC OK" is displayed.

SET button

I R I S LE VE L

NORMAL

AV E RA GE : P EAK

8 : 2

S H UT T ER / E x DR

NORMAL

AGC MODE

2 0 dB

L OL UX MODE

OF F

S E NS E U P

OF F

P R I OR I T Y

– – –

B L C

OF F

B&W/COLOUR MODE . .

5.Change the set value using the , button.

Change of the set value displays a change mark (›).

A L C SE T T I N GS

AWC OPERATION

DURING OPERATION

AWC NG : OBJECT

OBJECT ERROR

AWC ERROR : HIGH LIGHT

AWC OK

DISPLAYING RESULT

AWC ERROR : LOW LIGHT

LOW LIGHTING

4. Error message display

NG : OBJECT

Displayed when there is not enough white colour on an object or the colour temperature is not suitable.

By taking a shot of a white object to fill the screen, adjust the white balance again.

ERROR : LOW LIGHT

Displayed when the light is low. In- crease the illumination then re-adjust the white balance.

ERROR : HIGH LIGHT

Displayed when the light is too bright. Decrease the illumination then re-ad- just the white balance.

MEMO

Even if you press the AWC button, the white balance will not be re-adjusted during the operation in the black-and-white mode.

1.Press the MENU button.

The MENU screen is displayed.

2.Set the cursor (>) to a desired

sub-menu using the , button.

MENU

S YNC A DJ UST . .

A L C S E T T I NGS . .

V I DEO A DJ UST . .

MODE S E L ECT . .

MOT I ON D E TE CT . .

COMMUN I CAT I ON . .

MA I NTE N ANCE . .

F A C TORY SET T I NGS . .

3.Press the SET button.

The selected sub-menu screen is displayed.

A L C SE T T I NGS

I R I S LE VE L

NORMAL

AV E RA GE : P EAK

8 : 2

S H UT T ER / E x DR

NORMAL

›I R I S L E V E L

-5

AV E R A GE : P E AK

8 : 2

S H U T T ER / E x DR

NORMAL

AGC MOD E

2 0 d B

L OL U X MOD E

OF F

S E N S E U P

OF F

P R I OR I T Y

– – –

B L C

OF F

B&W/COLOUR MODE . .

If you wish to change the set values of another items, repeat items 2. to 5. above.

6.Press the MENU button.

The screen returns to the previous one (MENU screen).

7.Press the MENU button.

The screen returns to the normal screen (quitting the menu display).

*When the setting is executed using the RM-

P2580, use a joy stick instead of the button.

OVER LIGHTING

AGC MODE

2 0 dB

L OL UX MODE

OF F

S E NS E U P

OF F

P R I OR I T Y

– – –

B L C

OF F

B&W/COLOUR MODE . .

E-22


E-23


Page 12
Image 12
JVC TK-C1431 manual Menu Setting, Auto white balance control adjustment, Setting the menu

TK-C1431 specifications

The JVC TK-C1431 is a high-performance CCTV camera designed for professional surveillance applications. Its compact design and versatile features make it an excellent choice for various environments, including retail, transportation, and public spaces. This camera is known for delivering exceptional image quality and reliable performance in diverse lighting conditions.

One of the main features of the TK-C1431 is its advanced CCD sensor, which ensures crisp and clear image capture. The camera provides a resolution of 540 TV lines, allowing for detailed surveillance footage. Its sensitivity rating is notable, with a low-light performance of 0.05 lux at F1.2, enabling it to produce usable images even in dimly lit conditions. This feature is crucial for security professionals who require reliable performance around the clock, regardless of the lighting environment.

The TK-C1431 also integrates JVC's proprietary Image Stabilization Technology, which minimizes the effects of vibrations or movement that could compromise image quality. This technology is especially useful in dynamic environments where the camera may be subjected to external disturbances, such as wind or nearby traffic. As a result, users can expect stable and clear images even in less-than-ideal scenarios.

Moreover, the camera offers versatile installation options, thanks to its adjustable mounting options. Users can mount it on walls or ceilings, accommodating various surveillance needs. The TK-C1431 also features a varifocal lens, allowing for adjustable focal lengths ranging from 3.8mm to 9.5mm. This flexibility provides security personnel with the ability to zoom in on specific areas or objects, enhancing their monitoring capabilities.

Additionally, the JVC TK-C1431 supports various video output formats, including composite video output, making it compatible with a wide range of DVRs and monitoring systems. Its robust build quality ensures reliability in challenging environments, featuring a weather-resistant housing that allows for outdoor installation.

With these advanced features, technologies, and characteristics, the JVC TK-C1431 stands out as a reliable and effective option in the field of surveillance cameras. Whether for a small business or larger security operations, its combination of high-quality imaging, adaptability, and rugged design makes it an excellent choice for enhancing security systems. The TK-C1431 is an investment in peace of mind, providing surveillance solutions that meet the demands of today’s security challenges.