Introduction (continued)
Setting the Lens and
Switches (TK-C215V4)
Set the video setting switches on the camera unit before mounting it.
To set the switches, use a
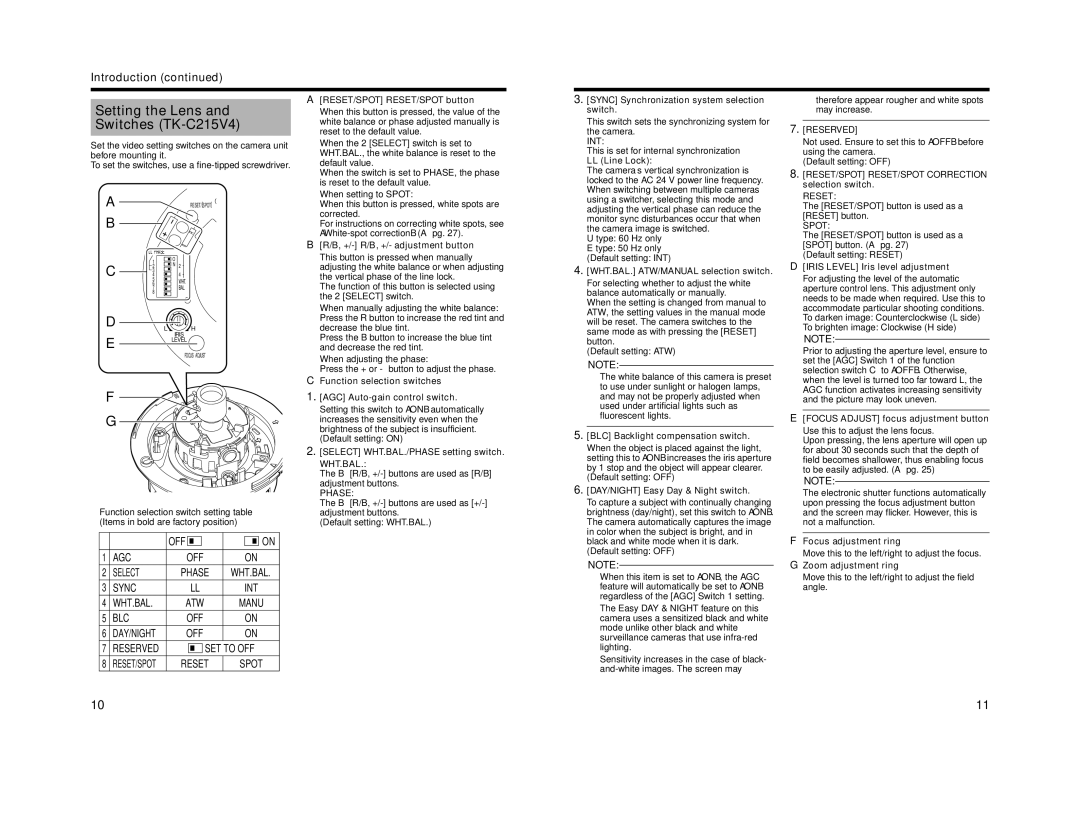
ARESET/ [SPOT]
B
R
B
LLPHASE
|
| 1 | O | |
|
| N 2 | ||
C | 2 | |||
4 | 4 | |||
|
| 3 |
|
|
|
| 5 |
| WHT. |
|
| 6 |
| |
|
| 7 |
| BAL. |
|
| 8 |
|
|
D |
|
|
|
|
|
|
| ||
| L |
| H | |
|
|
| ||
IRIS
ELEVEL
FOCUS ADJUST
F
G
Function selection switch setting table (Items in bold are factory position)
|
| OFF | ON |
|
|
|
|
1 | AGC | OFF | ON |
2 | SELECT | PHASE | WHT.BAL. |
3 | SYNC | LL | INT |
4 | WHT.BAL. | ATW | MANU |
5 | BLC | OFF | ON |
6 | DAY/NIGHT | OFF | ON |
7 | RESERVED | SET TO OFF | |
8 | RESET/SPOT | RESET | SPOT |
A [RESET/SPOT] RESET/SPOT button
When this button is pressed, the value of the white balance or phase adjusted manually is reset to the default value.
●When the 2 [SELECT] switch is set to WHT.BAL., the white balance is reset to the default value.
When the switch is set to PHASE, the phase is reset to the default value.
●When setting to SPOT:
When this button is pressed, white spots are corrected.
For instructions on correcting white spots, see
B[R/B, +/-] R/B, +/- adjustment button
This button is pressed when manually adjusting the white balance or when adjusting the vertical phase of the line lock.
The function of this button is selected using the 2 [SELECT] switch.
●When manually adjusting the white balance: Press the R button to increase the red tint and decrease the blue tint.
Press the B button to increase the blue tint and decrease the red tint.
●When adjusting the phase:
Press the + or - button to adjust the phase.
CFunction selection switches
1.[AGC]
2.[SELECT] WHT.BAL./PHASE setting switch.
WHT.BAL.:
The B [R/B,
PHASE:
The B [R/B,
(Default setting: WHT.BAL.)
3.[SYNC] Synchronization system selection switch.
This switch sets the synchronizing system for the camera.
INT:
This is set for internal synchronization
LL (Line Lock):
The camera’s vertical synchronization is locked to the AC 24 V power line frequency. When switching between multiple cameras using a switcher, selecting this mode and adjusting the vertical phase can reduce the monitor sync disturbances occur that when the camera image is switched.
U type: 60 Hz only
E type: 50 Hz only
(Default setting: INT)
4.[WHT.BAL.] ATW/MANUAL selection switch.
For selecting whether to adjust the white balance automatically or manually.
When the setting is changed from manual to ATW, the setting values in the manual mode will be reset. The camera switches to the same mode as with pressing the [RESET] button.
(Default setting: ATW)
NOTE:
●The white balance of this camera is preset to use under sunlight or halogen lamps, and may not be properly adjusted when used under artificial lights such as fluorescent lights.
5.[BLC] Backlight compensation switch.
When the object is placed against the light, setting this to AONB increases the iris aperture by 1 stop and the object will appear clearer. (Default setting: OFF)
6.[DAY/NIGHT] Easy Day & Night switch.
To capture a subject with continually changing brightness (day/night), set this switch to AONB. The camera automatically captures the image in color when the subject is bright, and in black and white mode when it is dark. (Default setting: OFF)
NOTE:
●When this item is set to AONB, the AGC feature will automatically be set to AONB regardless of the [AGC] Switch 1 setting.
●The Easy DAY & NIGHT feature on this camera uses a sensitized black and white mode unlike other black and white surveillance cameras that use
●Sensitivity increases in the case of black-
therefore appear rougher and white spots may increase.
7.[RESERVED]
Not used. Ensure to set this to AOFFB before using the camera.
(Default setting: OFF)
8.[RESET/SPOT] RESET/SPOT CORRECTION selection switch.
RESET:
The [RESET/SPOT] button is used as a [RESET] button.
SPOT:
The [RESET/SPOT] button is used as a [SPOT] button. (A pg. 27)
(Default setting: RESET)
D [IRIS LEVEL] Iris level adjustment
For adjusting the level of the automatic aperture control lens. This adjustment only needs to be made when required. Use this to accommodate particular shooting conditions. To darken image: Counterclockwise (L side) To brighten image: Clockwise (H side)
NOTE:
Prior to adjusting the aperture level, ensure to set the [AGC] Switch 1 of the function selection switch C to AOFFB. Otherwise, when the level is turned too far toward L, the AGC function activates increasing sensitivity and the picture may look uneven.
E [FOCUS ADJUST] focus adjustment button
Use this to adjust the lens focus.
Upon pressing, the lens aperture will open up for about 30 seconds such that the depth of field becomes shallower, thus enabling focus to be easily adjusted. (A pg. 25)
NOTE:
The electronic shutter functions automatically upon pressing the focus adjustment button and the screen may flicker. However, this is not a malfunction.
F Focus adjustment ring
Move this to the left/right to adjust the focus.
G Zoom adjustment ring
Move this to the left/right to adjust the field angle.
10 | 11 |