Getting started
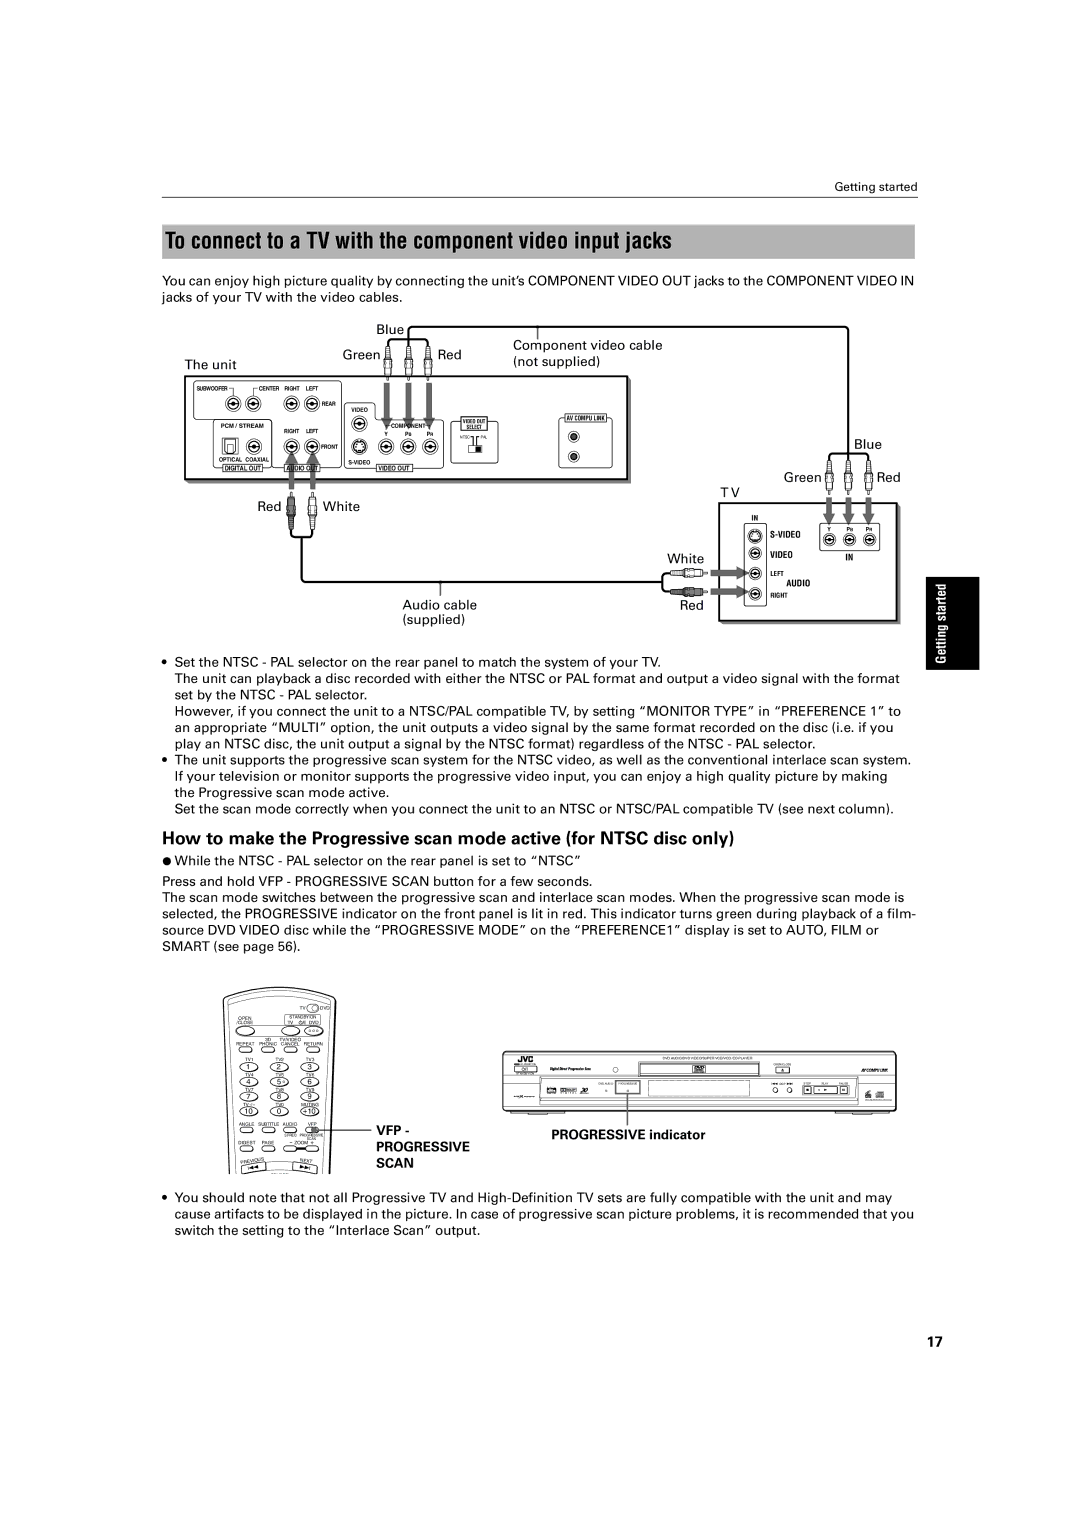
To connect to a TV with the component video input jacks
You can enjoy high picture quality by connecting the unit’s COMPONENT VIDEO OUT jacks to the COMPONENT VIDEO IN
jacks of your TV with the video cables.
|
|
|
| Blue |
|
|
| Component video cable |
|
|
|
| Green |
| Red |
| |
The unit |
|
|
|
|
| (not supplied) | ||
|
|
|
|
|
|
| ||
SUBWOOFER | CENTER | RIGHT | LEFT |
|
|
|
|
|
|
|
|
| REAR |
|
|
|
|
|
|
|
| VIDEO |
|
|
|
|
|
|
|
|
|
| VIDEO OUT | AV COMPU LINK | |
PCM / STREAM |
|
| COMPONENT |
|
| |||
RIGHT | LEFT |
| SELECT |
| ||||
|
| Y PB | PR |
|
|
| ||
|
|
|
| NTSC | PAL |
| ||
|
|
|
|
|
|
| ||
|
|
|
| FRONT |
|
|
|
|
OPTICAL COAXIAL |
|
|
|
|
|
| ||
DIGITAL OUT | AUDIO OUT |
|
|
|
| |||
VIDEO OUT |
|
|
|
| ||||
| Red |
|
| White |
|
|
|
|
|
|
|
|
|
|
|
| White |
|
|
|
| Audio cable |
| Red | ||
|
|
|
| (supplied) |
|
| ||
| Blue |
Green | Red |
T V |
|
IN |
|
Y | PB PR |
| |
VIDEO | IN |
LEFT |
|
AUDIO |
|
RIGHT |
|
Getting started
•Set the NTSC - PAL selector on the rear panel to match the system of your TV.
The unit can playback a disc recorded with either the NTSC or PAL format and output a video signal with the format set by the NTSC - PAL selector.
However, if you connect the unit to a NTSC/PAL compatible TV, by setting “MONITOR TYPE” in “PREFERENCE 1” to an appropriate “MULTI” option, the unit outputs a video signal by the same format recorded on the disc (i.e. if you play an NTSC disc, the unit output a signal by the NTSC format) regardless of the NTSC - PAL selector.
•The unit supports the progressive scan system for the NTSC video, as well as the conventional interlace scan system. If your television or monitor supports the progressive video input, you can enjoy a high quality picture by making the Progressive scan mode active.
Set the scan mode correctly when you connect the unit to an NTSC or NTSC/PAL compatible TV (see next column).
How to make the Progressive scan mode active (for NTSC disc only)
¶While the NTSC - PAL selector on the rear panel is set to “NTSC”
Press and hold VFP - PROGRESSIVE SCAN button for a few seconds.
The scan mode switches between the progressive scan and interlace scan modes. When the progressive scan mode is selected, the PROGRESSIVE indicator on the front panel is lit in red. This indicator turns green during playback of a film- source DVD VIDEO disc while the “PROGRESSIVE MODE” on the “PREFERENCE1” display is set to AUTO, FILM or SMART (see page 56).
|
|
| TV | DVD |
OPEN |
| STANDBY/ON |
| |
/CLOSE |
| TV | DVD |
|
REPEAT | 3D | TV/VIDEO |
| |
PHONIC CANCEL | RETURN | |||
TV1 |
| TV2 | TV3 |
|
1 |
| 2 | 3 |
|
TV4 |
| TV5 | TV6 |
|
4 |
| 5 | 6 |
|
TV7 |
| TV8 | TV9 |
|
7 |
| 8 | 9 |
|
TV |
| TV0 | MUTING |
|
10 |
| 0 | +10 |
|
ANGLE | SUBTITLE AUDIO | VFP |
| |
|
| S.FREQ | PROGRESSIVE | |
|
|
| SCAN |
|
DIGEST | PAGE | - ZOOM + |
| |
IOUS |
| NEXT |
| |
PREV |
|
|
| |
4 | ¢ |
| ||
SELECT
| ||
STANDBY/ON |
| OPEN/CLOSE |
| 0 |
|
|
|
STANDBY/ON |
|
|
|
|
DVD AUDIO PROGRESSIVE | 4 SKIP ¢ | STOP | PLAY | PAUSE |
|
| 7 | 3 | 8 |
VFP - |
|
|
|
|
|
|
|
|
|
|
|
|
|
| |
|
|
|
|
|
|
| |
|
|
|
|
|
|
| |
|
| PROGRESSIVE indicator | |||||
PROGRESSIVE |
|
| |||||
|
|
|
|
|
|
| |
SCAN |
|
|
|
|
|
|
|
DVD/SUPER VCD/VCD/CD
•You should note that not all Progressive TV and
17
