- STEP 2: INSTALL DRAIN ADAPTER -
•Note: Running the drain tubing directly to a floor
drain, sump, standpipe, laundry tub, etc., as shown
on page 19, is preferred. However, if that is not pos-
sible or practical, the included drain adapter installs in the sink drain pipe, always above or ahead of the
plumbing codes. Other drain pipe fittings, in addi-
tion to the adapter, may be needed.
•The drain adapter fits
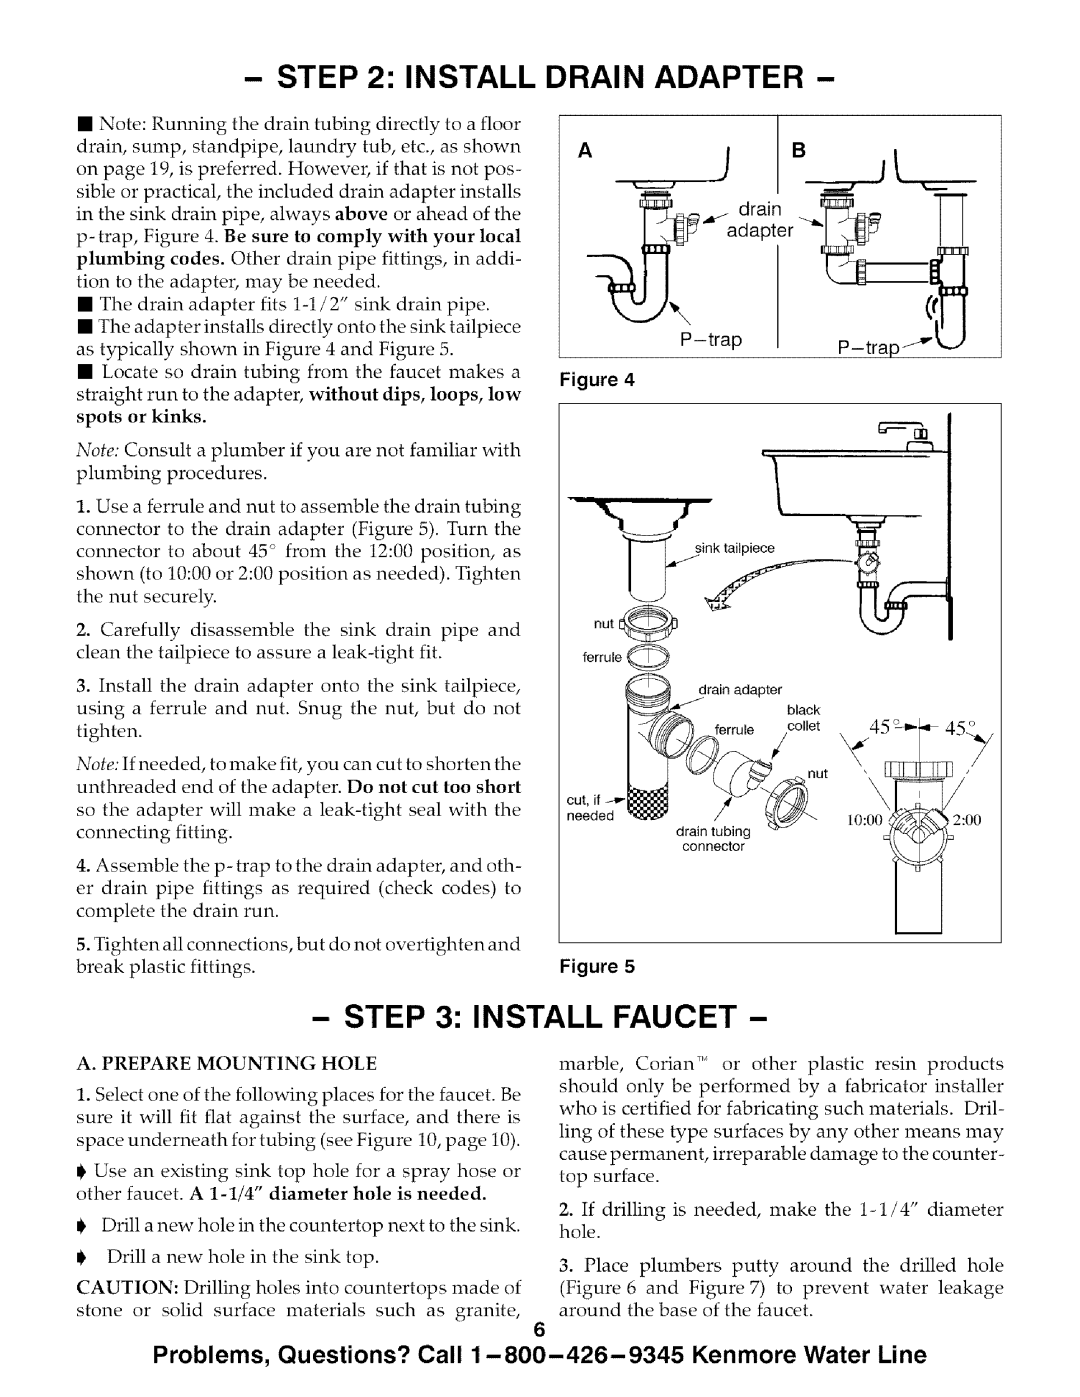
•The adapter installs directly onto the sink tailpiece
as typically shown in Figure 4 and Figure 5.
•Locate so drain tubing from the faucet makes a
straight run to the adapter, without dips, loops, low spots or kinks.
Note: Consult a plumber if you are not familiar with
plumbing procedures.
1.Use a ferrule and nut to assemble the drain tubing
connector to the drain adapter (Figure 5). Turn the
connector to about 45 ° from the 12:00 position, as
shown (to 10:00 or 2:00 position as needed). Tighten the nut securely.
2.Carefully disassemble the sink drain pipe and
clean the tailpiece to assure a
3.Install the drain adapter onto the sink tailpiece,
using a ferrule and nut. Snug the nut, but do not tighten.
Note: If needed, to make fit, you can cut to shorten the
unthreaded end of the adapter. Do not cut too short
so the adapter will make a
connecting fitting.
4.Assemble the p- trap to the drain adapter, and oth-
er drain pipe fittings as required (check codes) to
complete the drain run.
5.Tighten all connections, but do not overtighten and break plastic fittings.
Figure 4
ferrule 0
I _yrain | adapter | black |
cut, if _ | J(__u | t | 45_ | i | 4_.._ |
| X. |
| |||
needed |
|
| 10:00 ./,_ |
| _2:00 |
| dcraoinnnteUbionrg |
| _ |
|
|
Figure 5
- STEP 3: INSTALL FAUCET -
A. PREPARE MOUNTING HOLE
1.Select one of the following places for the faucet. Be
sure it will fit flat against the surface, and there is
space underneath for tubing (see Figure 10, page 10).
0 Use an existing sink top hole for a spray hose or
other faucet. A
JDrill a new hole in the countertop next to the sink.
t Drill a new hole in the sink top.
CAUTION: Drilling holes into countertops made of
stone or solid surface materials such as granite,
marble, Corian:" or other plastic resin products
should only be performed by a fabricator installer
who is certified for fabricating such materials. Dril- ling of these type surfaces by any other means may
cause permanent, irreparable damage to the counter- top surface.
2. If drilling is needed, make the
3. Place plumbers putty around the drilled hole
(Figure 6 and Figure 7) to prevent water leakage around the base of the faucet.
Problems, Questions? Call