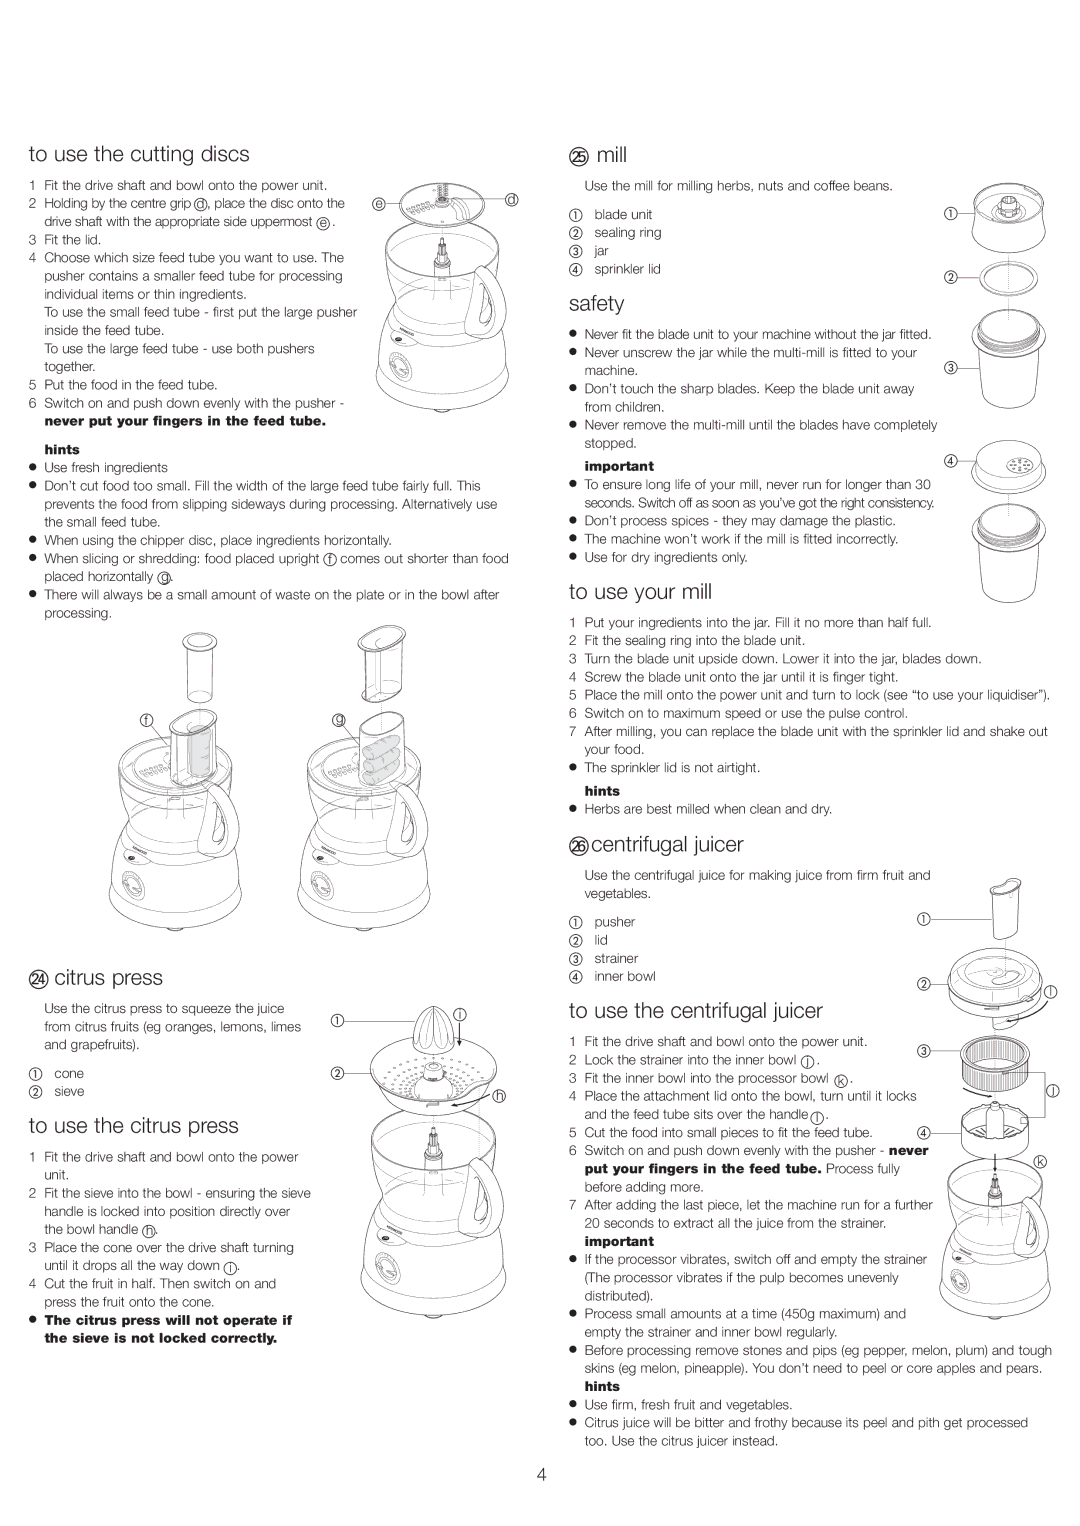
to use the cutting discs

1

Fit the drive shaft and bowl onto the power unit.


d

2

Holding by the centre grip d , place the disc onto the

e


drive shaft with the appropriate side uppermost e .


3

Fit the lid.


4

Choose which size feed tube you want to use. The


pusher contains a smaller feed tube for processing


individual items or thin ingredients.


To use the small feed tube - first put the large pusher


inside the feed tube.


P


To use the large feed tube - use both pushers


2

3 4 5 6


together.

1

7


0

8


5Put the food in the feed tube.

6Switch on and push down evenly with the pusher - never put your fingers in the feed tube.

hints

Use fresh ingredients

Don’t cut food too small. Fill the width of the large feed tube fairly full. This prevents the food from slipping sideways during processing. Alternatively use the small feed tube.

When using the chipper disc, place ingredients horizontally.

When slicing or shredding: food placed upright f comes out shorter than food placed horizontally g.

There will always be a small amount of waste on the plate or in the bowl after processing.

f

g

25mill

Use the mill for milling herbs, nuts and coffee beans.

blade unit sealing ring jar sprinkler lid

safety

Never fit the blade unit to your machine without the jar fitted.

Never unscrew the jar while the multi-mill is fitted to your machine.

Don’t touch the sharp blades. Keep the blade unit away from children.

Never remove the multi-mill until the blades have completely stopped.

important

To ensure long life of your mill, never run for longer than 30

seconds. Switch off as soon as you’ve got the right consistency.

Don’t process spices - they may damage the plastic.

The machine won’t work if the mill is fitted incorrectly.

Use for dry ingredients only.

to use your mill

1Put your ingredients into the jar. Fill it no more than half full.

2Fit the sealing ring into the blade unit.

3Turn the blade unit upside down. Lower it into the jar, blades down.

4Screw the blade unit onto the jar until it is finger tight.

5Place the mill onto the power unit and turn to lock (see “to use your liquidiser”).

6Switch on to maximum speed or use the pulse control.

7After milling, you can replace the blade unit with the sprinkler lid and shake out your food.

The sprinkler lid is not airtight. hints

Herbs are best milled when clean and dry.

26 centrifugal juicer


P


P

2

3 4 5 6

2

3 4 5 6

1

7

1

7

0

8

0

8

24citrus press

Use the citrus press to squeeze the juice from citrus fruits (eg oranges, lemons, limes and grapefruits).

cone sieve

to use the citrus press

1Fit the drive shaft and bowl onto the power unit.

2Fit the sieve into the bowl - ensuring the sieve handle is locked into position directly over the bowl handle h .

3Place the cone over the drive shaft turning until it drops all the way down i .

4Cut the fruit in half. Then switch on and press the fruit onto the cone.

The citrus press will not operate if the sieve is not locked correctly.

i

h


P

2

3 4 5 6

1

7

0

8

Use the centrifugal juice for making juice from firm fruit and vegetables.

pusher lid strainer inner bowl

l

to use the centrifugal juicer

1

Fit the drive shaft and bowl onto the power unit.


2

Lock the strainer into the inner bowl j .


3

Fit the inner bowl into the processor bowl k .


j

4

Place the attachment lid onto the bowl, turn until it locks


and the feed tube sits over the handle l .


5

Cut the food into small pieces to fit the feed tube.


6

Switch on and push down evenly with the pusher - never


k


put your fingers in the feed tube. Process fully


before adding more.


7

After adding the last piece, let the machine run for a further


20 seconds to extract all the juice from the strainer.


important


If the processor vibrates, switch off and empty the strainer


P


(The processor vibrates if the pulp becomes unevenly

12

3

4 5

6


7


0


8

distributed).

Process small amounts at a time (450g maximum) and empty the strainer and inner bowl regularly.

Before processing remove stones and pips (eg pepper, melon, plum) and tough skins (eg melon, pineapple). You don’t need to peel or core apples and pears. hints

Use firm, fresh fruit and vegetables.

Citrus juice will be bitter and frothy because its peel and pith get processed too. Use the citrus juicer instead.

4

Page 6
Image 6
Kenwood FP693 To use the cutting discs, Mill, To use your mill, Centrifugal juicer Citrus press, To use the citrus press

FP693 specifications

The Kenwood FP693 is a versatile food processor that combines power and functionality, making it an essential kitchen companion for both novice cooks and culinary aficionados. With a robust 800-watt motor, this food processor is designed to handle a wide array of food preparation tasks, ranging from chopping and slicing to grating and kneading dough.

One of the standout features of the FP693 is its generous 3-liter bowl capacity, which allows users to process large quantities of ingredients at once. This feature is particularly handy for preparing meals for families or hosting gatherings, as it reduces the need for multiple batches when cooking. The bowl is crafted from high-quality, durable plastic, ensuring easy cleaning and longevity.

The FP693 comes with an impressive range of attachments, including various stainless steel blades for slicing, shredding, and chopping, as well as a dough tool for making bread and pastry. The inclusion of a citrus juicer expands its utility, allowing you to easily prepare fresh juice. These versatile attachments make it possible to switch between tasks seamlessly, enhancing efficiency in the kitchen.

Another significant technology integrated into the Kenwood FP693 is its multiple speed settings. The processor features a pulse function and two speed settings, enabling precise control based on the consistency desired. This flexibility is particularly beneficial when creating diverse recipes that require different textures, from finely minced garlic to coarsely grated cheese.

Safety is a priority with the FP693, which includes a safety locking mechanism to ensure that the bowl is securely in place during operation. Additionally, non-slip feet provide stability, preventing the food processor from moving around on the countertop, even during heavy-duty processing tasks.

The sleek and compact design of the FP693 makes it an attractive addition to any kitchen. Its modern appearance and practical size facilitate storage without taking up too much counter space.

In summary, the Kenwood FP693 food processor is an exceptional kitchen appliance that combines power, versatility, and user-friendly features. Its powerful motor, large capacity, assortment of attachments, variable speed settings, and safety measures make it an ideal choice for anyone looking to simplify food preparation while achieving professional-quality results. Whether you are a home cook or a seasoned chef, the FP693 is sure to enhance your culinary experience.