TH-D7A
Thank YOU
Features
Models Covered by this Manual
One or more of the following statements may be applicable
Precautions
Contents
Microphone Control
Scan
System Ctcss
Functions
Optional Accessories
Wireless Remote Control TH-D7A only
SKY Command 2 TH-D7A only
Maintenance
KEY2
Supplied Accessories
KEY+ Power on
Conventions Followed in this Manual
Preparation
Latch, then slide the battery pack back
Insert the charger AC plug into an AC wall outlet
PB-39 NiCd PB-38 NiCd
Installing the Antenna
Installing the Hand STRAP/ Belt Hook
Batteries
10 2 Insert four AA LR6 alkaline batteries
Installing Alkaline Batteries
Alkaline
Connecting with a Cigarette Lighter Socket
Connecting with a Regulated Power Supply
First QSO
Selecting a Band
Switching Power ON/OFF
Adjusting Volume
Operating Basics
Press UP/ DWN to select from 6 squelch levels
Adjusting Squelch
Press OK to complete the setting
Press F, Moni
Reliable. You can program a different power for band
When you finish speaking, release the PTT switch
Selecting lower transmit power is a wise method to
Reduce battery consumption, if communication is still
Getting Acquainted
Indicators
OK key
Cursor Keys
Band a & B
UP/ DWN keys
Menu mode
Function Select mode
VFO mode
Memory Recall mode
Press TNC twice to select. In this mode, you can send
Full Duplex mode
Packet mode
Commands to the built-in TNC from a personal computer
Keypad Direct Entry
Menu SET-UP
Menu Access
Level Selections Default
Menu Configuration
OFF
Radio AUX
Level Selections
Aprs
SKY
Sstv
CMD
Offset Programming Flow
Operating Through Repeaters
Within the band limits
Programming Offset
Press UP/ DWN to select the appropriate offset Frequency
Following methods to bring the transmit frequency
Press UP/ DWN to select the appropriate tone frequency
Press F, 1 to switch the Tone function on or OFF
67.0 97.4 136.5 192.8
A. and Canada versions
Automatic Repeater Offset
Automatic Simplex Check ASC
Press REV to switch the Reverse function on or 13 OFF
Press REV 1 s to switch the function on
Reverse Function
Tone FREQ. ID
Ctcss on
Memory Channels
CHANNEL?
Parameter
Press PTT+OK
Press UP/ DWN to select the desired memory channel Press OK
Press UP/ DWN to select the desired memory Channel
Press MR+ Power on
Recalling a Memory Channel
Clearing a Memory Channel
Press UP/ DWN to select the first digit
Naming a Memory Channel
Repeat steps 3 and 4 to enter up to 8 digits
Press VFO
Call Channel TH-D7A only
Press PTT+CALL
Channel Display
MEMORY-TO-VFO Transfer
UHF Band Defaults
Partial or Full RESET?
Press F+ Power on
VHF Band Defaults Version VFO Freq Tone
This transceiver provides the following types of scans
Scan
Scan Type Scan Range
Selecting Scan Resume Method
Time-Operated mode
Carrier-Operated mode
Seek mode
Press MR 1 s
VFO Scan
Memory Scan
Press VFO 1 s
To quit MHz Scan, press ESC
MHz Scan
Select the desired frequency as the lower limit
Program Scan
Press F, MR
CALL/MEMORY Scan TH-D7A only
CALL/VFO Scan TH-D7A only
Recall the desired memory channel
Press UP/ DWN to select the appropriate Ctcss frequency
Continuous Tone Coded Squelch System Ctcss
Selecting a Ctcss Frequency
Press F, 4 to select F-4 Ctcss Freq
OFF
Using Ctcss
Press F, 3 to switch the Ctcss function on or
Ctcss FREQ. ID
Manual Dialing
Dual Tone MULTI-FREQUENCY Dtmf Functions
Freq. Hz 1209 1336 1477 1633
Press UP/ DWN to select a character
Automatic Dialer
Press OK
Press PTT+MENU
Transmitting a Stored Dtmf Number
Ctcss ON/ OFF
Microphone Control
Programmed for the digits not yet entered
Auxiliary Functions
Direct Frequency Entry
Data is accepted for the digits entered and 0 is
Programmable VFO
Changing Frequency Step Size
Tone Alert
Press F, ENT to switch Tone Alert on or OFF
Beep ON/OFF
Blanking a Band Display
Adjusting Volume Balance
Adjusting Display Contrast
Lamp Function
Battery Saver
Automatic Power OFF APO
15 4 Press OK
POWER-ON Message
Transceiver Lock
13 3 Press UP/ DWN to select a character
Advanced Intercept Point AIP
Switching AM/FM Mode TH-D7A only
Switching TX Deviation TH-D7E only
TX Inhibit
Equipment
Packet Operation
Reference material for starting packet operation should
Be available at any store that handles Amateur Radio
Operating TNC
Connecting with a Personal Computer
Command mode
Converse mode
On your personal computer. First connect
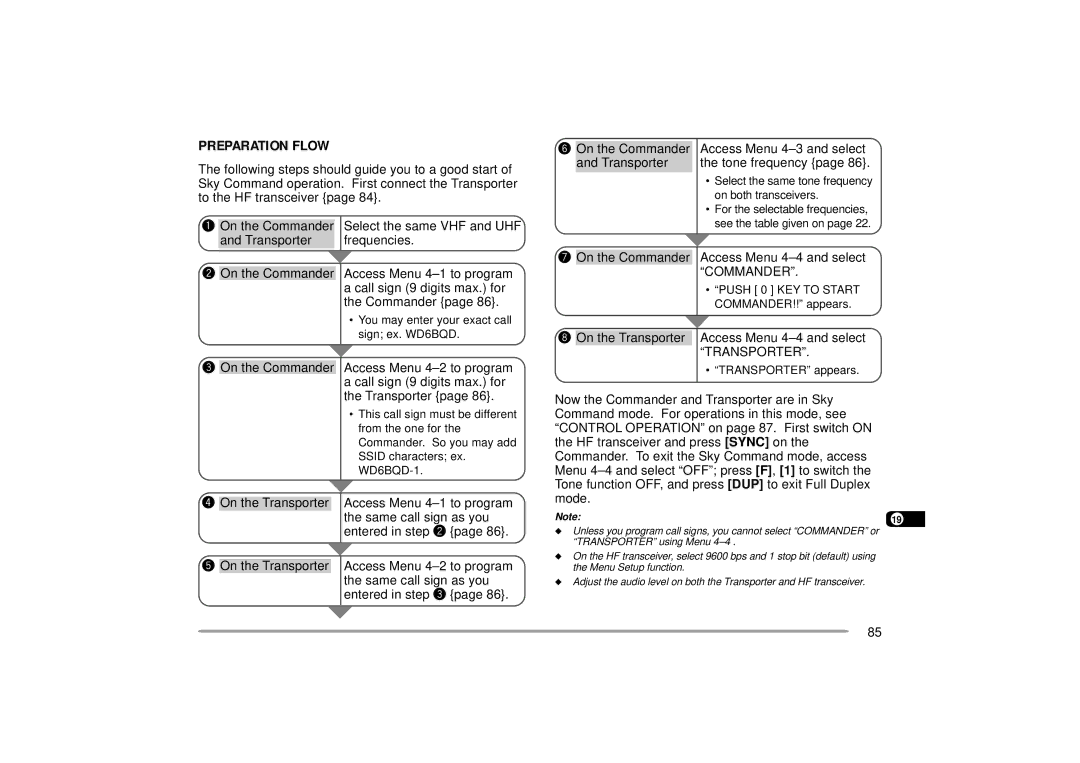
Preparation Flow
Following steps should guide you to a good start
Packet operation. The shaded steps indicate operations
Both Bands
Selecting Data Band
Full Duplex
Band only
DX Packetclusters Monitor
Comment Press List to restore the frequency display
SLOW-SCAN Television Sstv with VC-H1
20 3 Press UP/ DWN to select a character
Entering Call SIGN/ MESSAGE/ RSV
22 4 Press OK
Selecting Color for Call SIGN/ MESSAGE/ RSV
Executing Superimposition
VC-H1 Control
Power is on
VC-H1
Automatic PACKET/ Position Reporting System
Operation Flow
KEY
Indicator Meaning What is Included?
Receiving Aprs Data
New Aprs Duplicate
18 3 Press OK
Accessing Received Aprs Data
Press List
12 2 Press UP/ DWN to select the desired station
Temperature
15 5 Repeat steps 3 and 4 to enter up to 9 digits
Programming a Call Sign
11 3 Press UP/ DWN to select a character
13 4 Press OK
Kenwood Sstv
Press OK Press Menu to exit Menu mode
Selecting Your Station Icon
Press UP/ DWN to select from 15 icons plus Others
Entering LATITUDE/ Longitude Data
Press Menu to enter Menu mode
Press 2, 3 to select 2-3 My Pos
Press UP/ DWN to select the desired comment
Selecting a Position Comment
Press UP/ DWN to select a character
Entering Status Text
17 4 Press OK
Alternate net
Programming a Group Code
All calls
Special
Repeat steps 3 and 4 to enter up to 32 digits
Programming a Packet Path
Method 4 Ssid path
Method 1 Specific path
Method 2 Generic path
Method 3 WIDEN-N path
Press 2, 9 to select 2-9 Data TX
Selecting Beacon Transmit Method
Bcon again
Press UP/ DWN to select the desired distance
Selecting Beacon Transmit Interval
Restricting Reception of Aprs Data
Press UP/ DWN to select the desired interval
Aprs Message
KEY+NEW Data
Status
Accessing Received Aprs Messages
Press MSG
Message Type
Repeat steps 4 and 5 to enter up to 9 digits
Entering a Message
Repeat to enter a message or bulletin with up to 45 digits
Press OK to start transmitting
Transmitting a Message
Press a numeric key 0 to 9 to enter a 3-digit secret number
Wireless Remote Control TH-D7A only
Press PTT+VFO+ Power on
Preparation
Control Operation
Press PTT+MR+ Power on
ENT or VFO UP/ DWN To recall a memory channel
SKY Command 2 TH-D7A only
Contact your authorized Kenwood dealer
Transceiver
You can use the optional cables PG-4R to connect
Transporter with the HF transceiver. For these cables
On the Commander Access Menu 4-4 and select Commander
On Transporter
On Commander
Programming Call Signs
Programming a Tone Frequency
CLR
Power
UP/ DWN
Mode
Page
Cleaning
Maintenance
Service
Service Note
Problem Probable Cause Corrective Action
Troubleshooting
Press A/B+ Power on to exit
Press BAL, then UP/ DWN to
Page
Problem Probable Cause Corrective Action
EMC-3 PB-38 PB-39 BT-11
Optional Accessories
SMC-32 SMC-33 SMC-34
HMC-3
PG-4R
PG-3J
PG-4W
VC-H1 PG-4V
Equipment Connections
Connecting Other External Equipment
General VHF Band UHF Band
Specifications
Transmitter VHF Band UHF Band
Short Default Parameter Description
TNC Commands List
Appendix
Flow ON/ OFF
Dwait
Echo ON/ OFF
Firmrnr FIR OFF ON/ OFF
Ltext
Hbaud
Location LOC Every
Lpath LPA GPS
Ppersist ON/ OFF
Reset
Txdelay
Persist
Quick Reference Guide
1 s
Key Operation Function
VFO F
Index