Guided’utilisationetd’entretien
Models/Modèles KDRU707 KDRU763 KDRU767 KDRU783 W10285549A
Table of Contents
Table DES Matières
Range Safety
Your safety and the safety of others are very important
Important Safety Instructions
Anti-Tip Bracket
For self-cleaning ranges
For units with ventilating hood
Oven Interior
Parts and Features
Range
KDRU763
Control Panels
KDRU707 KDRU767
KDRU783
Cooktop USE
Reignition Feature
Simmer Burner Settings To Set
CooktopControls
Sealed Surface Burners
Power Failure
Cooktop Surface
15,000 Btu/h Professional Burner
To Use
To Clean
Even-Heat ChromeElectricGriddle
Cookware
HomeCanning
Glass-Touch Menu DrivenDisplay
Electronic Oven Controls
Control Panel
30 76.2 cm and 36 91.4 cm Range Control Panel
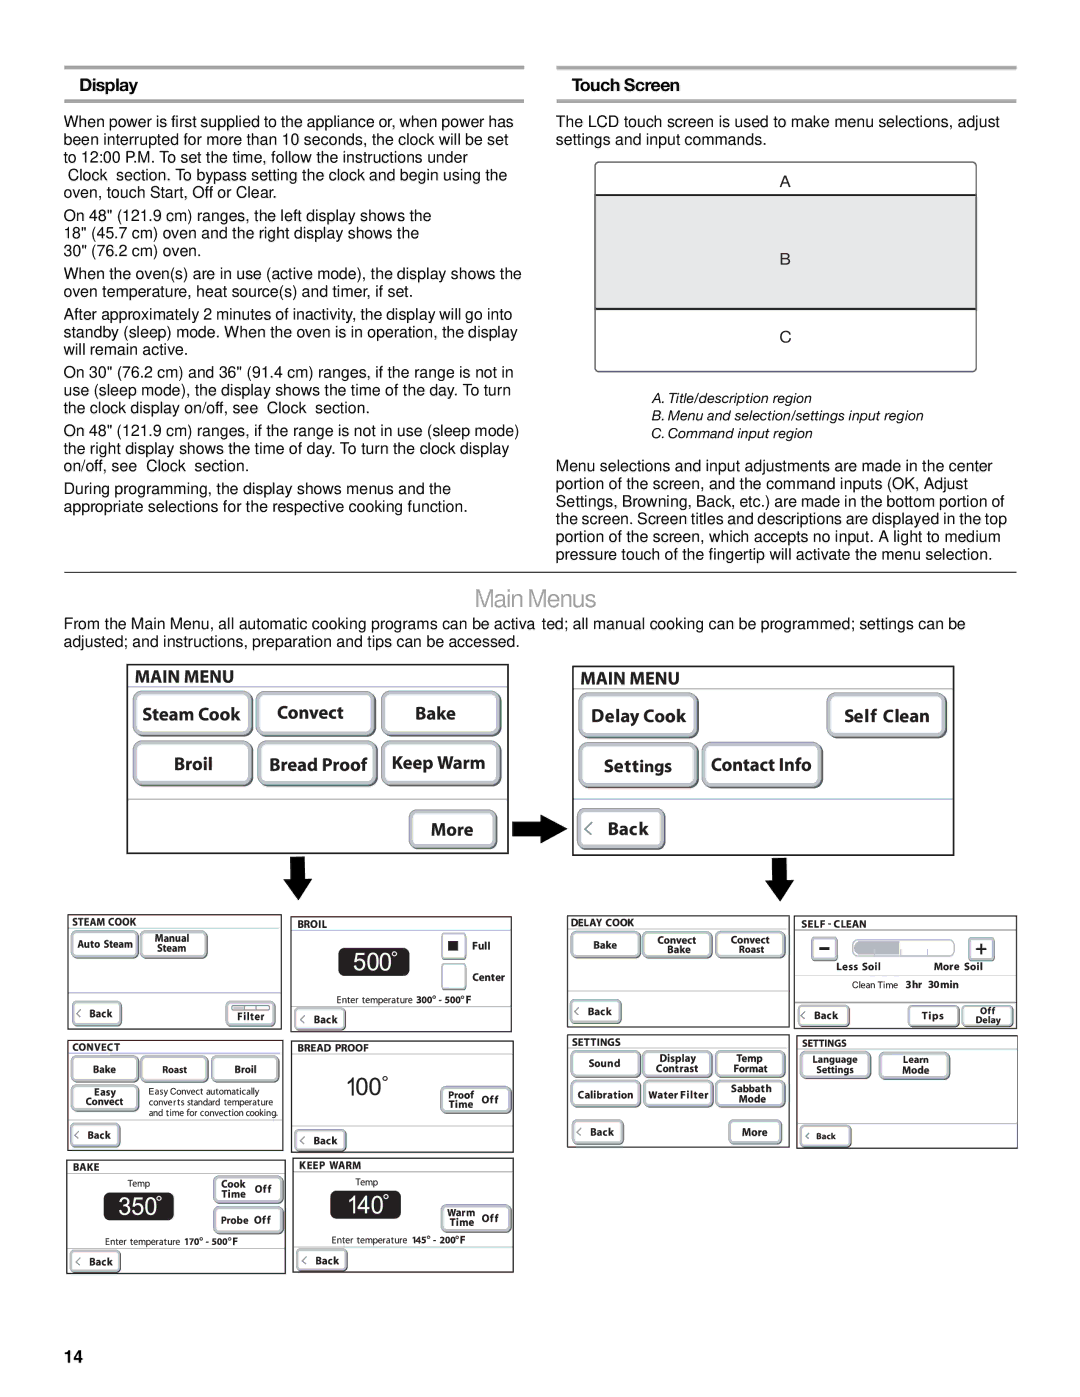
Touch Screen
MainMenus
Display
Menu Demonstration
Sound Tones
Settings
Calibration Oven Temperature Control
Temp FormatFahrenheitand Celsius
LearnMode
SabbathMode
To Set Delayed
To Regularly Set Timed
Clock
Timer
Languages
Start
AluminumFoil
Oven USE
AboutYourOven
Bakeware
Bakeware
SatinGlide Roll-Out Extension Rack
MeatThermometer
To Remove SatinGlide Roll-Out Extension Rack
True-Broil Reflector Full and CenterBroiling
Oven Vent
Bakingand Roasting
To Bake or Roast
To Broil
Broiling Chart
DualFanTrueConvection Cooking
Food Cook Time
ConvectionBake
To Convection Bake
To Convection Roast
Convection Roast
Convection Broil
To Convection Broil
Proofing Bread
Setting Foods
EasyConvect Conversion
To Proof
AutoSteam
AutoSteamSettings
STEAM-ASSISTED Cooking
Vegetables
Seafood
Breads
Desserts
To Cook with Manual Steam
Manual Steam
Keep Warm
Temperature Probe
Keep Warm Chart Setting Recommended Foods
To Set a Cooking Time
Timed/Delay Cooking
To Set a Delay Cooking Time
Yeast Breads
Cooking Charts
Bread Baking Chart
Quick Breads
Food Oven Browning
CasserolesBakingChart
DessertsBaking Chart
Food Oven
Manual Steam CookingChart
Auto SteamVegetableCookingChart
Auto Steam Seafood Cooking Chart
Food Oven Temperature Browning Cooking Time
AutoSteamMeats and Poultry RoastingChart
PER 1 LB Temperature
Ham, fully cooked shank ½-10 lbs 4.3-4.5 kg
Pork Loin Center Rib Roast Lbs 1.4-1.8 kg
Pork Tenderloin 1 lb 454 g
Lamb Leg of Lamb 6-7 lbs 2.7-3.1 kg
Self-Cleaning Cycle
Range Care
PORCELAIN-COATED Grates and Caps
Water Filter Cartridge Replacement
GeneralCleaning
Surface Burners
Oven Lights
Oven Door
Troubleshooting
Assistance or Service
TheU.S.A
Accessories
Canada
Items Excluded from Warranty
Kitchenaid Dual Fuel Range Warranty
Limited Warranty
This limited warranty does not cover
Page
Page
Sécurité DE LA Cuisinière
Votre sécurité et celle des autres est très importante
Labride antibasculement
Conservez CES Instructions
Pour les cuisinières avec programme d’autonettoyage
Pour les appareils avec hotte de ventilation
Intérieur du four
Pièces ET Caractéristiques
Cuisinière
KDRU767
Tableaux de commande
KDRU707
KDRU783
Utilisation DE LA Table DE Cuisson
Commandesdela table decuisson
Réglage Utilisation Recommandée
Caractéristique de rallumage
Réglages de brûleurs à mijotage
Surface delatabledecuisson
Brûleurs desurfacescellés
Panne de courant
Utilisation
Plaqueà frire chromée électriqueEven Heat
Nettoyage
Tableau de préchauffage
Ustensilesdecuisson
Tableaux de cuisson avec plaque à frire
Tableau de cuisson
Préparation deconserves àlamaison
Commandes Électroniques DU Four
Tableau de commande de la cuisinière de 48 121,9 cm
Afficheur
Tableaudecommande
Écran tactile en verre à menus
Écran tactile
Menusprincipaux
Démonstration de menu
Réglages
Partir du menu Cuiss. vap. auto., appuyer sur Volaille
Contrasted’affichage
Calibragecommandedela température Du four
Sons signaux sonores
Formatdetempérature Fahrenheit et Celsius
ModeSabbat
Filtre à eau/système de filtration deleau
Moded’apprentissage
Pour un réglage normal, minuté
Désactivation
Pour un réglage normal, non minuté
Modèles de 30 76,2 cm et 36 91,4 cm
Réglage de cuisson différée
Startmiseen marche
Langues
Horloge
Minuterie
Off arrêt
Verrouillage de lacommande
Utilisation DU Four
Àpropos du four
Grilles
Ustensiles de cuisson
Positionnement desgrilles et desustensiles Decuisson
Ustensiles DE Cuisson
Évent du four
Grille coulissantedéployante SatinGlide
Thermomètreàviande
Dépose de la grille coulissante déployante SatinGlide
Cuisson au fouretrôtissage
Cuisson au four ou rôtissage
Tableau DE Cuisson AU Gril
Cuissonparconvectionvéritableàdouble Ventilateur
Cuisson au gril
Aliment Durée DE Cuisson
Cuisson aufourparconvection
Cuisson au four par convection
Rôtissage par convection
Rôtissage parconvection
Cuisson au gril parconvection
Cuisson au gril par convection
Conversion EasyConvect
Levéedu pain
Pour faire lever la pâte
Réglagesdecuisson àlavapeurautomatique
Cuisson Avec Injection DE Vapeur
Cuisson àla vapeur automatique
Viandes
Pains
Volaille
Fruits de mer
Légumes
Cuisson avec le réglage Cuisson à la vapeur manuelle
Cuisson àlavapeurmanuelle
Cuisson avec le réglage Cuisson à la vapeur automatique
Garderauchaud
Sondethermométrique
Cuisson minutée/différée
Réglage dune durée de cuisson
Réglage dune durée de cuisson différée
Pains à la levure
Tableaux DE Cuisson
Tableaudecuisson du pain
Pains éclairs
Aliment Température Brunissage Durée DE Cuisson DU Four
Tableau decuisson desmets en sauce
Autres aliments
Aliment Température
Tableau decuisson desdesserts
Tableau decuisson à la vapeurautomatique des légumes
Aliment Température DU Brunissage Durée DE Cuisson Four
Vapeur
Tableaudecuisson àlavapeurautomatiquedes fruits de mer
Tableau decuisson àlavapeurmanuelle
Rôti de porc, longe centrale 4 lb 1,4 à 1,8 kg
Faux-filet de rôti de bœuf, désossé 4½ lb 1,8 à 2 kg
Rôti de bœuf, surlonge, désossé 5 lb 1,8 à 2,3 kg
Filet de porc 1 lb 454 g
Dinde Dinde 10 à 12 lb 4,5 à 5,4 kg
Poulet rôti 4 à 5 lb 1,8 à 2,3 kg
Poulet rôti 6 à 6½ lb 2,7 à 2,9 kg
Dinde 14 à 17 lb 6,4 à 7,7 kg
Préparation du four
Entretien DE LA Cuisinière
Programme dautonettoyage
Comment fonctionne le programme
Remplacement delacartouchedu filtre à eau
Nettoyagegénéral
Grilles ET Chapeaux Émaillés
Tableau DE Commande
Commandes DE LA Table DE Cuisson
Brûleurs DE Surface
Portedu four
Réinstallation
Lampes dufour
Dépose
Dépannage
Le programme d’autonettoyage ne fonctionne pas
Le four a-t-il été préchauffé?
Pour plus d’assistance
Assistance OU Service
Si vous avez besoin de pièces de rechange
Nos consultants vous renseigneront sur les sujets suivants
Accessoires
Articles Exclus DE LA Garantie
Garantie DE LA Cuisinière À BI-COMBUSTIBLE Kitchenaid
Garantie Limitée
La présente garantie limitée ne couvre pas
Composer le 1-800-422-1230. Au Canada, composer le
Page
W10285549A