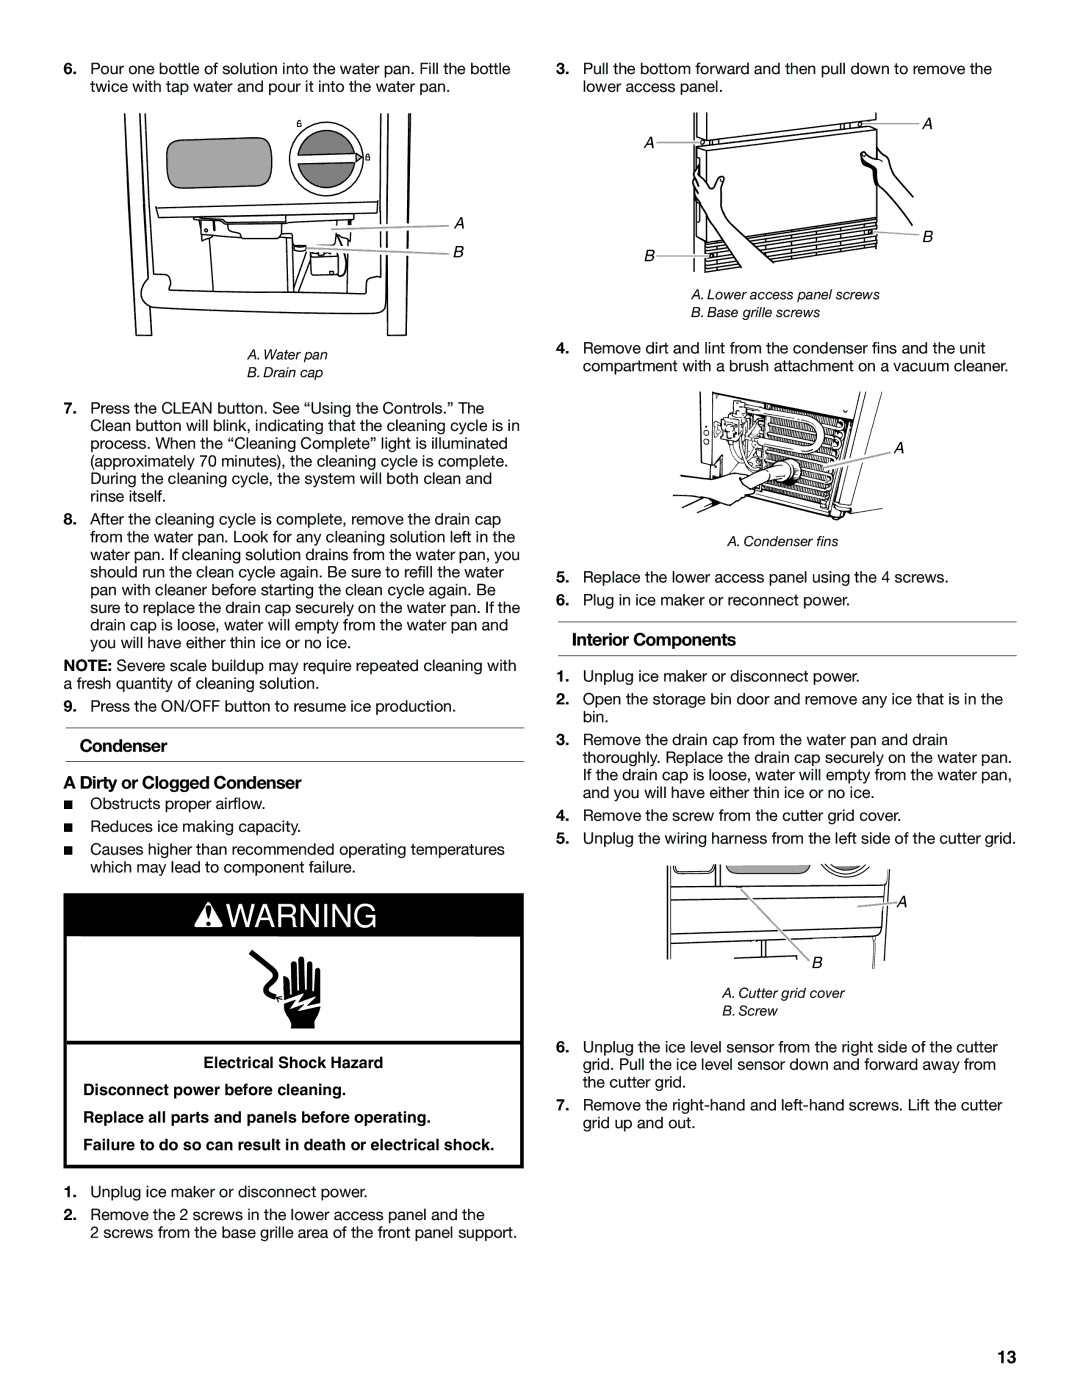
6.Pour one bottle of solution into the water pan. Fill the bottle twice with tap water and pour it into the water pan.

A

B

A. Water pan

B. Drain cap

7.Press the CLEAN button. See “Using the Controls.” The Clean button will blink, indicating that the cleaning cycle is in process. When the “Cleaning Complete” light is illuminated (approximately 70 minutes), the cleaning cycle is complete. During the cleaning cycle, the system will both clean and rinse itself.

8.After the cleaning cycle is complete, remove the drain cap from the water pan. Look for any cleaning solution left in the water pan. If cleaning solution drains from the water pan, you should run the clean cycle again. Be sure to refill the water pan with cleaner before starting the clean cycle again. Be sure to replace the drain cap securely on the water pan. If the drain cap is loose, water will empty from the water pan and you will have either thin ice or no ice.

NOTE: Severe scale buildup may require repeated cleaning with a fresh quantity of cleaning solution.

9.Press the ON/OFF button to resume ice production.

Condenser

A Dirty or Clogged Condenser

Obstructs proper airflow.

Reduces ice making capacity.

Causes higher than recommended operating temperatures which may lead to component failure.

WARNING

Electrical Shock Hazard

Disconnect power before cleaning.

Replace all parts and panels before operating.

Failure to do so can result in death or electrical shock.

1.Unplug ice maker or disconnect power.

2.Remove the 2 screws in the lower access panel and the

2 screws from the base grille area of the front panel support.

3.Pull the bottom forward and then pull down to remove the lower access panel.

A

A

B

B

A. Lower access panel screws

B. Base grille screws

4.Remove dirt and lint from the condenser fins and the unit compartment with a brush attachment on a vacuum cleaner.

A

A. Condenser fins

5.Replace the lower access panel using the 4 screws.

6.Plug in ice maker or reconnect power.

Interior Components

1.Unplug ice maker or disconnect power.

2.Open the storage bin door and remove any ice that is in the bin.

3.Remove the drain cap from the water pan and drain thoroughly. Replace the drain cap securely on the water pan. If the drain cap is loose, water will empty from the water pan, and you will have either thin ice or no ice.

4.Remove the screw from the cutter grid cover.

5.Unplug the wiring harness from the left side of the cutter grid.

A

B

A. Cutter grid cover

B.Screw

6.Unplug the ice level sensor from the right side of the cutter grid. Pull the ice level sensor down and forward away from the cutter grid.

7.Remove the right-hand and left-hand screws. Lift the cutter grid up and out.

13

Page 13
Image 13
KitchenAid W10515677C manual Condenser Dirty or Clogged Condenser, Interior Components

W10515677C specifications

The KitchenAid W10515677C is a versatile and essential component for any home chef who prioritizes both quality and performance in their kitchen tools. This food processor attachment, designed for use with KitchenAid stand mixers, enhances the functionality of the mixer by providing a reliable and efficient method for food preparation.

One of the standout features of the W10515677C is its powerful chopping and slicing capability. With sharp stainless-steel blades, this attachment allows for precise and consistent cuts, whether you're dicing vegetables, grating cheese, or slicing meats. The adjustable slicing disc provides multiple thickness options, making it easy to achieve the desired texture for your ingredients.

The design of the W10515677C is user-friendly, featuring an easy-to-assemble construction that ensures quick setup and minimal hassle. Once attached to the stand mixer, it operates seamlessly, allowing users to focus on their culinary creativity without worrying about the intricacies of food prep.

Another significant characteristic of this attachment is its generous capacity. It can handle large quantities of ingredients, making it perfect for meal preps or when cooking for a crowd. This efficiency saves time and simplifies the cooking process, allowing you to enjoy more time with family and friends.

Safety is also a key consideration in the design of the W10515677C. The attachment features a safety latch that keeps it securely attached to the stand mixer during operation. Additionally, the component comes with a push tool that ensures your hands are kept safely away from the blades while processing food.

Cleaning and maintenance are made straightforward, as most parts of the W10515677C are dishwasher safe, facilitating an easy cleanup after use. This attachment exemplifies KitchenAid’s commitment to durability and quality, built to withstand frequent use in busy kitchens.

In summary, the KitchenAid W10515677C food processor attachment elevates the experience of cooking at home. With its sharp stainless-steel blades, adjustable slicing capabilities, ease of use, and safety features, it stands as a reliable ally in meal preparation. Expanding the capabilities of your KitchenAid stand mixer, this attachment is a practical investment for anyone looking to enhance their culinary skills.