Kodak Easyshare Z981
For interactive tutorials For help with your camera
Eastman Kodak Company Rochester, New York
Back, bottom view
EVF/LCD
Front view
Table of contents
Table of contents
See other power options
Extend battery life
Purchase accessories
Charging the rechargeable batteries
Loading the batteries
Turning on the camera Setting the language, date/time
Attaching the strap
Using the vertical grip for portrait orientation
Storing pictures on an accessory SD or Sdhc Card
Turn off the camera
Using other accessory power options
Use the Kodak 5-Volt AC Adapter to save battery power
Taking pictures in Smart Capture mode
Taking pictures/videos
Using the framing marks
To access your camera’s Help system, see
Taking a video
Press the Shutter button halfway
Adjusting LCD brightness
To adjust the LCD brightness for your environment, see
Reviewing the picture/video just taken
To review pictures/videos anytime, see
Capture modes
Scene modes
Using the zoom
Using digital zoom
Digital zoom is not available in Smart Capture mode
Using the flash
Longer than when using preflash
Light, hold the camera steady or use a tripod
Off Never
Using the Drive button
Using the self-timer
To get into the scene
Release on a tripod
Taking burst pictures
Using the Focus button
Mode Icon For Normal AF
Infinity AF
Macro AF
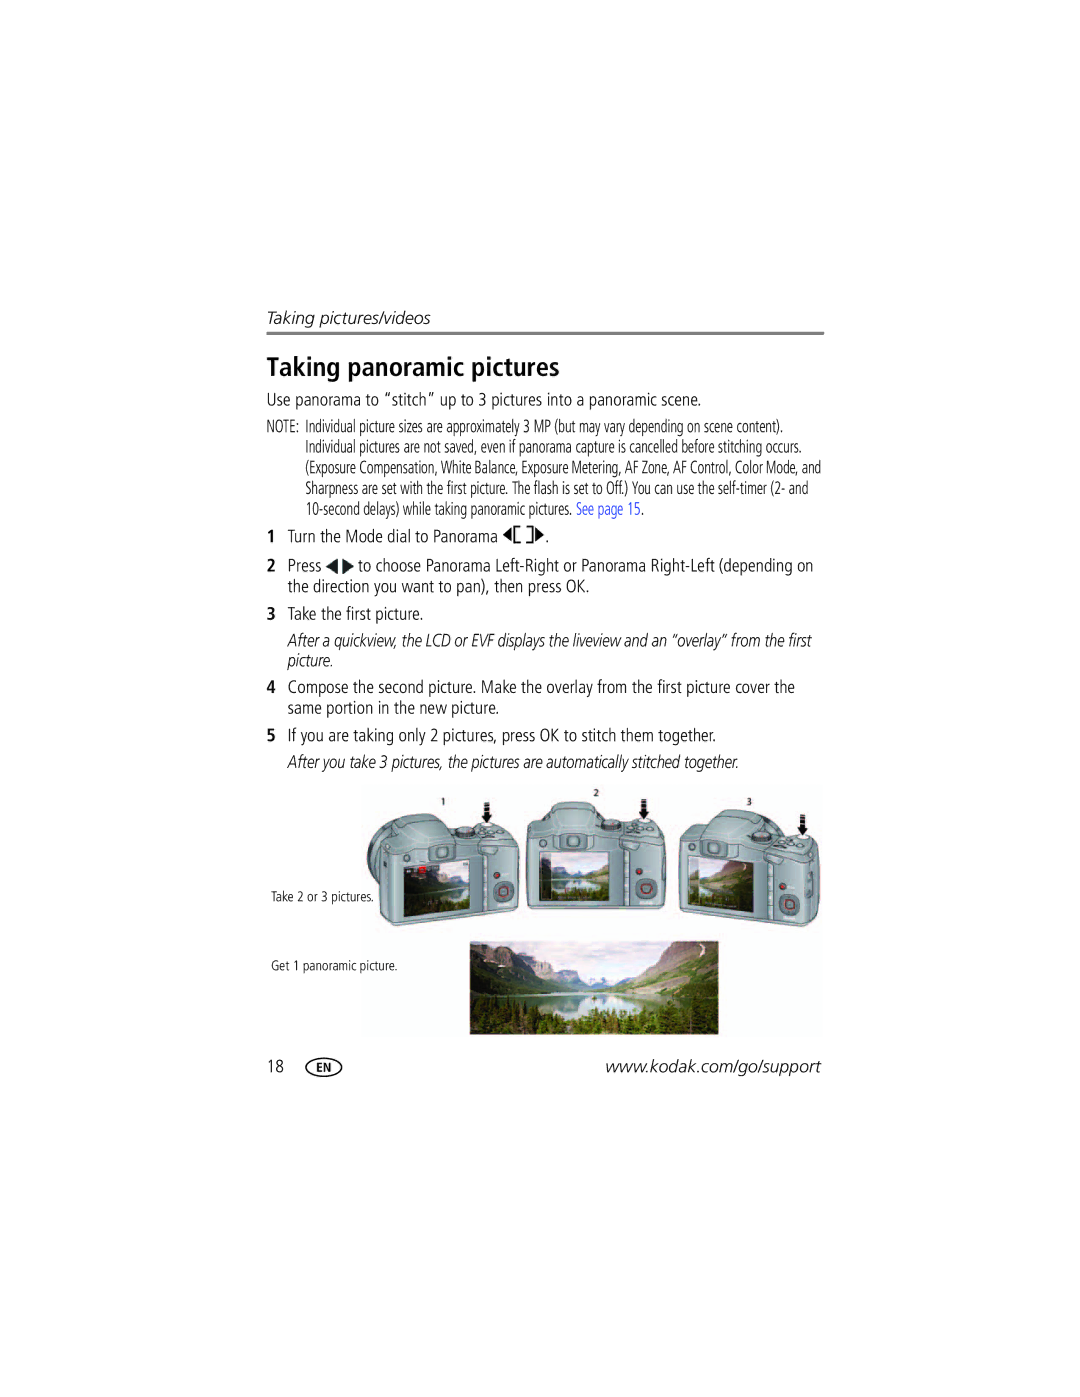
Turn the Mode dial to Panorama
Taking panoramic pictures
Take the first picture
Mode When to use
S, and M modes
Changing P, A, S, or M mode settings
Using exposure compensation with exposure bracketing
If the exposure
Then the exposures
Interval is set to 0.3 steps Taken are
Using the histogram to view picture brightness
Know when your batteries need charging
Understanding the picture-taking icons
Review, press Menu button, then to choose Properties
Sharing pictures through social networks
Press to choose a social networking site, then press OK
Press to choose Done, then press OK
Tip Do you send pictures to the same sites each time?
When finished, press to choose Done, then press OK
Manage email addresses and Kodak Pulse Digital Frames
Tagging pictures
Tagging people
Tip Are faces not always detected?
Need to update a name?
Tagging with keywords
Tip You can have up to 20 active names
Press the Review button, then to find a picture to tag
Using the keyboard
Press to choose Update People Tags, then press OK
Marking pictures/videos for emailing
Reviewing pictures/videos
Playing a video
Find your pictures like a pro
Using the undo delete picture feature
Deleting pictures/videos
Protecting pictures/videos from deletion
Press the Menu button to exit the menu
Viewing pictures/videos in different ways
Magnifying a picture
Viewing as thumbnails multi-up
Smarter way to find your pictures
People All Date
Understanding the review icons
Creating a multimedia slide show
Make a slide show that you can save
Play a slide show loop
Displaying pictures/videos on a television
Using the menu button in review
Review Edit Setup
Selecting multiple pictures/videos
Press OK to select pictures/videos
Cropping pictures
Copying pictures/videos
Copy pictures/videos
Press the Menu button, then to choose the Edit tab
Using Kodak Perfect Touch Technology
Using the RAW Develop feature
Editing videos
Making a picture from a video
Trimming a video
You can do incredible things with your videos
Using the menu button to change settings
Using the capture tab
Setting More information Color Mode High Color
Natural Color
Low Color
Black & White
Setting More information Face Detect
Off
Exposure Metering
AF Zone
Using the Setup menu
Video settings To access your camera’s Help system, see
Use Setup to customize other camera settings
Setting More information Share Button Settings Show or hide
Volume
Individual social networking sites
Button is pressed in Review
Setting More information Image Storage
Reset Camera
Language
About
Transferring pictures to your computer
Download Kodak Software later
Connecting the camera to a Kodak All-in-One Printer
Printing pictures
Direct printing with a Kodak All-in-One Printer
Printing from a Kodak All-in-One Printer
Disconnecting the camera from a Kodak All-in-One Printer
Ordering prints online
Printing from an optional SD or Sdhc Card
Marking your pictures for print
Getting help from your camera
Great news
Turning on camera Help
Troubleshooting
Camera problems
Status Solution
Videos, including protected files
Reset Camera
Transfer the pictures to the computer see
Or entirely full
Charge the batteries see
Computer/connectivity problems
Picture quality problems
StatusSolution
Taken in Smart Capture mode
Direct printing Pictbridge enabled printer problems
Getting help on the Web
Camera
Software Other
Camera specifications
Viewfinder-Electronic
Face detection-Yes Face recognition-Yes
Image file format
Care and maintenance
Operating temperature-0-40C 32-104F
Tripod mount-1/4 inch
Extending battery life
Important safety instructions
Limited warranty
Limited warranty coverage
Do not charge non-rechargeable batteries
Limitations
Your rights
Outside the United States and Canada
Regulatory compliance
FCC compliance and advisory
Be by negligence or other act
Russian GOST-R
Eastman Kodak Company Rochester, NY
Australian C-Tick
Vcci Class B ITE Korean Class B ITE
N137
China RoHS
Out
During quickview
Add keywords, names, 27 AF control Still
Infinity Format Guidelines, battery
Edit videos
Icons
LCD brightness, 10, 43 lens Cleaning lens, 59 loading
Locate pictures
Marking For email, 27 memory
Pictures copying, 36 cropping, 36 emailing marked
Using
Safety
Self-timer, 15 set tag, 40 setting
Protecting pictures, videos
Setting up the camera, 1 setup menu
Undelete, undo
Transfer pictures
Emailing marked, 27 out, 44 playback
Warranty, 62 white balance
Video out, 44 viewing
Optical