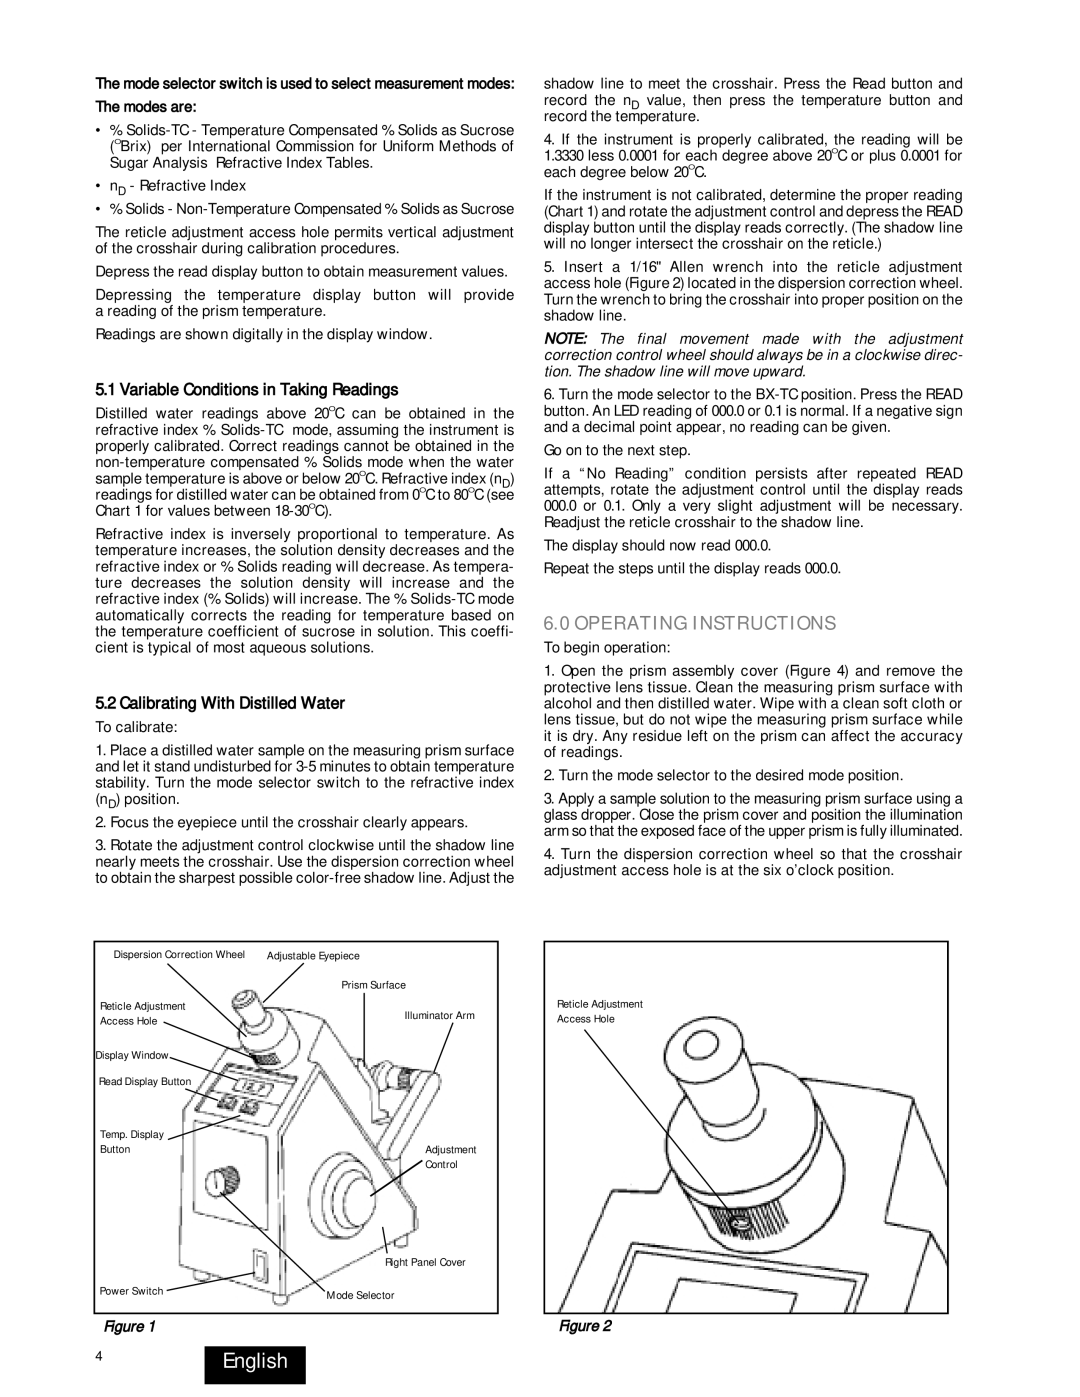
The mode selector switch is used to select measurement modes: The modes are:

% Solids-TC - Temperature Compensated % Solids as Sucrose (OBrix) per International Commission for Uniform Methods of Sugar Analysis Refractive Index Tables.

nD - Refractive Index

% Solids - Non-Temperature Compensated % Solids as Sucrose

The reticle adjustment access hole permits vertical adjustment of the crosshair during calibration procedures.

Depress the read display button to obtain measurement values.

Depressing the temperature display button will provide a reading of the prism temperature.

Readings are shown digitally in the display window.

5.1 Variable Conditions in Taking Readings

Distilled water readings above 20OC can be obtained in the refractive index % Solids-TC mode, assuming the instrument is properly calibrated. Correct readings cannot be obtained in the non-temperature compensated % Solids mode when the water sample temperature is above or below 20OC. Refractive index (nD) readings for distilled water can be obtained from 0OC to 80OC (see Chart 1 for values between 18-30OC).

Refractive index is inversely proportional to temperature. As temperature increases, the solution density decreases and the refractive index or % Solids reading will decrease. As tempera- ture decreases the solution density will increase and the refractive index (% Solids) will increase. The % Solids-TC mode automatically corrects the reading for temperature based on the temperature coefficient of sucrose in solution. This coeffi- cient is typical of most aqueous solutions.

5.2 Calibrating With Distilled Water

To calibrate:

1.Place a distilled water sample on the measuring prism surface and let it stand undisturbed for 3-5 minutes to obtain temperature stability. Turn the mode selector switch to the refractive index (nD) position.

2.Focus the eyepiece until the crosshair clearly appears.

3.Rotate the adjustment control clockwise until the shadow line nearly meets the crosshair. Use the dispersion correction wheel to obtain the sharpest possible color-free shadow line. Adjust the

shadow line to meet the crosshair. Press the Read button and record the nD value, then press the temperature button and record the temperature.

4.If the instrument is properly calibrated, the reading will be 1.3330 less 0.0001 for each degree above 20OC or plus 0.0001 for each degree below 20OC.

If the instrument is not calibrated, determine the proper reading (Chart 1) and rotate the adjustment control and depress the READ display button until the display reads correctly. (The shadow line will no longer intersect the crosshair on the reticle.)

5.Insert a 1/16" Allen wrench into the reticle adjustment access hole (Figure 2) located in the dispersion correction wheel. Turn the wrench to bring the crosshair into proper position on the shadow line.

NOTE: The final movement made with the adjustment correction control wheel should always be in a clockwise direc- tion. The shadow line will move upward.

6.Turn the mode selector to the BX-TC position. Press the READ button. An LED reading of 000.0 or 0.1 is normal. If a negative sign and a decimal point appear, no reading can be given.

Go on to the next step.

If a “No Reading” condition persists after repeated READ attempts, rotate the adjustment control until the display reads

000.0or 0.1. Only a very slight adjustment will be necessary. Readjust the reticle crosshair to the shadow line.

The display should now read 000.0.

Repeat the steps until the display reads 000.0.

6.0 OPERATING INSTRUCTIONS

To begin operation:

1.Open the prism assembly cover (Figure 4) and remove the protective lens tissue. Clean the measuring prism surface with alcohol and then distilled water. Wipe with a clean soft cloth or lens tissue, but do not wipe the measuring prism surface while it is dry. Any residue left on the prism can affect the accuracy of readings.

2.Turn the mode selector to the desired mode position.

3.Apply a sample solution to the measuring prism surface using a glass dropper. Close the prism cover and position the illumination arm so that the exposed face of the upper prism is fully illuminated.

4.Turn the dispersion correction wheel so that the crosshair adjustment access hole is at the six o’clock position.

Dispersion Correction Wheel

Adjustable Eyepiece


Prism Surface

Reticle Adjustment

Illuminator Arm

Access Hole


Display Window

Read Display Button

Temp. Display

ButtonAdjustment

Control

Right Panel Cover

Power Switch

Mode Selector


Figure 1

Reticle Adjustment Access Hole

Figure 2

4English

Page 4
Image 4
Leica 13104810 4English, Operating Instructions, Variable Conditions in Taking Readings, Calibrating With Distilled Water

13104950, 13104940, 13104810, 13104800 specifications

Leica, a revered name in the world of optics, presents a range of binoculars that exemplify precision, durability, and outstanding optical performance. Among their notable offerings are the models Leica 13104800, 13104810, 13104940, and 13104950, each designed to cater to specific needs of outdoor enthusiasts, wildlife watchers, and professional observers.

The Leica 13104800 is part of the Trinovid HD series, renowned for its robust construction and superior optical capabilities. This model features a compact and lightweight design, making it an excellent companion for on-the-go adventures. The exceptional HD glass ensures high contrast and vivid color reproduction, while the phase-corrected roof prism system enhances clarity and sharpness across the entire field of view. The 13104800's waterproof and fog-proof design further underscores its resilience in various weather conditions, ensuring reliability and longevity.

Following closely is the Leica 13104810, which also belongs to the Trinovid HD series but offers a broader 8x magnification and a wider objective lens. This increases light gathering capabilities, making it ideal for low-light situations such as dawn and dusk observations. With its ergonomic design and intuitive handling, the 13104810 provides a comfortable viewing experience, enabling users to spot distant objects with ease and clarity.

The Leica 13104940 model stands out for its impressive image stabilization feature, a must-have technology for birdwatchers and nature observers. The incorporation of advanced optical stabilization minimizes the effects of hand movement, allowing for clear, stable images even at higher magnifications. Coupled with high-quality coatings that reduce glare and improve light transmission, the 13104940 is engineered for optimal performance in the field.

Lastly, the Leica 13104950 offers a premium viewing experience that combines high magnification with exceptional lens quality. This model is equipped with a large objective lens that enhances light transmission, providing bright and lifelike images even in challenging lighting conditions. The robust build quality and precision engineering make it a reliable choice for dedicated outdoor activities, ensuring durability while maintaining exceptional optical performance.

In summary, the Leica 13104800, 13104810, 13104940, and 13104950 binoculars share a commitment to excellence in optical technology, each tailored to meet distinct user requirements. From rugged construction and high magnification capabilities to advanced stabilization features, these models embody Leica's dedication to quality and innovation in the realm of optics. Whether for casual observation or professional applications, Leica binoculars remain an exceptional choice for clarity and reliability in any outdoor setting.